دليل المستخدم الشامل
منصة إدارة معارض السيارات
Complete User Guide
Car Dealership Management Platform
هذا الدليل يغطي جميع وحدات النظام بالتفصيل - من إنشاء الحساب وإدارة المخزون حتى عقود البيع والأقساط والتقارير المالية. يمكنك التنقل بين الأقسام عبر الفهرس الجانبي. This guide covers all system modules in detail - from account creation and inventory management to sale contracts, installments, and financial reports. Navigate between sections using the sidebar index.
يتيح النظام لأصحاب المعارض إنشاء حساب جديد عبر معالج تسجيل من 5 خطوات، يبدأ من بيانات المعرض وينتهي بتفعيل الحساب عبر رمز OTP يُرسل إلى البريد الإلكتروني. بعد التسجيل يمكن تسجيل الدخول مباشرةً للوصول إلى لوحة التحكم. The platform allows dealership owners to create a new account through a 5-step registration wizard, starting from showroom details and ending with OTP email verification. After registration, you can log in directly to access your dashboard.
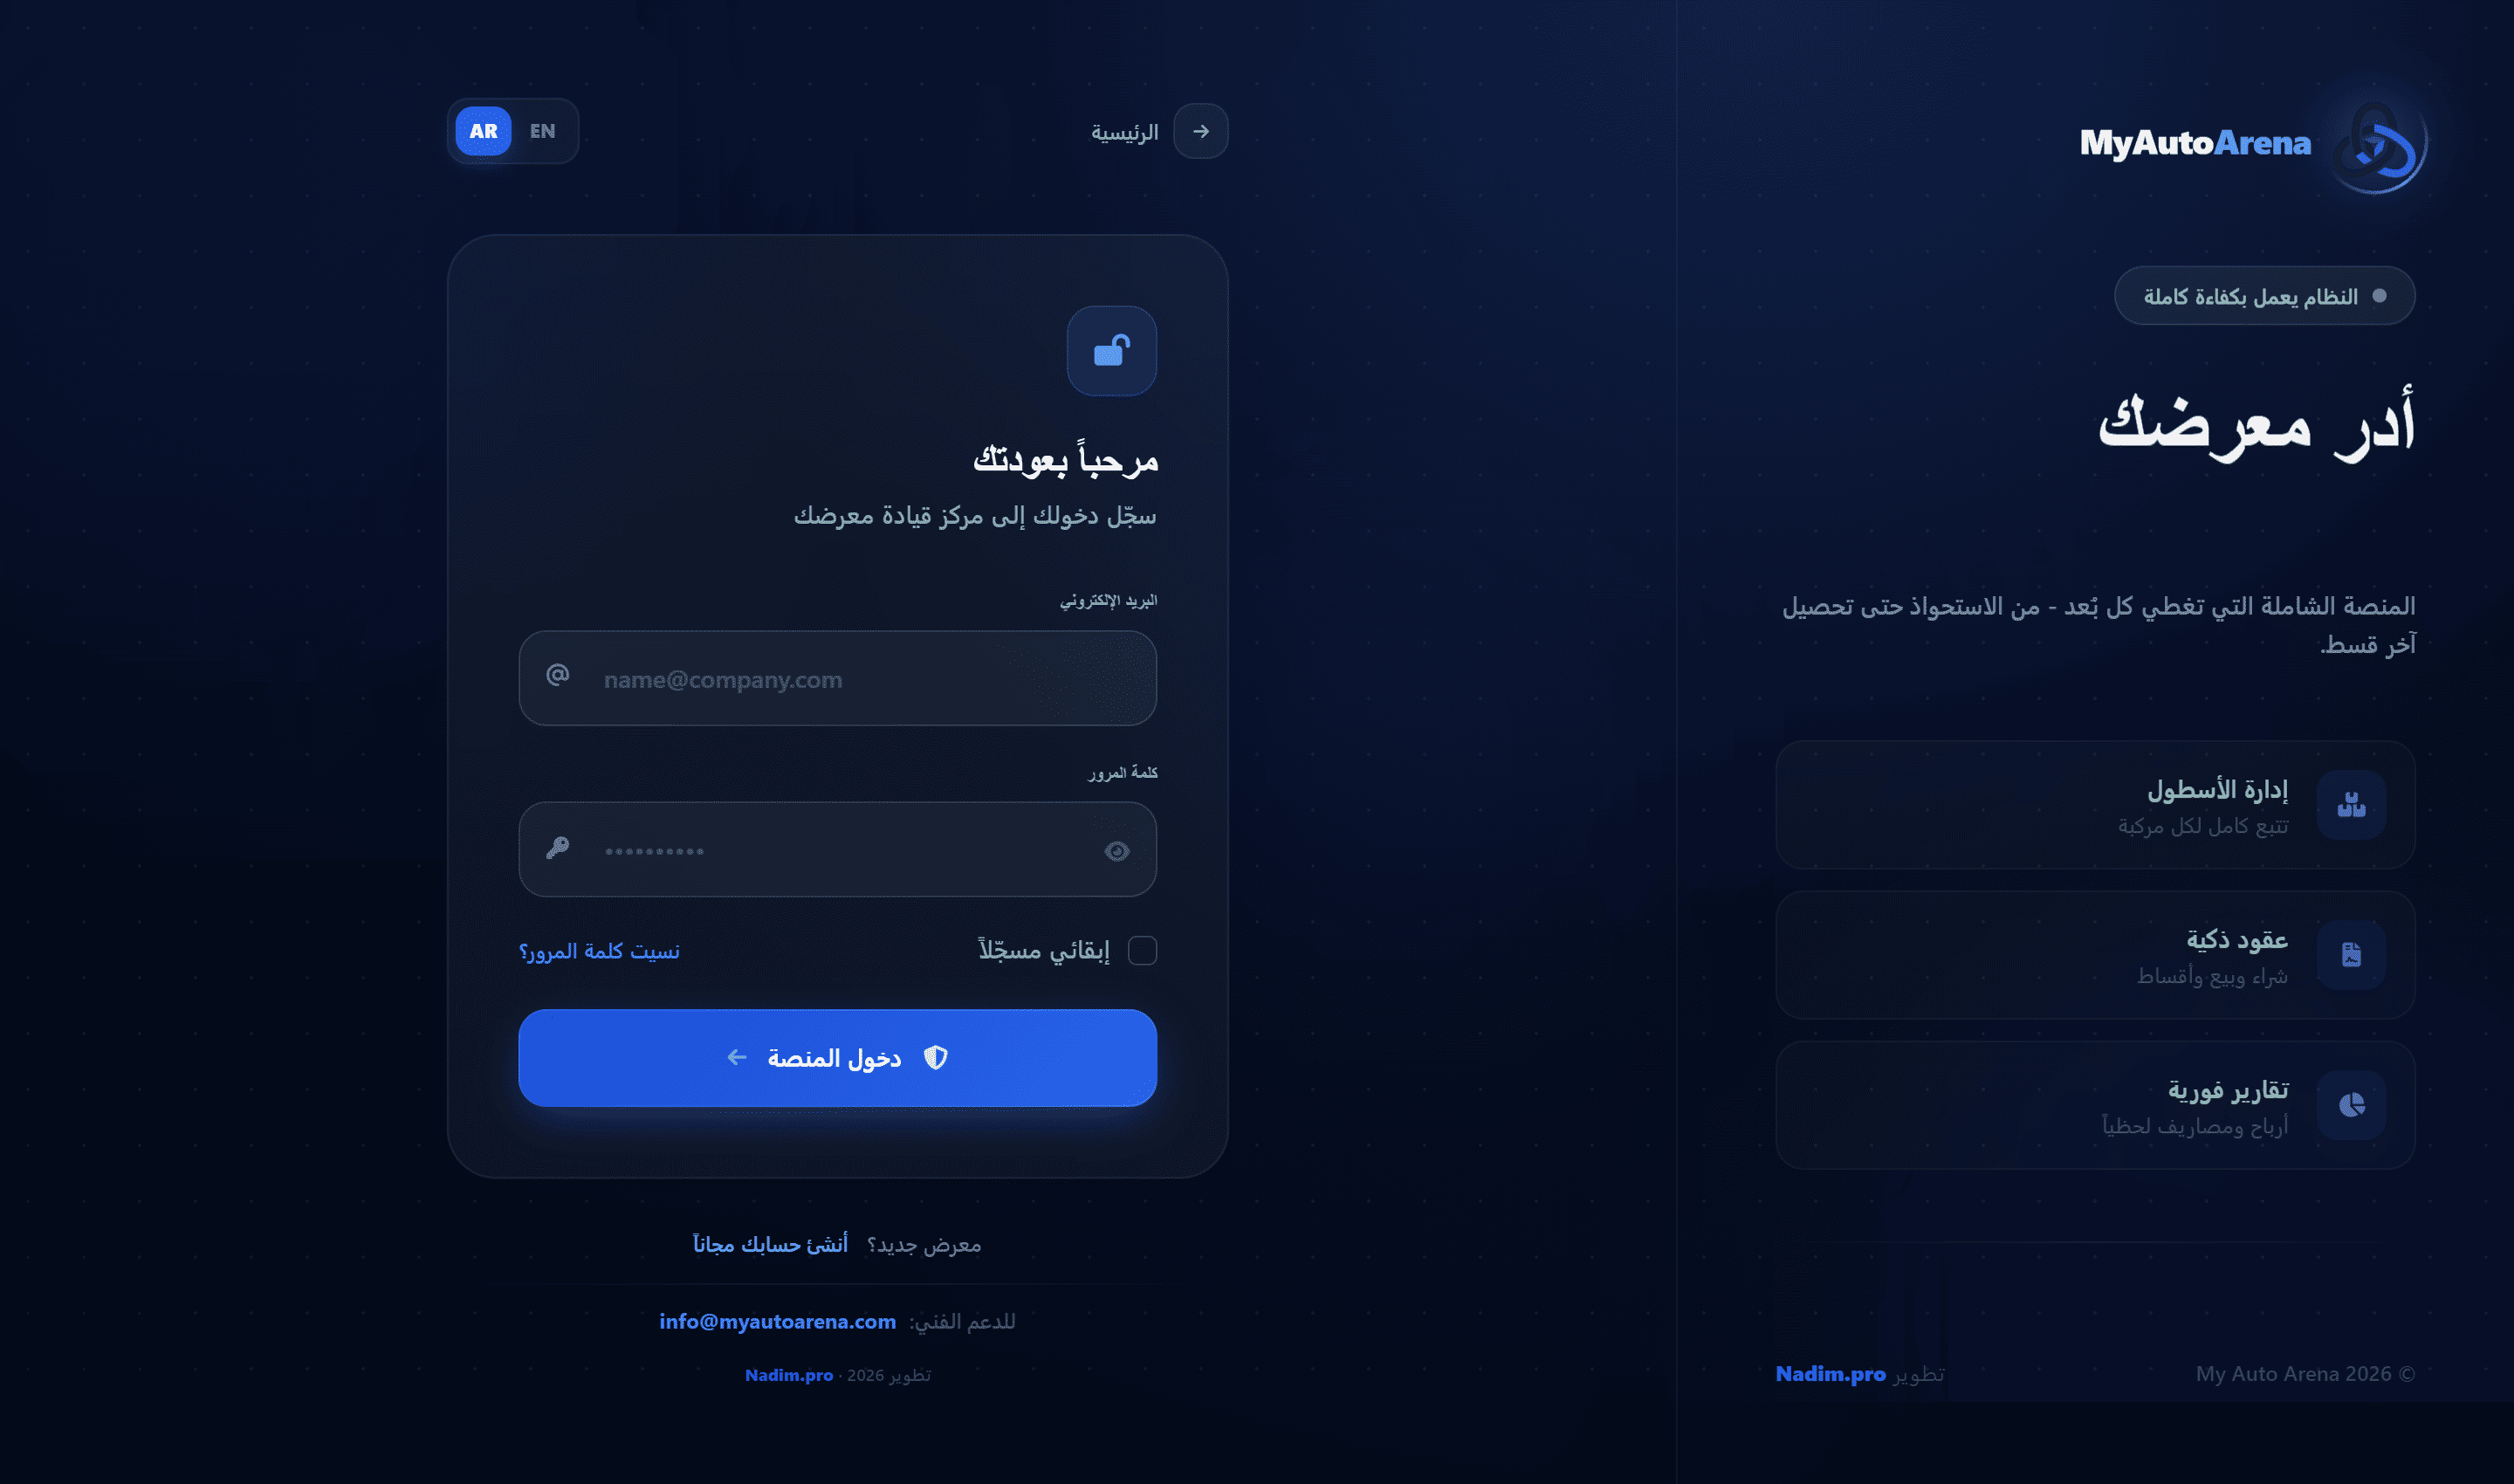
واجهة معالج تسجيل المعرض - الخطوة الأولى Dealership registration wizard - Step 1
خطوات العمل Workflow Steps
بيانات المعرض
Showroom Info
أدخل اسم المعرض بالعربية والإنجليزية، الـ Slug (المعرّف في الرابط)، ورقم الهاتف. يجب أن يكون الـ Slug فريداً على المنصة.
Enter your showroom name in Arabic and English, a unique URL slug (e.g. myshowroom), and phone number. The slug must be unique across the platform.
بيانات المالك
Owner Details
أدخل اسمك الكامل، البريد الإلكتروني، وكلمة مرور لا تقل عن 8 أحرف. البريد الإلكتروني يجب أن يكون فريداً.
Enter your full name, email address, and a password of at least 8 characters. The email must be unique.
اختيار الخطة
Plan Selection
اختر الخطة المناسبة من الخطط المتاحة. يمكنك البدء بفترة تجريبية مجانية وتفعيل الاشتراك لاحقاً.
Choose the appropriate subscription plan. You can start with a free trial period and activate a paid subscription later.
التحقق عبر OTP
OTP Verification
سيُرسل رمز تحقق مكوّن من 6 أرقام إلى بريدك الإلكتروني. الرمز صالح لمدة 15 دقيقة. يمكن إعادة الإرسال حتى 3 مرات خلال 10 دقائق.
A 6-digit verification code is sent to your email. The code is valid for 15 minutes. You can resend up to 3 times within 10 minutes.
تأكيد الحساب
Account Confirmed
بعد التحقق الناجح، يُنشأ حسابك وحساب المعرض تلقائياً وتُحوّل إلى لوحة التحكم.
After successful verification, your account and showroom are created automatically and you are redirected to the dashboard.
المزايا والخصائص Features & Capabilities
تسجيل الدخول الآمن
Secure Login
يدعم النظام التحقق الثنائي (2FA) ويحفظ جلسة تسجيل الدخول بشكل آمن.
The system supports Two-Factor Authentication (2FA) and maintains secure login sessions.
نسيت كلمة المرور
Forgot Password
من صفحة تسجيل الدخول، انقر على 'نسيت كلمة المرور' لإرسال رابط إعادة تعيين إلى بريدك الإلكتروني.
From the login page, click 'Forgot Password' to receive a password reset link at your email.
تحقق البريد الإلكتروني
Email Verification via OTP
رمز OTP هو بحد ذاته آلية التحقق من البريد الإلكتروني. بعد إدخال الرمز بنجاح يُعتبر بريدك موثّقاً تلقائياً ولا يُرسل أي رابط إضافي.
The OTP code is itself the email verification mechanism. Once you enter it successfully, your email is automatically confirmed - no separate verification link is sent.
رمز الإحالة
Referral Code
عند التسجيل يمكنك إدخال رمز إحالة من معرض صديق. عند أول دفعة تقوم بها، يُضاف شهر مجاني إضافي لاشتراكك تلقائياً.
During registration you can enter a referral code from a friend's showroom. On your first paid subscription, a free extra month is automatically added to your plan.
الـ Slug هو معرّف معرضك في الرابط (مثال: myshowroom). لا يمكن تغييره بعد التسجيل، لذا اخترْه بعناية. The slug is your showroom's URL identifier (e.g. myshowroom). It cannot be changed after registration, so choose carefully.
إذا لم يصلك رمز OTP، تحقق من مجلد الـ Spam في بريدك. يمكنك طلب إرسال جديد بعد دقيقة واحدة. If you don't receive the OTP, check your Spam folder. You can request a new code after 1 minute.
إذا وصلك رابط إحالة من معرض آخر، أدخل رمز الإحالة في حقل الخطوة الأولى. عند أول اشتراك مدفوع، ستحصل تلقائياً على شهر مجاني إضافي مضاف لاشتراكك. If you received a referral link from another showroom, enter the referral code in Step 1. On your first paid subscription, a free extra month will be automatically added to your plan.
لوحة التحكم هي الصفحة الرئيسية للنظام وتعرض نظرة عامة شاملة على أداء المعرض المالي والتشغيلي. تدعم تصفية البيانات حسب الفترات الزمنية وتعرض المؤشرات الحيوية في الوقت الفعلي. The dashboard is the main page of the system and provides a comprehensive overview of your dealership's financial and operational performance. It supports date-range filtering and displays key metrics in real time.
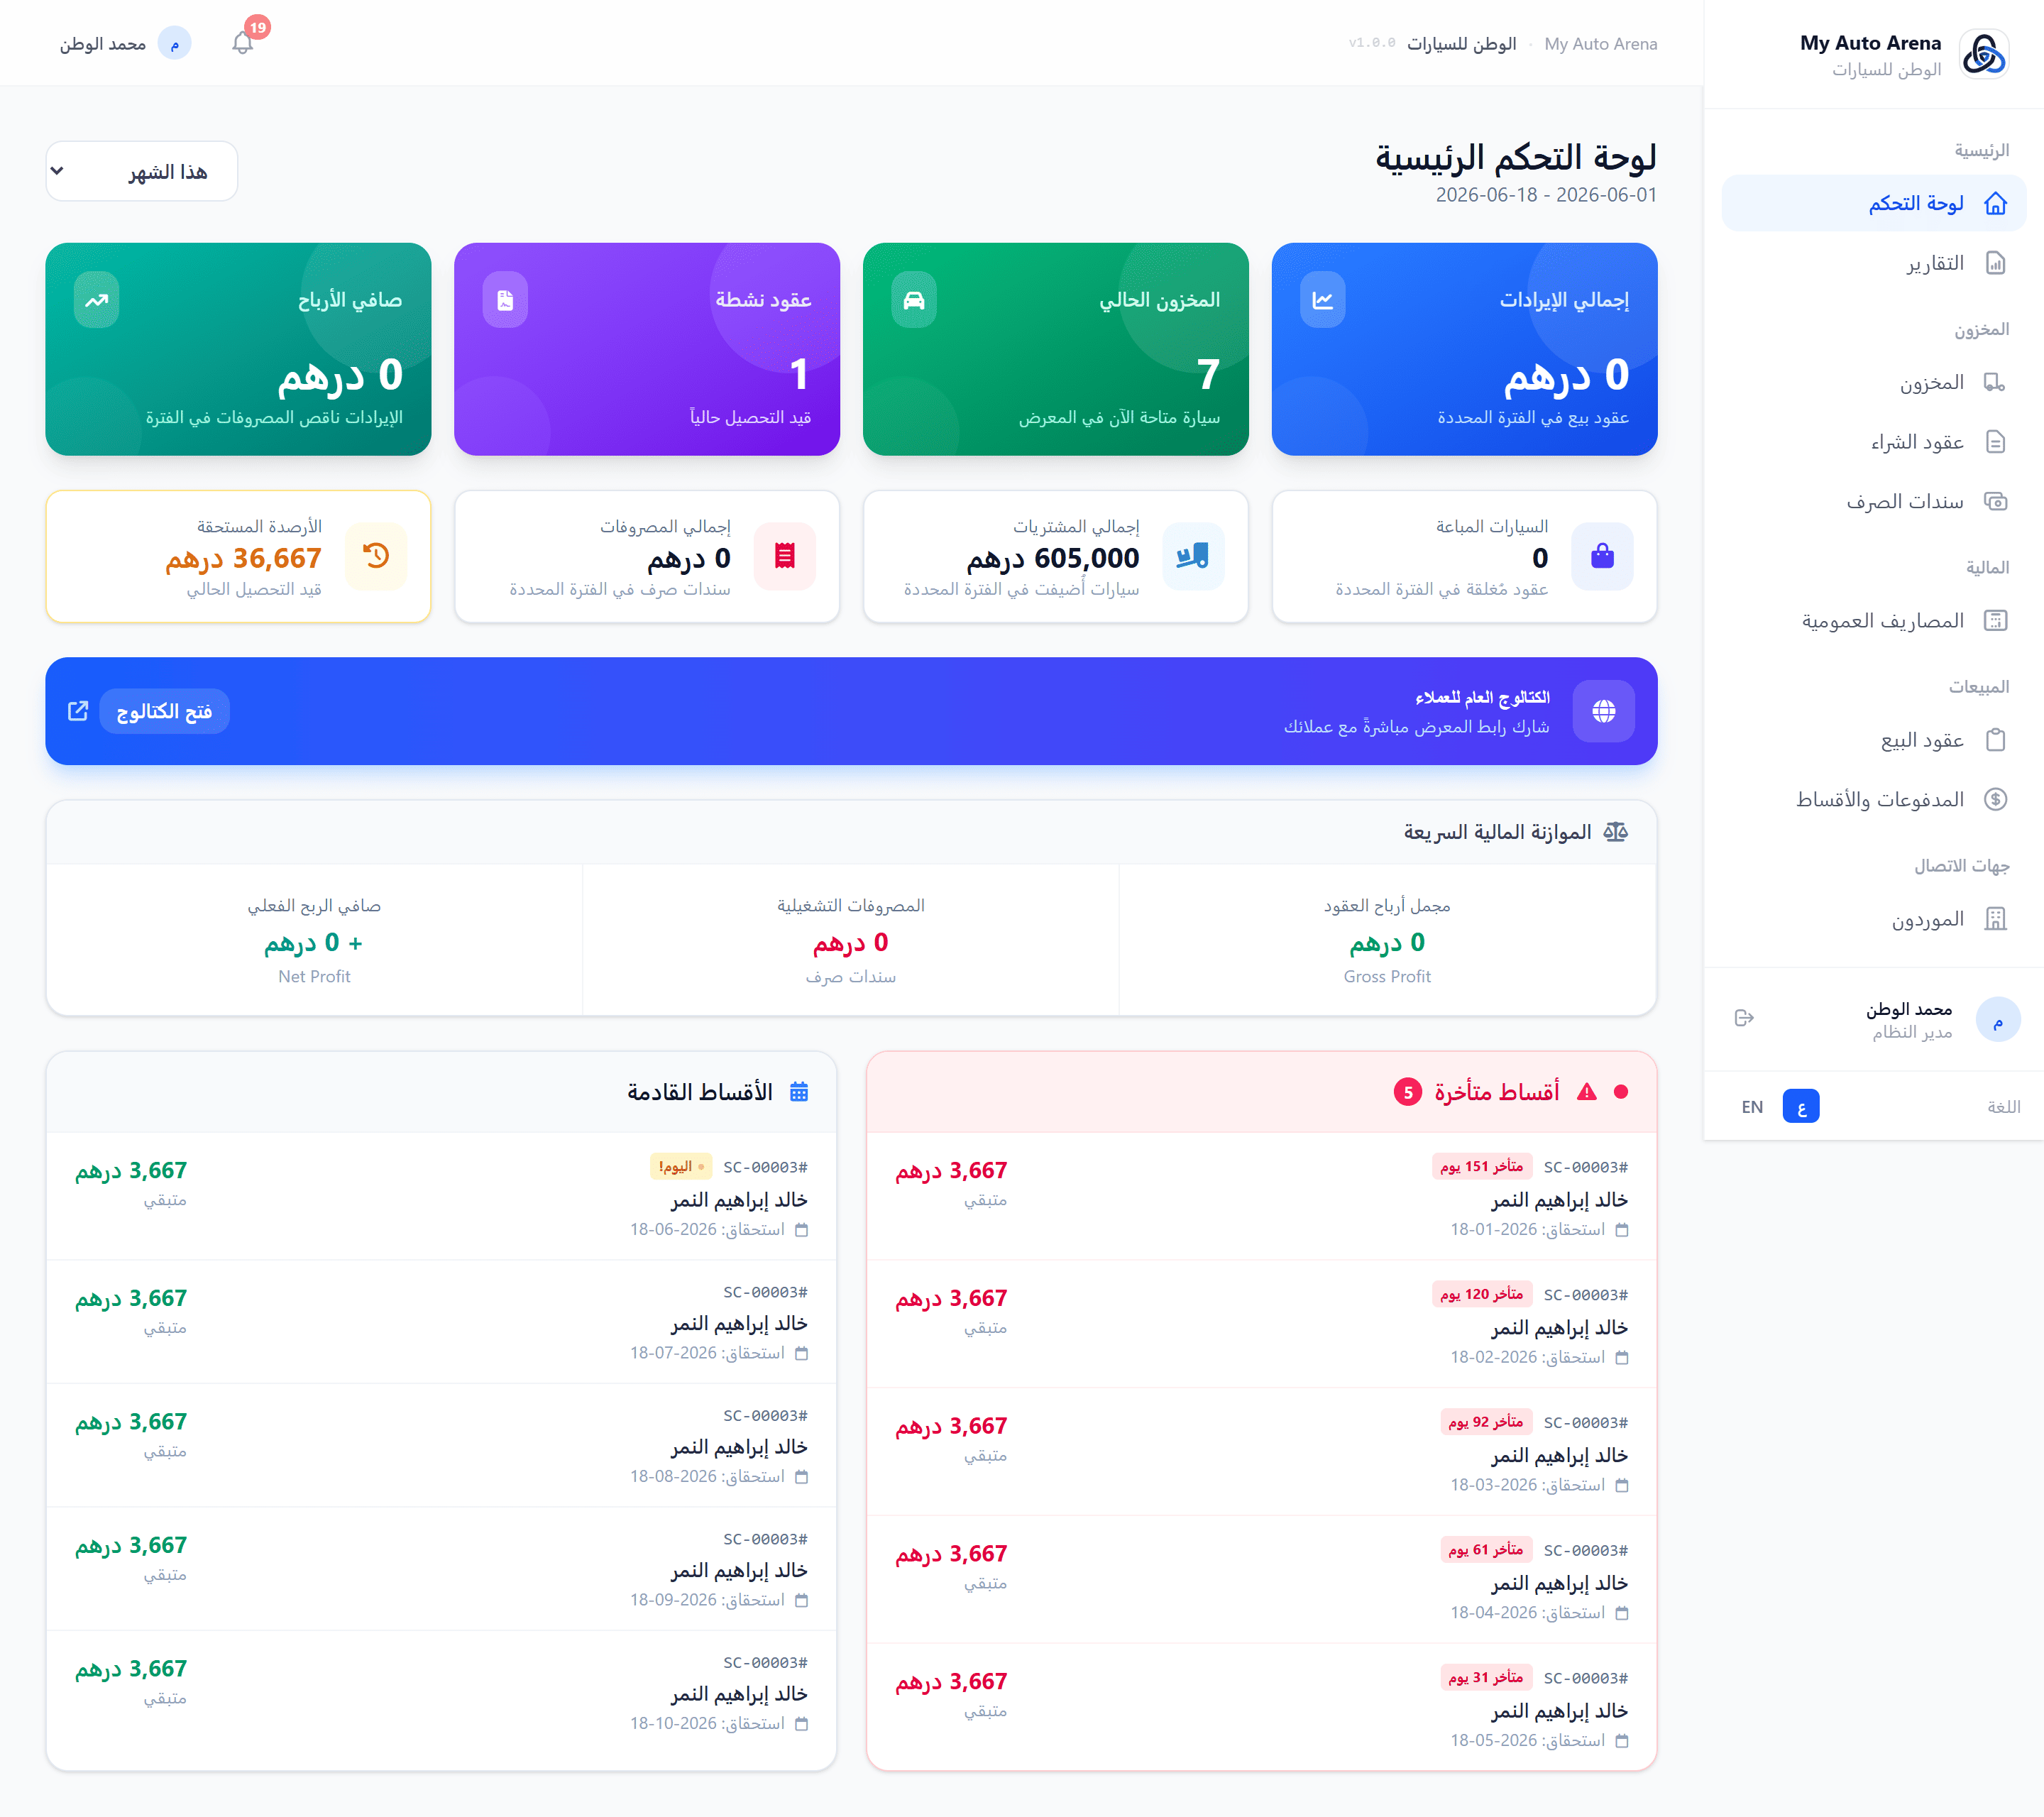
لوحة التحكم مع بطاقات الإحصاءات والأقساط المتأخرة Dashboard with stats cards and overdue installments panel
خطوات العمل Workflow Steps
اختيار الفترة
Select Period
استخدم منتقي الفترة (هذا الشهر / الشهر الماضي / هذه السنة / السنة الماضية / مخصص) لتصفية جميع المؤشرات.
Use the period picker (This Month / Last Month / This Year / Last Year / Custom) to filter all metrics.
مراجعة المؤشرات
Review Metrics
استعرض بطاقات الإحصاءات في أعلى الصفحة لمعرفة الإيرادات والأرباح والمخزون.
Browse the stat cards at the top of the page to see revenue, profit, and inventory.
متابعة الأقساط
Monitor Installments
راجع قسم الأقساط المتأخرة وتصرف فوراً لتحصيل الدفعات المستحقة.
Check the overdue installments section and act immediately to collect due payments.
المزايا والخصائص Features & Capabilities
إجمالي الإيرادات
Total Revenue
مجموع أسعار عقود البيع المُبرمة خلال الفترة المحددة.
Sum of sale contract prices for the selected period.
الربح الإجمالي والصافي
Gross & Net Profit
الربح الإجمالي = الإيرادات ناقص تكلفة السيارات. الربح الصافي = الربح الإجمالي ناقص المصاريف.
Gross Profit = Revenue minus car costs. Net Profit = Gross Profit minus expenses.
السيارات في المخزن
Cars in Stock
عدد السيارات المتاحة حالياً بالمعرض (حالة: متاحة).
Number of vehicles currently available at the dealership (status: available).
الأقساط المتأخرة
Overdue Installments
قائمة بالأقساط المستحقة وتاريخ الاستحقاق قد تجاوز اليوم الحالي.
List of installments whose due date has passed without payment.
الأقساط القادمة
Upcoming Installments
الأقساط التي ستستحق قريباً مع بيانات العميل والمبلغ.
Installments due soon with customer details and amounts.
آخر العقود
Recent Contracts
آخر 5 عقود بيع مُبرمة مع اسم العميل والسيارة والمبلغ.
Last 5 sale contracts with customer name, car, and amount.
جميع الأرقام مرتبطة بالفترة الزمنية المختارة. تغيير الفترة يُحدّث جميع البطاقات تلقائياً. All numbers are tied to the selected time period. Changing the period automatically refreshes all cards.
يمكن الوصول للوحة التحكم مباشرةً بعد تسجيل الدخول من الرابط الرئيسي لمعرضك. The dashboard is accessible immediately after login via your showroom's main URL.
يوفر النظام وحدة تقارير متكاملة تشمل 6 أنواع رئيسية: التقرير المالي، تقرير المخزون، تقرير العمولات، تقرير المستحقات، تحليل الخسائر، وتقرير تقادم المخزون. متاحة للخطط المدفوعة فقط. The system provides a comprehensive reports module with 6 main types: Financial Report, Inventory Report, Commissions Report, Receivables Report, Loss Analysis, and Inventory Aging Report. Available on paid plans only.
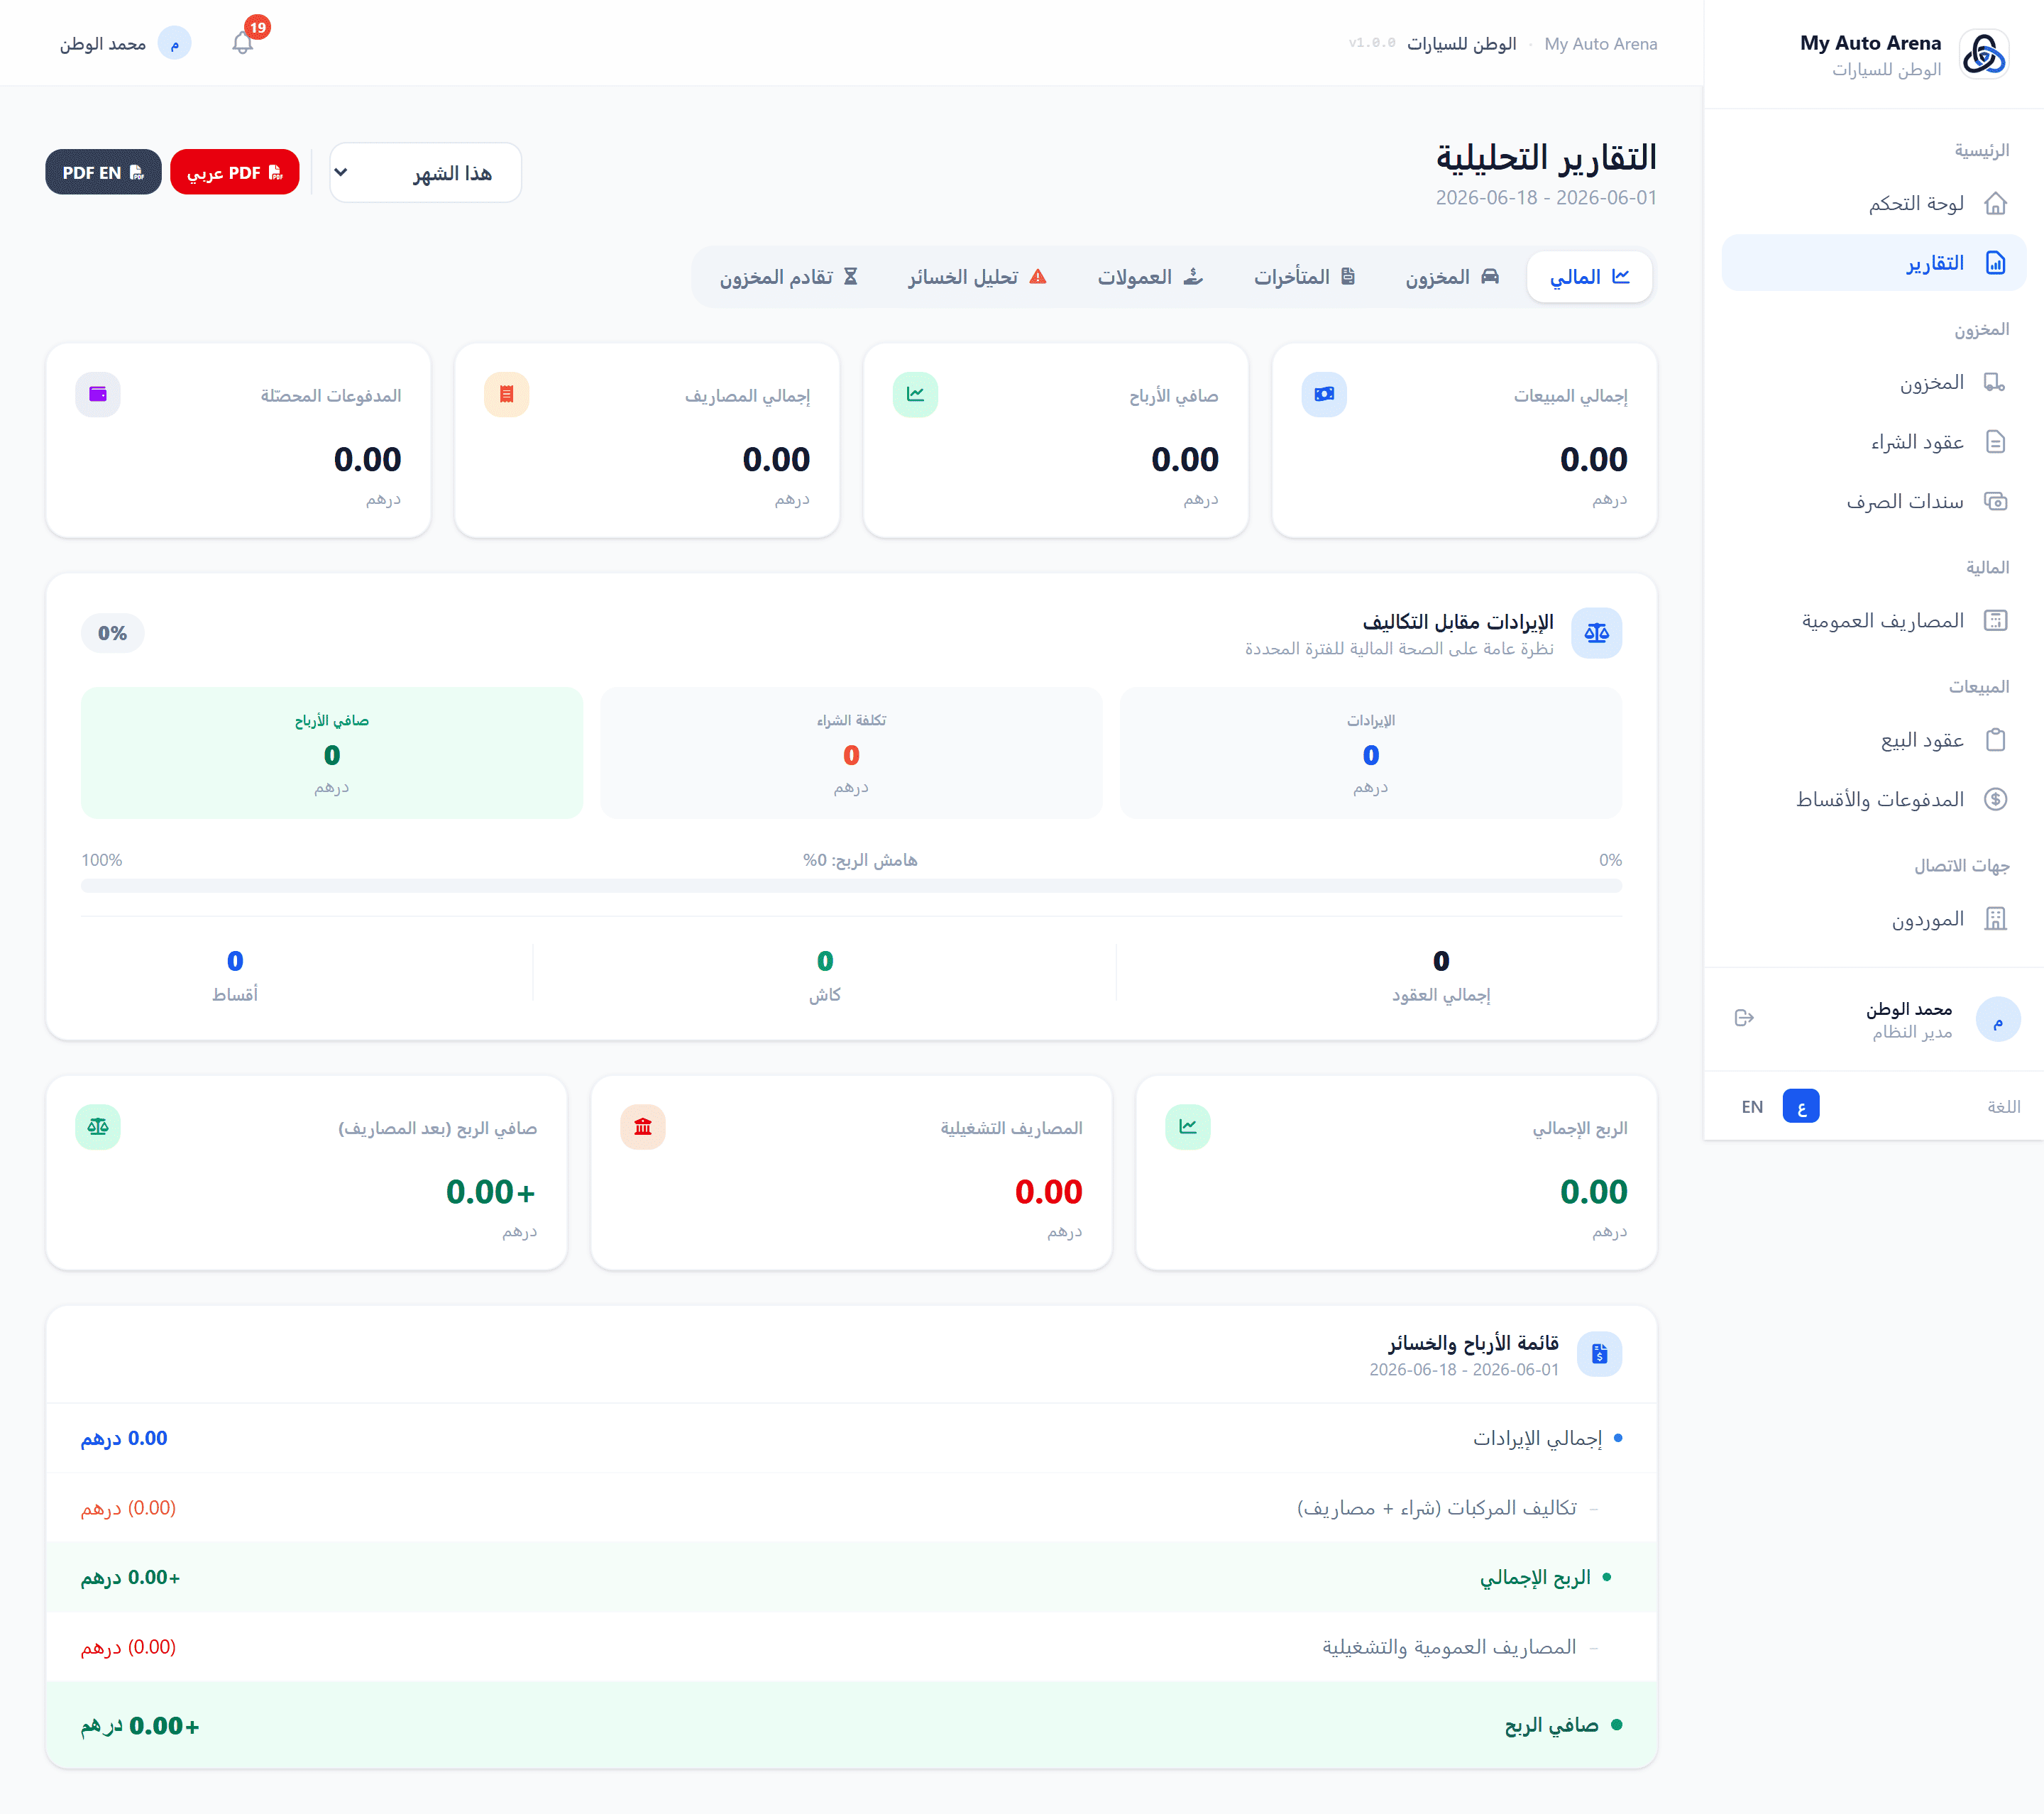
صفحة التقارير - التقرير المالي مع الرسم البياني الشهري وأزرار تصدير PDF Reports page - Financial report with monthly chart and PDF export buttons
خطوات العمل Workflow Steps
الوصول للتقارير
Access Reports
من القائمة الجانبية، انقر على 'التقارير'. يجب أن تكون خطتك تدعم هذه الميزة.
From the sidebar, click 'Reports'. Your plan must support this feature.
تحديد الفترة
Set Period
اختر فترة زمنية محددة (هذا الشهر، السنة، أو مخصص) لتصفية بيانات التقرير.
Choose a time period (This Month, Year, or Custom) to filter report data.
مراجعة النتائج
Review Results
استعرض كل قسم من أقسام التقرير واستخدم الرسومات البيانية للتحليل.
Browse each report section and use charts for analysis.
تصدير PDF
Export PDF
انقر 'PDF عربي' أو 'PDF EN' بجانب فلاتر التاريخ لتنزيل التقرير الحالي مع كامل الفترة المختارة. يفتح في تبويب جديد جاهزاً للطباعة.
Click 'Arabic PDF' or 'English PDF' next to the date filters to download the current report with the full selected period. Opens in a new tab ready for printing.
المزايا والخصائص Features & Capabilities
التقرير المالي
Financial Report
يعرض إجمالي الإيرادات، الأرباح، التكاليف، المصاريف، والمدفوعات مع رسم بياني للأرباح الشهرية.
Displays total revenue, profit, costs, expenses, and payments with a monthly profit chart.
تقرير المخزون
Inventory Report
تفصيل السيارات حسب الحالة (متاحة/محجوزة/مباعة)، متوسط أيام البيع، وأكثر 5 ماركات مبيعاً.
Car breakdown by status (available/reserved/sold), average days to sell, and top 5 brands.
تقرير العمولات
Commissions Report
يُلخّص العمولات المعلّقة والمدفوعة مقسّمةً حسب المستخدم.
Summarizes pending and paid commissions broken down by user.
تقرير المستحقات
Receivables Report
قائمة مُصفّحة بالعقود النشطة التي لديها رصيد متبقٍ وتاريخ استحقاق منقضٍ.
Paginated list of active contracts with outstanding balance past due date.
تحليل الخسائر
Loss Analysis
يعرض السيارات المباعة بخسارة (سعر البيع < التكلفة الكلية)، مع تفاصيل كل صفقة وإجمالي الخسائر المتراكمة خلال الفترة.
Displays cars sold at a loss (sale price < total cost), with individual deal details and total accumulated losses over the selected period.
تقرير تقادم المخزون
Inventory Aging Report
يُدرج السيارات التي تجاوزت حد التقادم المحدد في الإعدادات (بالأيام)، مما يساعد في اتخاذ قرار التسعير أو البيع السريع.
Lists vehicles that have exceeded the stagnant threshold defined in Settings (in days), helping you decide on repricing or quick-sale actions.
تصدير PDF (عربي / إنجليزي)
PDF Export (Arabic / English)
لكل تقرير زران للتصدير: 'PDF عربي' و'PDF EN'. يُصدَّر التقرير الحالي مع الفترة الزمنية المختارة في ملف PDF جاهز للطباعة يحمل هوية المعرض البصرية.
Each report has two export buttons: 'Arabic PDF' and 'English PDF'. The current report is exported with the selected date range as a print-ready PDF carrying your showroom's visual identity.
التقارير متاحة للخطط المدفوعة فقط (غير مدرجة في خطة Starter). تواصل مع الدعم للترقية. Reports are available on paid plans only (not included in Starter). Contact support to upgrade.
متوسط أيام البيع يُحسب من تاريخ إضافة السيارة حتى تاريخ عقد البيع. Average days to sell is calculated from the car's add date to the sale contract date.
ملف PDF التقرير يعكس الفترة الزمنية المحددة حالياً - اضبط الفلاتر قبل التصدير للحصول على النطاق الزمني الصحيح. The PDF report reflects the currently selected period - adjust date filters before exporting to get the correct time range.
وحدة المخزون هي قلب النظام، تتيح إدارة كاملة لسيارات المعرض من الإضافة والتعديل حتى تتبع الحالة وإدارة الصور. كل سيارة مرتبطة بتكلفة شراء، مصاريف، وسعر طلب. The inventory module is the heart of the system, enabling complete management of dealership vehicles from addition and editing to status tracking and image management. Each car is linked to a purchase cost, expenses, and an asking price.
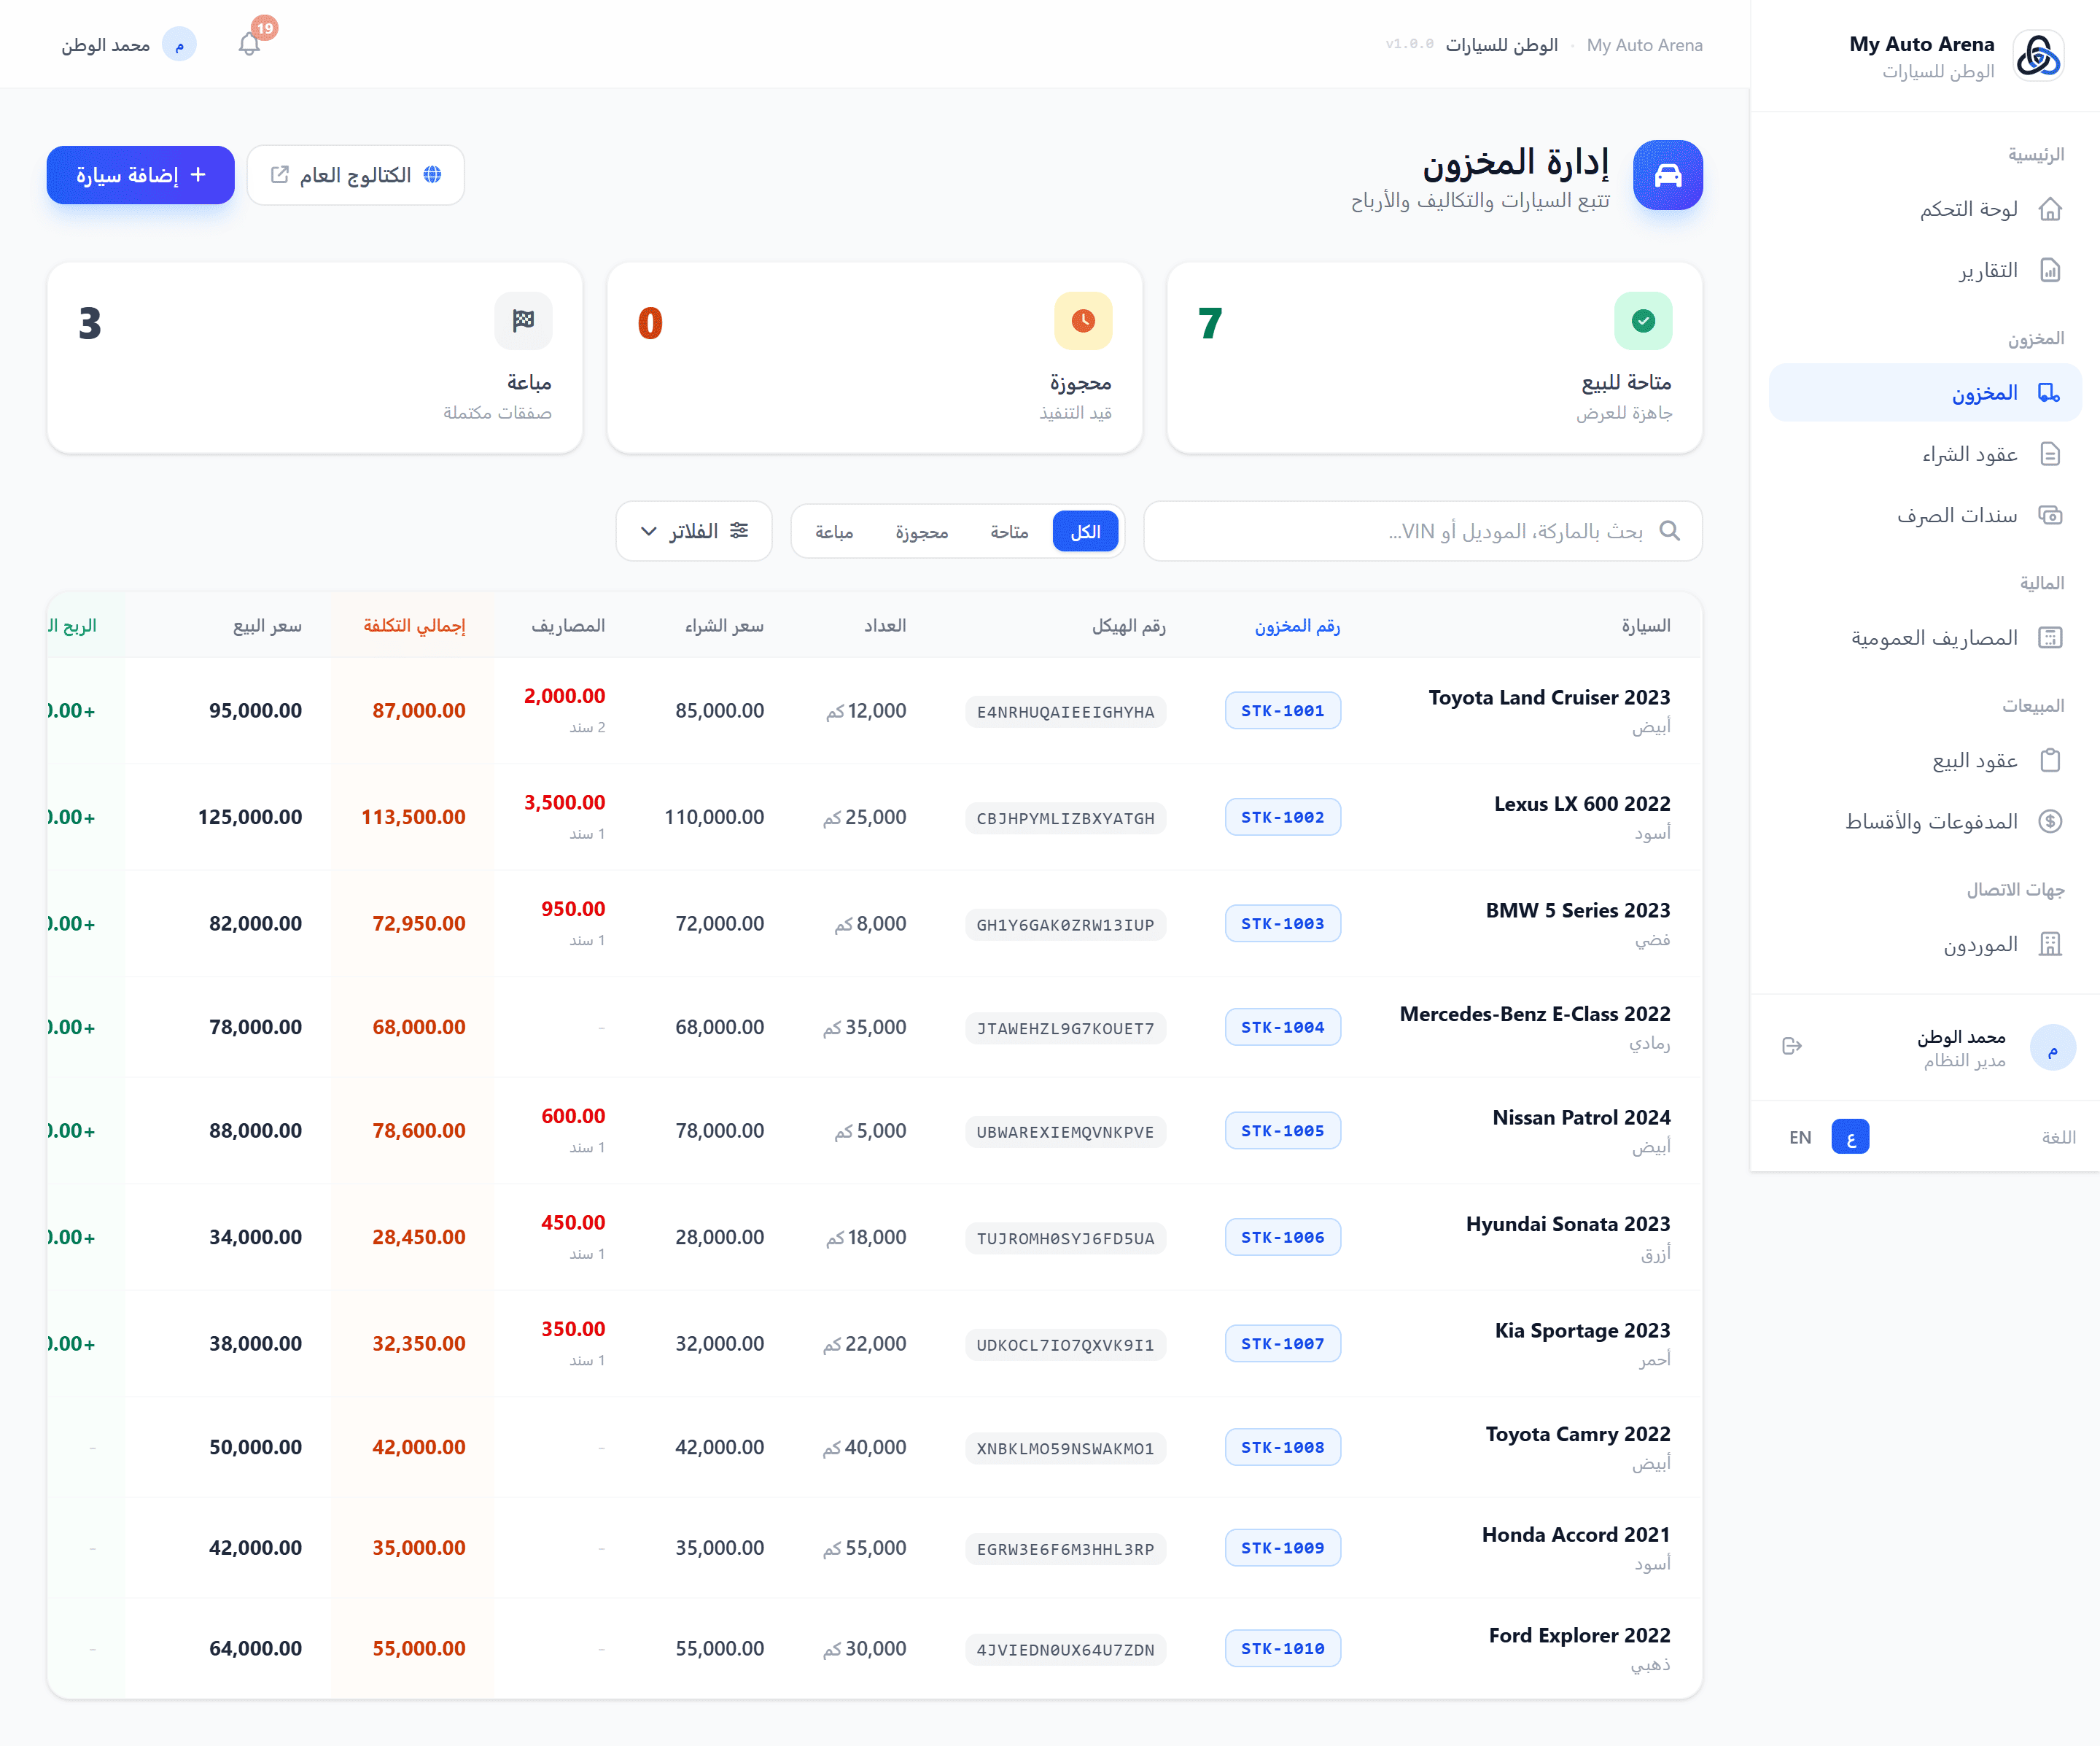
صفحة المخزون مع قائمة السيارات وأزرار الإجراءات Inventory page with car list and action buttons
خطوات العمل Workflow Steps
إضافة سيارة جديدة
Add New Car
انقر 'إضافة سيارة'، أدخل رقم VIN (فريد لكل معرض)، وأكمل باقي البيانات.
Click 'Add Car', enter a unique VIN, and complete the remaining fields.
رفع الصور
Upload Images
افتح مدير الصور للسيارة وارفع الصور. انقر على صورة لتعيينها كصورة رئيسية.
Open the car's image manager and upload photos. Click any image to set it as the primary.
تعيين سعر الطلب
Set Asking Price
استخدم زر 'تعيين السعر' لتحديث سعر الطلب في أي وقت دون فتح نموذج التعديل.
Use the 'Set Price' button to update the asking price at any time without opening the full edit form.
ملف المركبة 360°
Vehicle 360° Profile
انقر على اسم السيارة أو زر التفاصيل لفتح ملف المركبة الكامل. من هنا يمكنك تعبئة المواصفات التقنية، مراجعة جميع العقود والمصاريف المرتبطة، وتشغيل قائمة تحقق السلامة.
Click the vehicle name or details button to open the full Vehicle 360° profile. From there you can fill in technical specs, review all linked contracts and expenses, and run the safety integrity checklist.
مشاركة السيارة
Share Car
استخدم زر واتساب لفتح معالج الرسائل، اختر الحقول، وأرسل للعميل.
Use the WhatsApp button to open the message wizard, select fields, and send to a customer.
المزايا والخصائص Features & Capabilities
إضافة سيارة
Add Car
أدخل رقم الهيكل (VIN)، الماركة، الموديل، السنة، اللون، عداد المسافات، سعر الشراء، وسعر الطلب.
Enter VIN, brand, model, year, color, mileage, purchase price, and asking price.
إدارة الصور
Image Management
رفع حتى 10 صور لكل سيارة (بحد أقصى 5MB لكل صورة). يمكن تحديد الصورة الرئيسية وحذف الصور الأخرى.
Upload up to 10 images per car (max 5MB each). Set a primary image and delete others.
التصفية والبحث
Filter & Search
ابحث بـ VIN أو الماركة أو الموديل. صفّح القائمة حسب الحالة (متاحة / محجوزة / مباعة).
Search by VIN, brand, or model. Filter the list by status (available / reserved / sold).
مشاركة عبر واتساب
WhatsApp Sharing
أرسل تفاصيل السيارة لعميل محتمل مباشرةً عبر واتساب بضغطة واحدة من خلال المعالج المدمج.
Send car details to a prospect directly via WhatsApp in one click using the built-in wizard.
رابط السيارة العام
Public Car Link
كل سيارة لها رابط عام يمكن مشاركته مع العملاء للاطلاع على التفاصيل والصور.
Each car has a public URL you can share with customers to view details and photos.
الملف التقني للمركبة
Technical Profile
سجّل المحرك، ناقل الحركة، نوع الوقود، نظام الدفع، اللون الخارجي والداخلي. تظهر هذه البيانات في الكتالوج العام.
Record engine, gearbox, fuel type, drivetrain, exterior and interior color. These details appear on the public catalog page.
الخيارات والحزم
Options & Packages
أضف قائمة بالمميزات والحزم التجهيزية للسيارة (فتحة سقف، شاشة، جلد...) لإبرازها في صفحة العرض العام.
Add a list of features and equipment packages (sunroof, screen, leather...) to highlight them on the public listing.
حالة المركبة
Vehicle Condition
وثّق خلوّ السيارة من الحوادث، توفر سجل الصيانة الكامل، وصلاحية الضمان. تُعرض كشارات ثقة في الكتالوج.
Document accident-free status, full service history availability, and active warranty. Displayed as trust badges on the catalog.
المميزات والملاحظات
Highlights & Notes
أضف أبرز مميزات السيارة وأي ملاحظات يجب أن يعرفها المشتري. تظهر في صفحة تفاصيل السيارة العامة.
Add the car's key selling points and any notes the buyer should know. Shown on the public car detail page.
حذف السيارة
Delete Car
يتطلب الحذف تأكيد رقم VIN لمنع الحذف العرضي. لا يمكن حذف سيارة لها عقد بيع نشط.
Deletion requires VIN confirmation to prevent accidental removal. Cars with active sale contracts cannot be deleted.
رقم المخزون
Stock ID
يُعيَّن لكل سيارة رقم مخزون تلقائي (Stock ID) يُستخدم كمرجع داخلي يظهر في القوائم والتقارير ويسهّل البحث السريع.
Each vehicle is automatically assigned a sequential Stock ID used as an internal reference visible in lists and reports for quick look-up.
شارة التقادم
Stagnant Badge
تظهر شارة برتقالية تلقائياً على السيارات التي تجاوزت حد الأيام المحدد في الإعدادات دون أن تُباع، مما يُنبّه الفريق للسيارات الراكدة.
An orange badge automatically appears on vehicles that have exceeded the stagnant threshold set in Settings without being sold, alerting staff to slow-moving inventory.
ملف المركبة 360°
Vehicle 360° Profile
صفحة متكاملة لكل سيارة تعرض: بطاقة الهوية، جميع العقود المرتبطة، المصاريف، الأقساط والمدفوعات، المواصفات التقنية، ولوحة التحقق من السلامة - مع صلاحية الخصم الأقصى للمستخدمين المخوّلين.
A comprehensive detail page per vehicle showing: identity card, all linked contracts, expenses, installments and payments, technical specs, and a safety integrity checklist - with max-discount control for authorized users.
التكلفة الإجمالية للسيارة = سعر الشراء + مجموع سندات الصرف المرتبطة بها. Total car cost = Purchase price + sum of all linked expense vouchers.
لا يمكن تغيير حالة سيارة 'مباعة' يدوياً. الحالة تتغير تلقائياً عند إنشاء عقد بيع أو حذفه. A 'sold' car's status cannot be changed manually. It changes automatically when a sale contract is created or deleted.
رقم VIN لا يمكن تكراره لنفس المعرض وهو معرّف فريد للسيارة في النظام. The VIN must be unique per dealership and serves as the car's unique identifier in the system.
كلما كان الملف التقني أكثر اكتمالاً (مواصفات + خيارات + حالة المركبة)، كلما بدت صفحة السيارة أكثر مصداقية واحترافاً للعملاء. A complete technical profile (specs + options + vehicle condition) makes the public car page more credible and professional to customers.
تُسجّل عقود الشراء عمليات اقتناء السيارات من الموردين. يدعم النظام بنود متعددة لتوزيع تكلفة الشراء (سعر الأساس، رسوم المزاد، النقل الداخلي، رسوم الفحص، ضريبة التصدير، وتكاليف أخرى). Purchase contracts record vehicle acquisition from suppliers. The system supports multiple line items to distribute purchase cost (base price, auction fee, inland transport, inspection, export tax, and other acquisition costs).
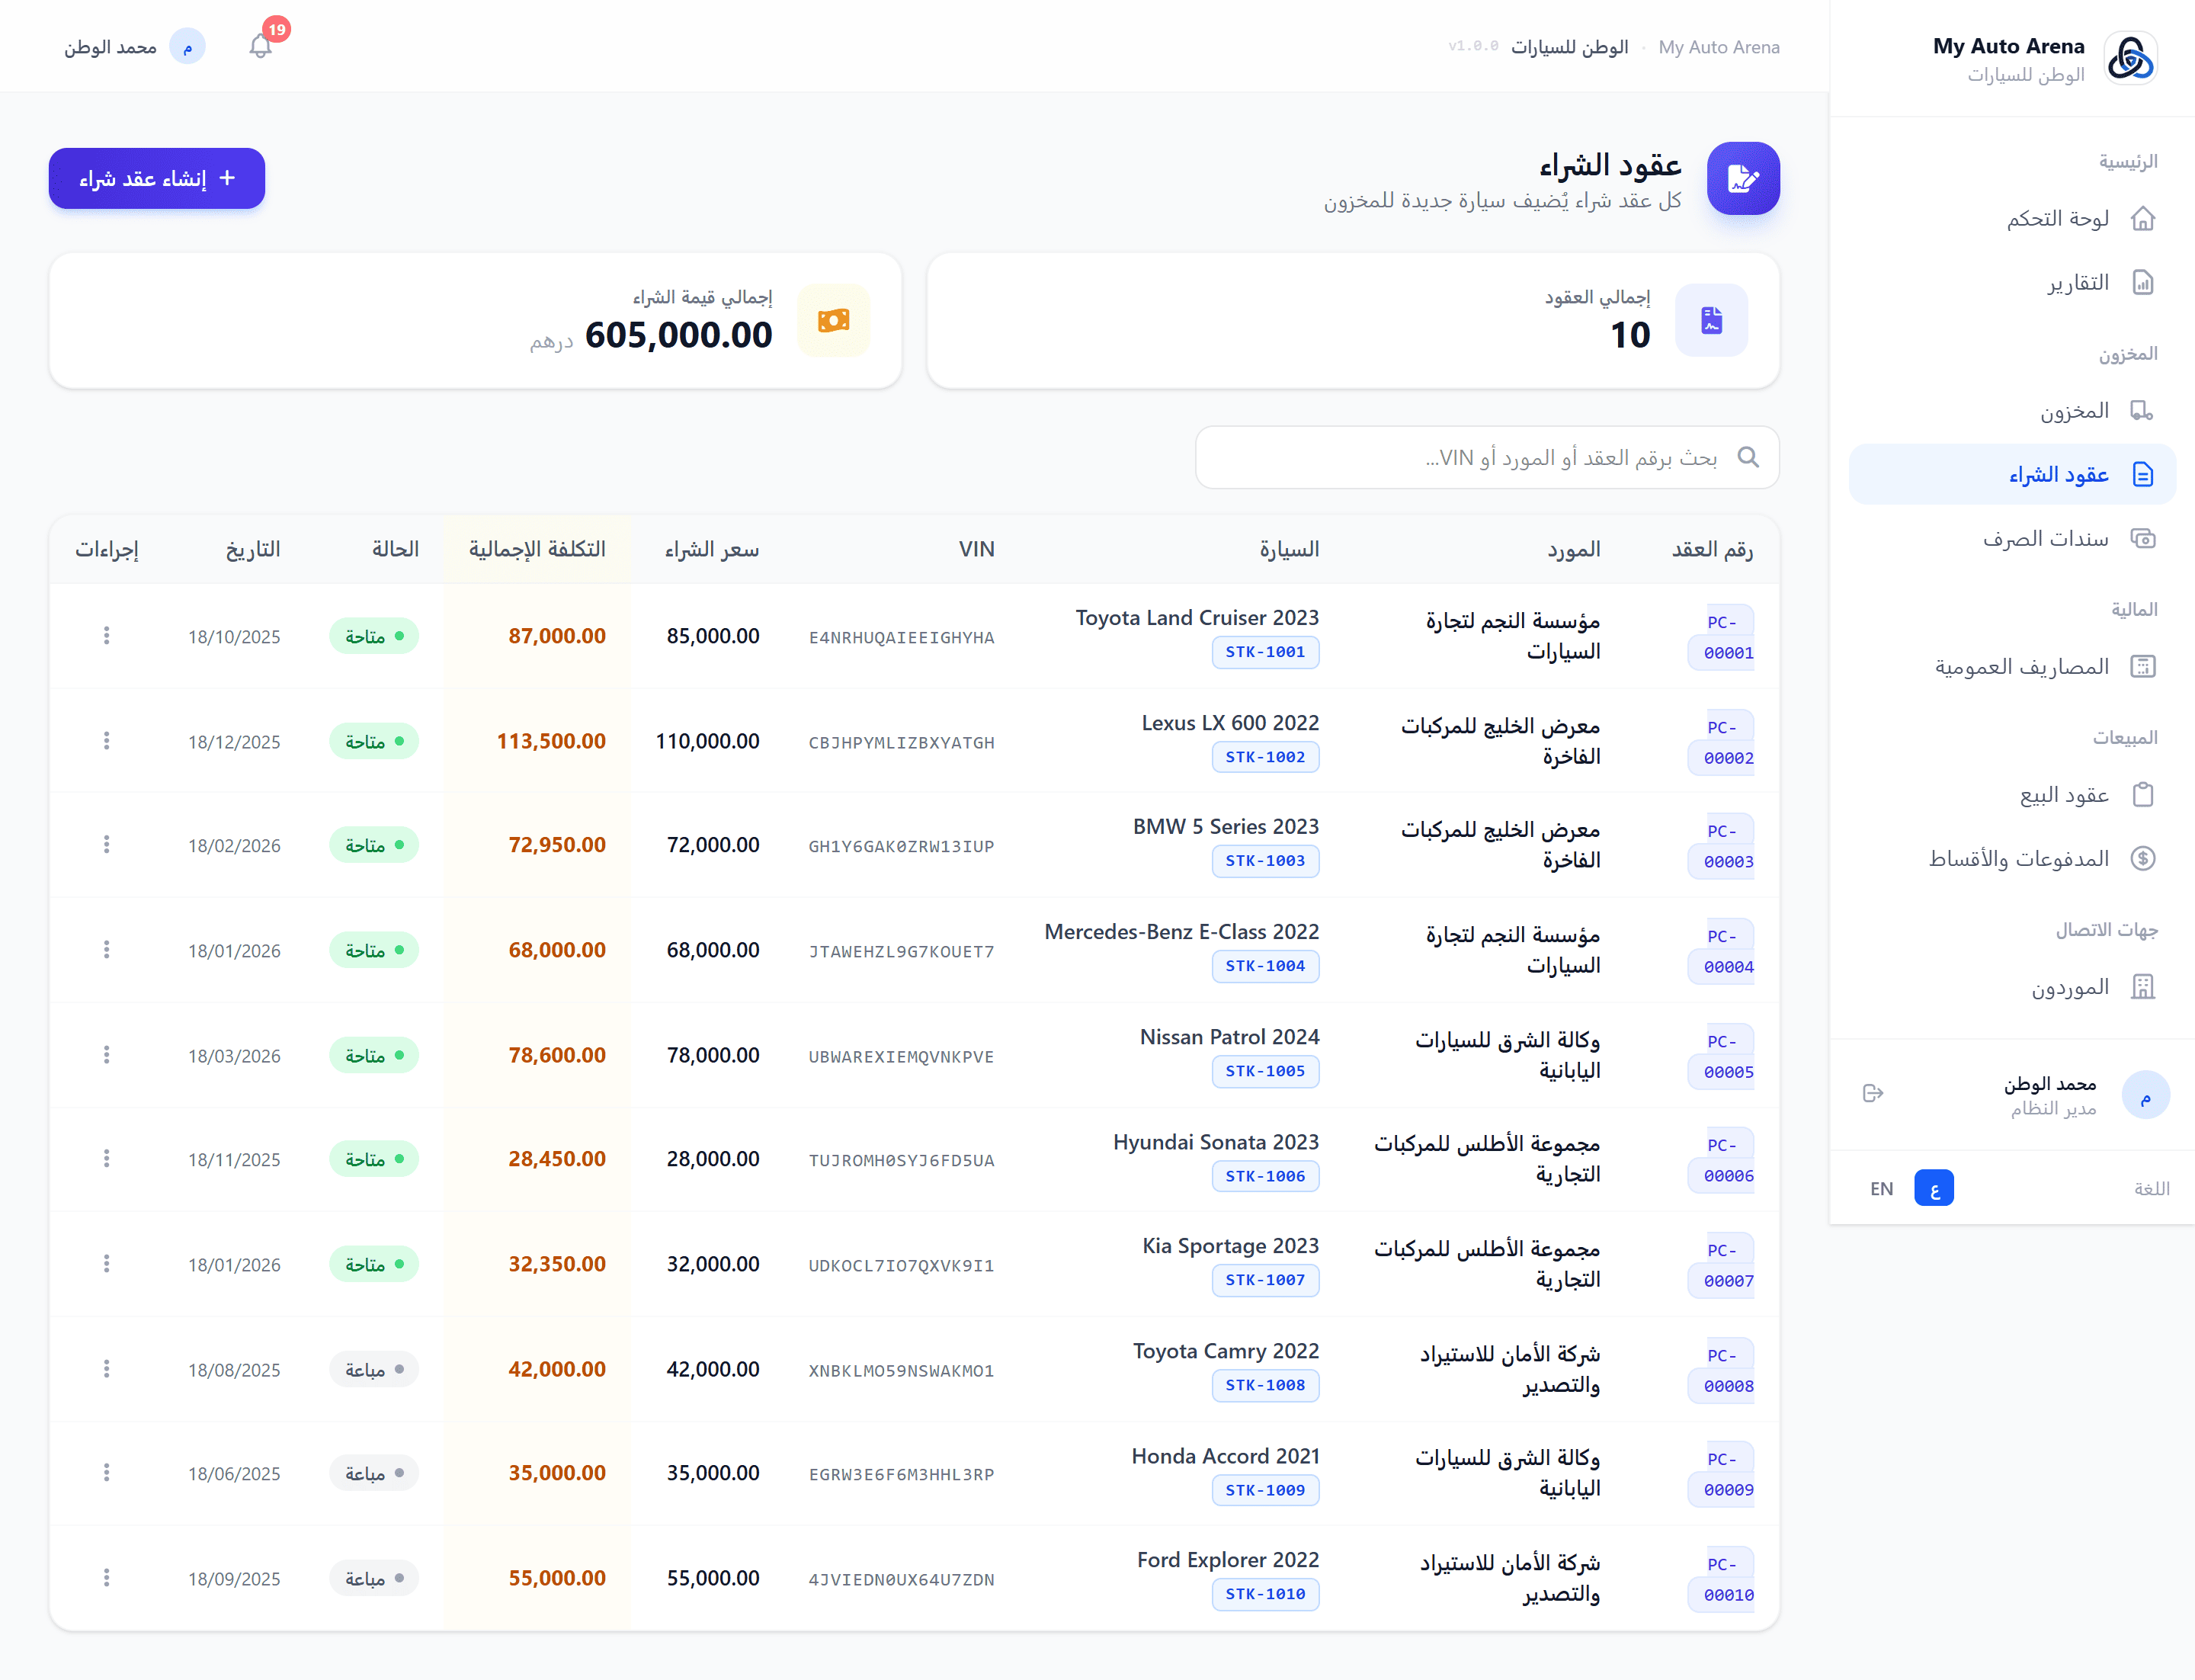
صفحة عقود الشراء مع نموذج البنود التفصيلية Purchase contracts page with detailed line items form
خطوات العمل Workflow Steps
اختيار المورد والسيارة
Select Supplier & Car
حدد المورد من القائمة أو أضف مورداً جديداً. أدخل بيانات السيارة الجديدة (VIN، ماركة، موديل...).
Choose a supplier from the list or add a new one. Enter the new car's details (VIN, brand, model...).
إضافة بنود التكلفة
Add Cost Line Items
انقر 'إضافة بند' واختر نوع التكلفة وأدخل المبلغ. أضف بنوداً متعددة حسب الحاجة.
Click 'Add Item', choose cost type, and enter the amount. Add multiple items as needed.
مراجعة وتأكيد
Review & Confirm
راجع إجمالي سعر الشراء ثم انقر 'حفظ'. ستُضاف السيارة تلقائياً إلى المخزون.
Review the total purchase price then click Save. The car is automatically added to inventory.
رفع المستندات
Upload Documents
من قائمة العقود، افتح خيارات العقد وانقر 'المرفقات' لرفع الوثائق ذات الصلة.
From the contracts list, open the contract options and click 'Attachments' to upload related documents.
المزايا والخصائص Features & Capabilities
إنشاء عقد شراء
Create Purchase Contract
يُنشئ عقد الشراء سيارة جديدة في المخزون تلقائياً مع ربطها بالمورد المحدد.
Creating a purchase contract automatically adds a new car to inventory and links it to the selected supplier.
بنود متعددة
Multiple Line Items
أضف بنوداً تفصيلية للتكلفة: سعر الأساس، رسوم المزاد، النقل الداخلي، رسوم الفحص، ضريبة التصدير، وتكاليف اقتناء أخرى.
Add detailed cost items: base price, auction fee, inland transport, inspection fee, export tax, and other acquisition costs.
حساب تلقائي
Auto Calculation
سعر الشراء الإجمالي = مجموع جميع البنود. يُحدَّث رصيد السيارة تلقائياً.
Total purchase price = sum of all line items. Car cost is updated automatically.
البحث والتصفية
Search & Filter
ابحث برقم العقد، اسم المورد، VIN، أو اسم السيارة.
Search by contract number, supplier name, VIN, or car name.
المرفقات
Attachments
أرفق وثائق الشراء (صور، PDF، مستندات Word/Excel) مباشرةً بعقد الشراء.
Attach purchase documents (images, PDFs, Word/Excel) directly to the purchase contract.
لا يمكن تعديل سعر عقد الشراء إذا كانت السيارة مباعة بالفعل. The purchase contract price cannot be modified if the car has already been sold.
حذف عقد الشراء يتطلب تأكيد رقم VIN ويؤدي إلى حذف السيارة من المخزون أيضاً. Deleting a purchase contract requires VIN confirmation and also deletes the car from inventory.
سندات الصرف تُسجّل المصاريف الإضافية المرتبطة بالسيارات (صيانة، تصوير، تنظيف، رسوم جمركية...إلخ). كل سند يُضاف تلقائياً لتكلفة السيارة ويؤثر على ربح عقد البيع. Expense vouchers record additional costs linked to vehicles (maintenance, photography, cleaning, customs fees, etc.). Each voucher is automatically added to the car's cost and affects sale contract profit.
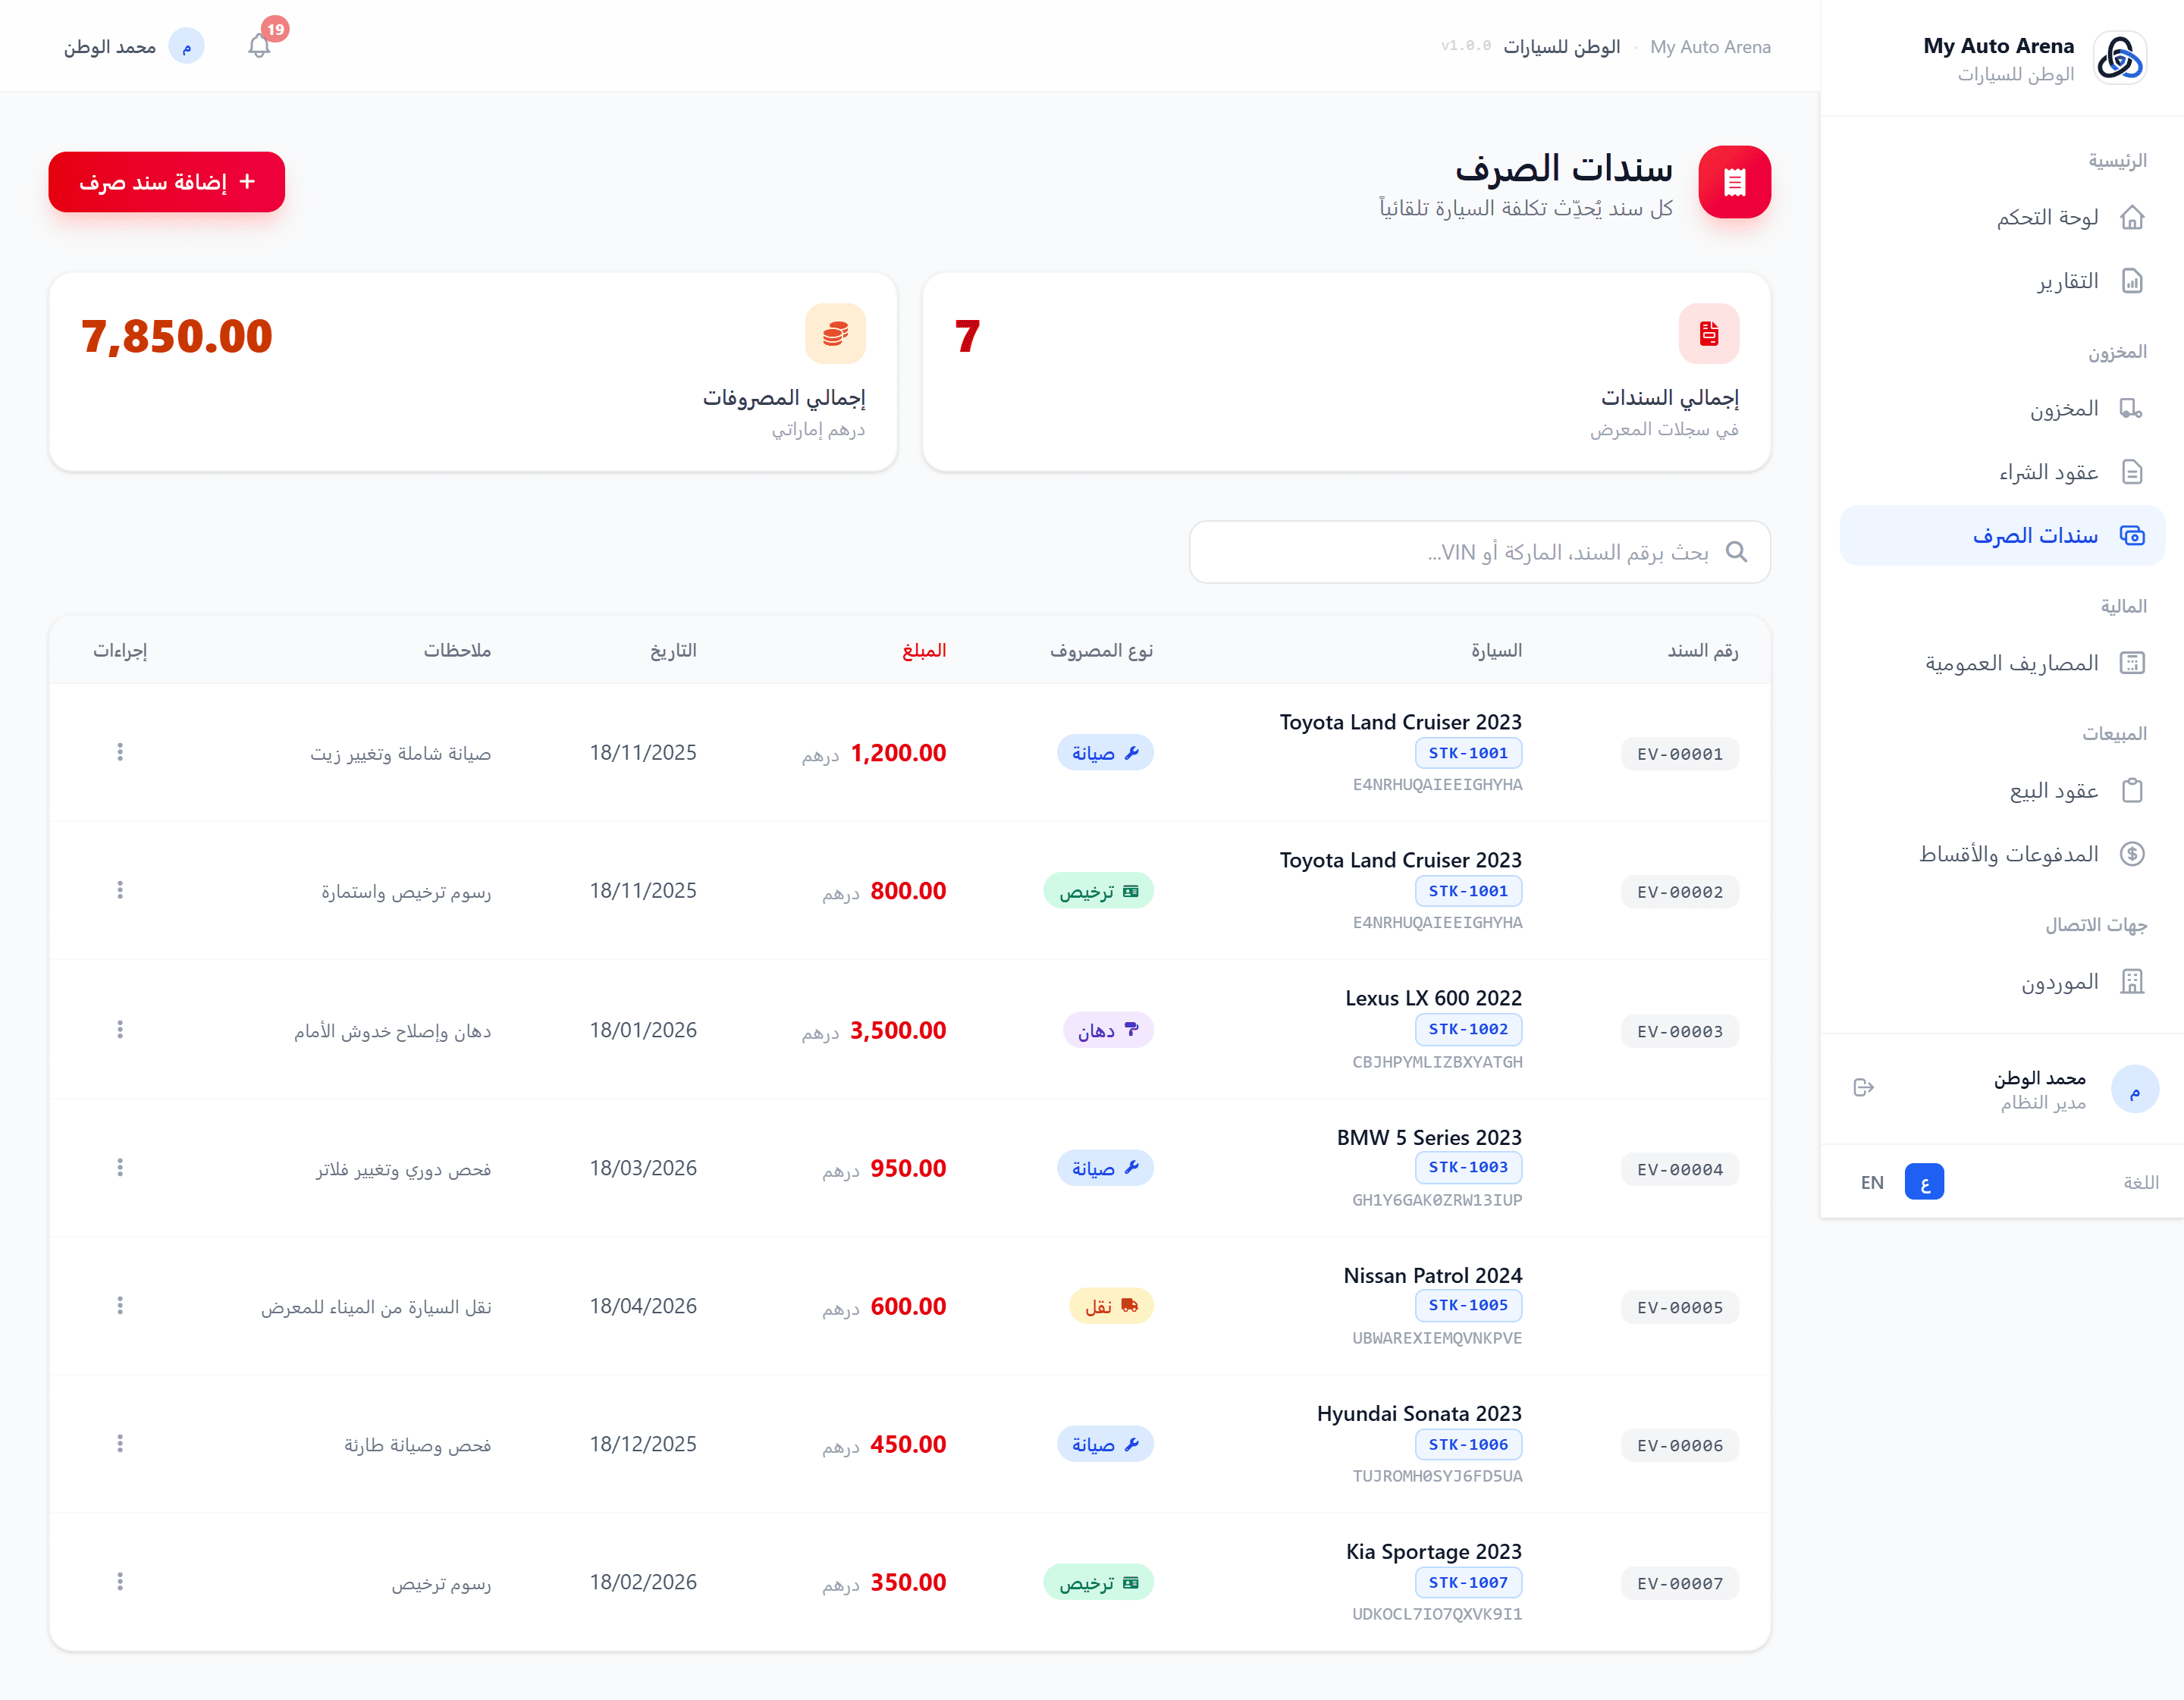
صفحة سندات الصرف مع نموذج الإضافة Expense vouchers page with add form
خطوات العمل Workflow Steps
إضافة سند صرف
Add Expense Voucher
انقر 'إضافة سند'، اختر السيارة من القائمة المنسدلة، أدخل نوع المصروف والمبلغ والتاريخ.
Click 'Add Voucher', select the car from the dropdown, enter expense type, amount, and date.
مراجعة التكلفة
Review Cost
بعد الحفظ، راجع صفحة السيارة في المخزون لمشاهدة التكلفة الإجمالية المحدّثة.
After saving, check the car in inventory to see the updated total cost.
المزايا والخصائص Features & Capabilities
ربط بسيارة
Linked to a Car
كل سند مرتبط بسيارة محددة. يُحدَّث رصيد تكلفة السيارة تلقائياً عند الإضافة أو الحذف.
Each voucher is tied to a specific car. The car's total cost is updated automatically on add or delete.
نوع المصروف
Expense Type
أدخل وصفاً حراً لنوع المصروف (مثال: صيانة، صبغ، ترخيص...إلخ).
Enter a free-text description of the expense type (e.g. maintenance, paint, registration, etc.).
البحث والتصفية
Search & Filter
ابحث برقم السند أو VIN السيارة أو اسمها. صفّح القائمة حسب السيارة.
Search by voucher number, car VIN, or car name. Filter the list by car.
أثر على الأرباح
Impact on Profit
كل مصروف يُضاف لتكلفة السيارة، مما يُقلّل الربح الإجمالي لعقد البيع المرتبط.
Each expense is added to the car's cost, which reduces the gross profit of any linked sale contract.
التكلفة الإجمالية للسيارة = سعر الشراء + مجموع سندات الصرف. هذا يؤثر مباشرةً على ربح عقد البيع. Total car cost = Purchase price + sum of expense vouchers. This directly impacts the sale contract profit.
تاريخ سند الصرف يجب أن يكون اليوم الحالي أو في الماضي. لا يمكن إدخال تواريخ مستقبلية. Voucher date must be today or in the past. Future dates are not allowed.
وحدة المصاريف التشغيلية تتيح تسجيل وتتبع جميع نفقات المعرض العامة - الرواتب والإيجار والفواتير والتسويق وسواها - بمعزل عن مصروفات السيارات. تُدمج هذه المصاريف مع تقرير الأرباح والخسائر لتعطيك صورة مالية حقيقية شاملة. The General Expenses module lets you record and track all showroom overhead costs - salaries, rent, utilities, marketing, and more - separately from vehicle-specific expenses. These costs are integrated into the Profit & Loss report, giving you a true net profit picture.
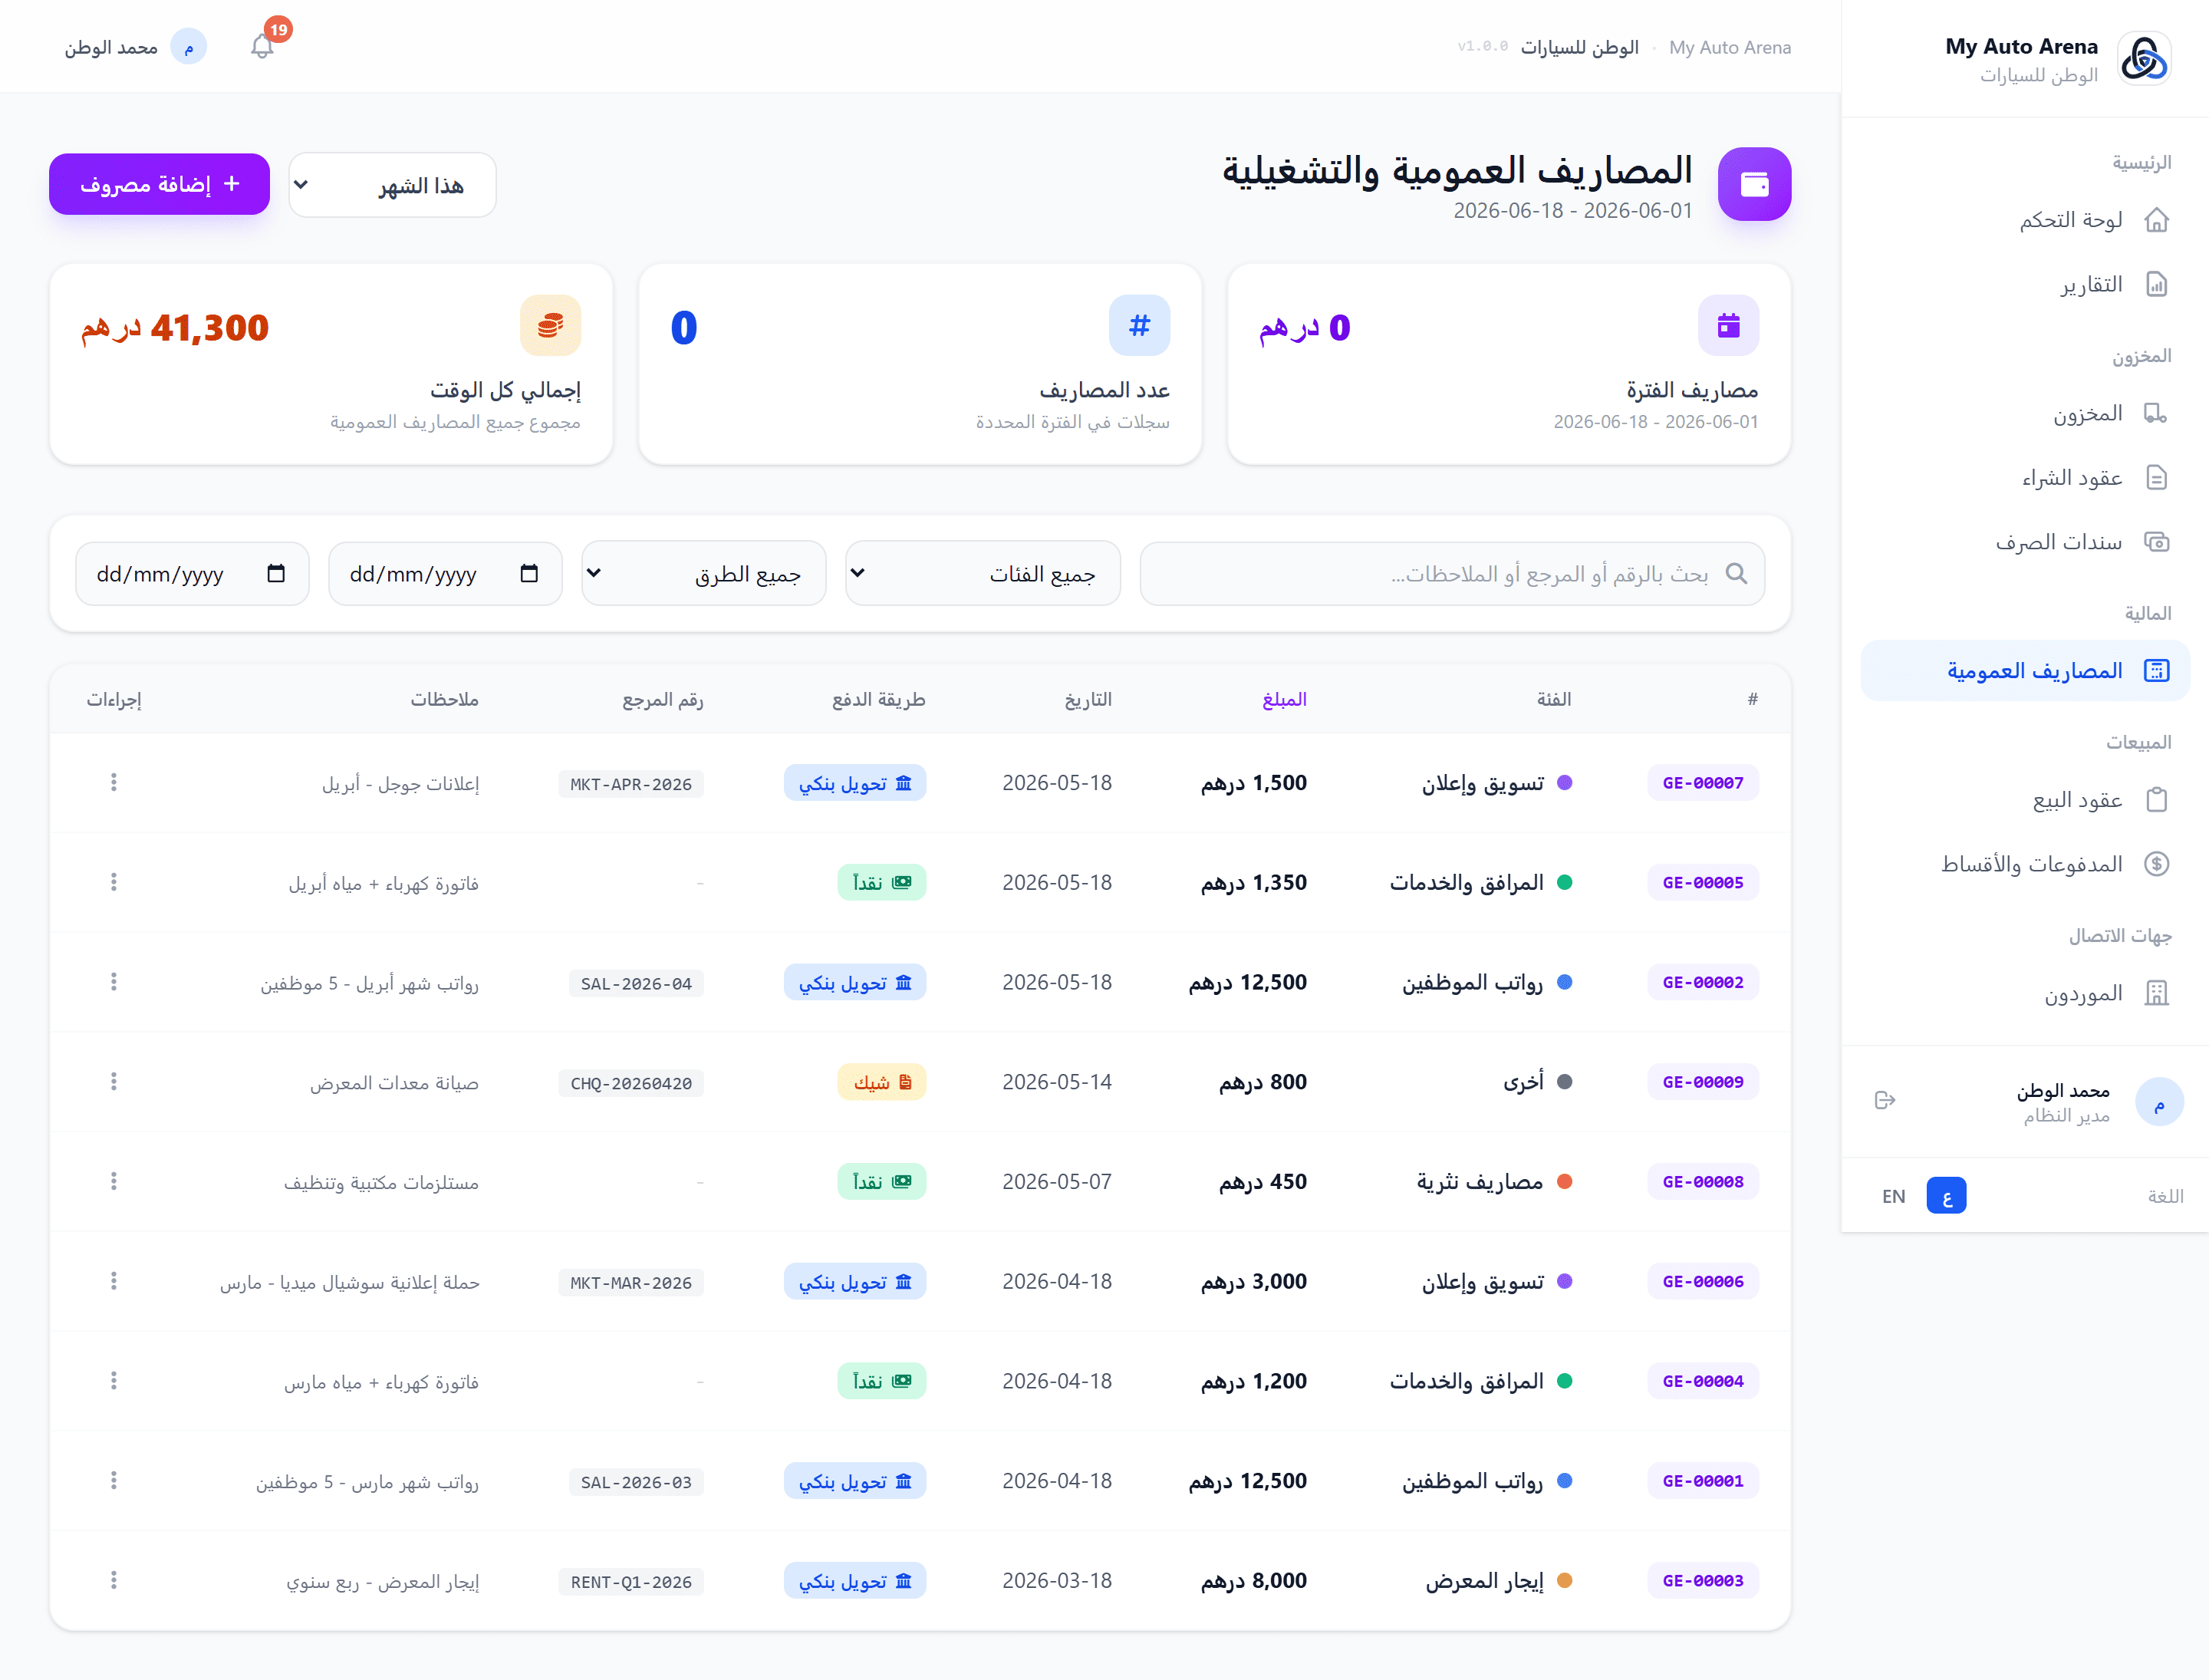
صفحة المصاريف التشغيلية - إجماليات الشهر والفئات Operating Expenses page - monthly totals and category breakdown
خطوات العمل Workflow Steps
الانتقال للمصاريف
Navigate to Expenses
من القائمة الجانبية اختر «الماليات» ثم «المصاريف التشغيلية».
From the sidebar choose «Financials» then «Operating Expenses».
إضافة مصروف جديد
Add a New Expense
انقر زر «+ مصروف جديد»، اختر الفئة والمبلغ والتاريخ وطريقة الدفع، وأضف رقم مرجعي أو ملاحظات اختيارية.
Click «+ New Expense», select a category, amount, date, and payment method. Reference number and notes are optional.
رفع إيصال
Upload a Receipt
يمكنك إرفاق صورة أو PDF للإيصال (حد أقصى 5 ميغابايت). المرفق مرتبط بالمصروف بشكل دائم.
Attach a receipt image or PDF (max 5 MB). The attachment is permanently linked to the expense record.
مراجعة الإجماليات
Review Totals
تظهر بطاقات الإحصاء أعلى الصفحة: مصاريف الشهر الحالي، إجمالي المصاريف الكلي، وعدد الإدخالات.
Stat cards at the top show: this-month expenses, all-time total, and entry count.
ربط التقارير
Connect to Reports
انتقل لصفحة التقارير لترى تقرير الأرباح والخسائر الكامل: الربح الإجمالي - المصاريف التشغيلية = صافي الربح.
Visit the Reports page to see the full P&L: Gross Profit − Operating Expenses = Net Profit.
المزايا والخصائص Features & Capabilities
فئات قابلة للتخصيص
Customisable Categories
ست فئات افتراضية جاهزة (رواتب، إيجار، خدمات، تسويق، مصروف نثري، أخرى). يمكن توسيعها لاحقاً.
Six default categories ready to use (Salaries, Rent, Utilities, Marketing, Petty Cash, Other). Extendable.
ترقيم تلقائي
Auto Numbering
كل مصروف يحصل على رقم GE-XXXXX فريد يُسهّل المراجعة والتدقيق.
Every expense receives a unique GE-XXXXX reference number for audit trail and easy lookup.
قائمة الأرباح والخسائر
Profit & Loss Statement
التقارير تدمج المصاريف التشغيلية تلقائياً لتعرض: الربح الإجمالي، إجمالي OpEx، وصافي الربح.
Reports auto-merge operating expenses to show: Gross Profit, Total OpEx, and Net Profit.
إرفاق الإيصالات
Receipt Attachments
ارفق إيصالات PDF أو صوراً لكل مصروف - يُحفظ مع السجل المالي للمراجعة في أي وقت.
Attach PDF or image receipts per expense - stored with the financial record for review at any time.
المصاريف التشغيلية مستقلة تماماً عن سندات الصرف المرتبطة بالسيارات. سندات الصرف تؤثر في تكلفة السيارة، أما المصاريف التشغيلية فهي تكاليف المعرض العامة. General Expenses are completely independent from Expense Vouchers tied to vehicles. Vouchers affect vehicle cost; General Expenses are showroom overheads.
تأكد من اختيار تاريخ المصروف الصحيح لأن تقارير الأرباح والخسائر تعتمد على نطاق التاريخ المحدد. Make sure to set the correct expense date - the P&L report filters by the selected date range.
عقود البيع هي الوحدة الأساسية لإدارة مبيعات السيارات. تدعم بنوداً متعددة، دفع مقدّم، وخطة أقساط مرنة تصل إلى 120 شهراً. يُحسب الربح تلقائياً بعد كل تعديل. Sale contracts are the core module for managing vehicle sales. They support multiple line items, down payment, and flexible installment plans up to 120 months. Profit is automatically calculated after every change.
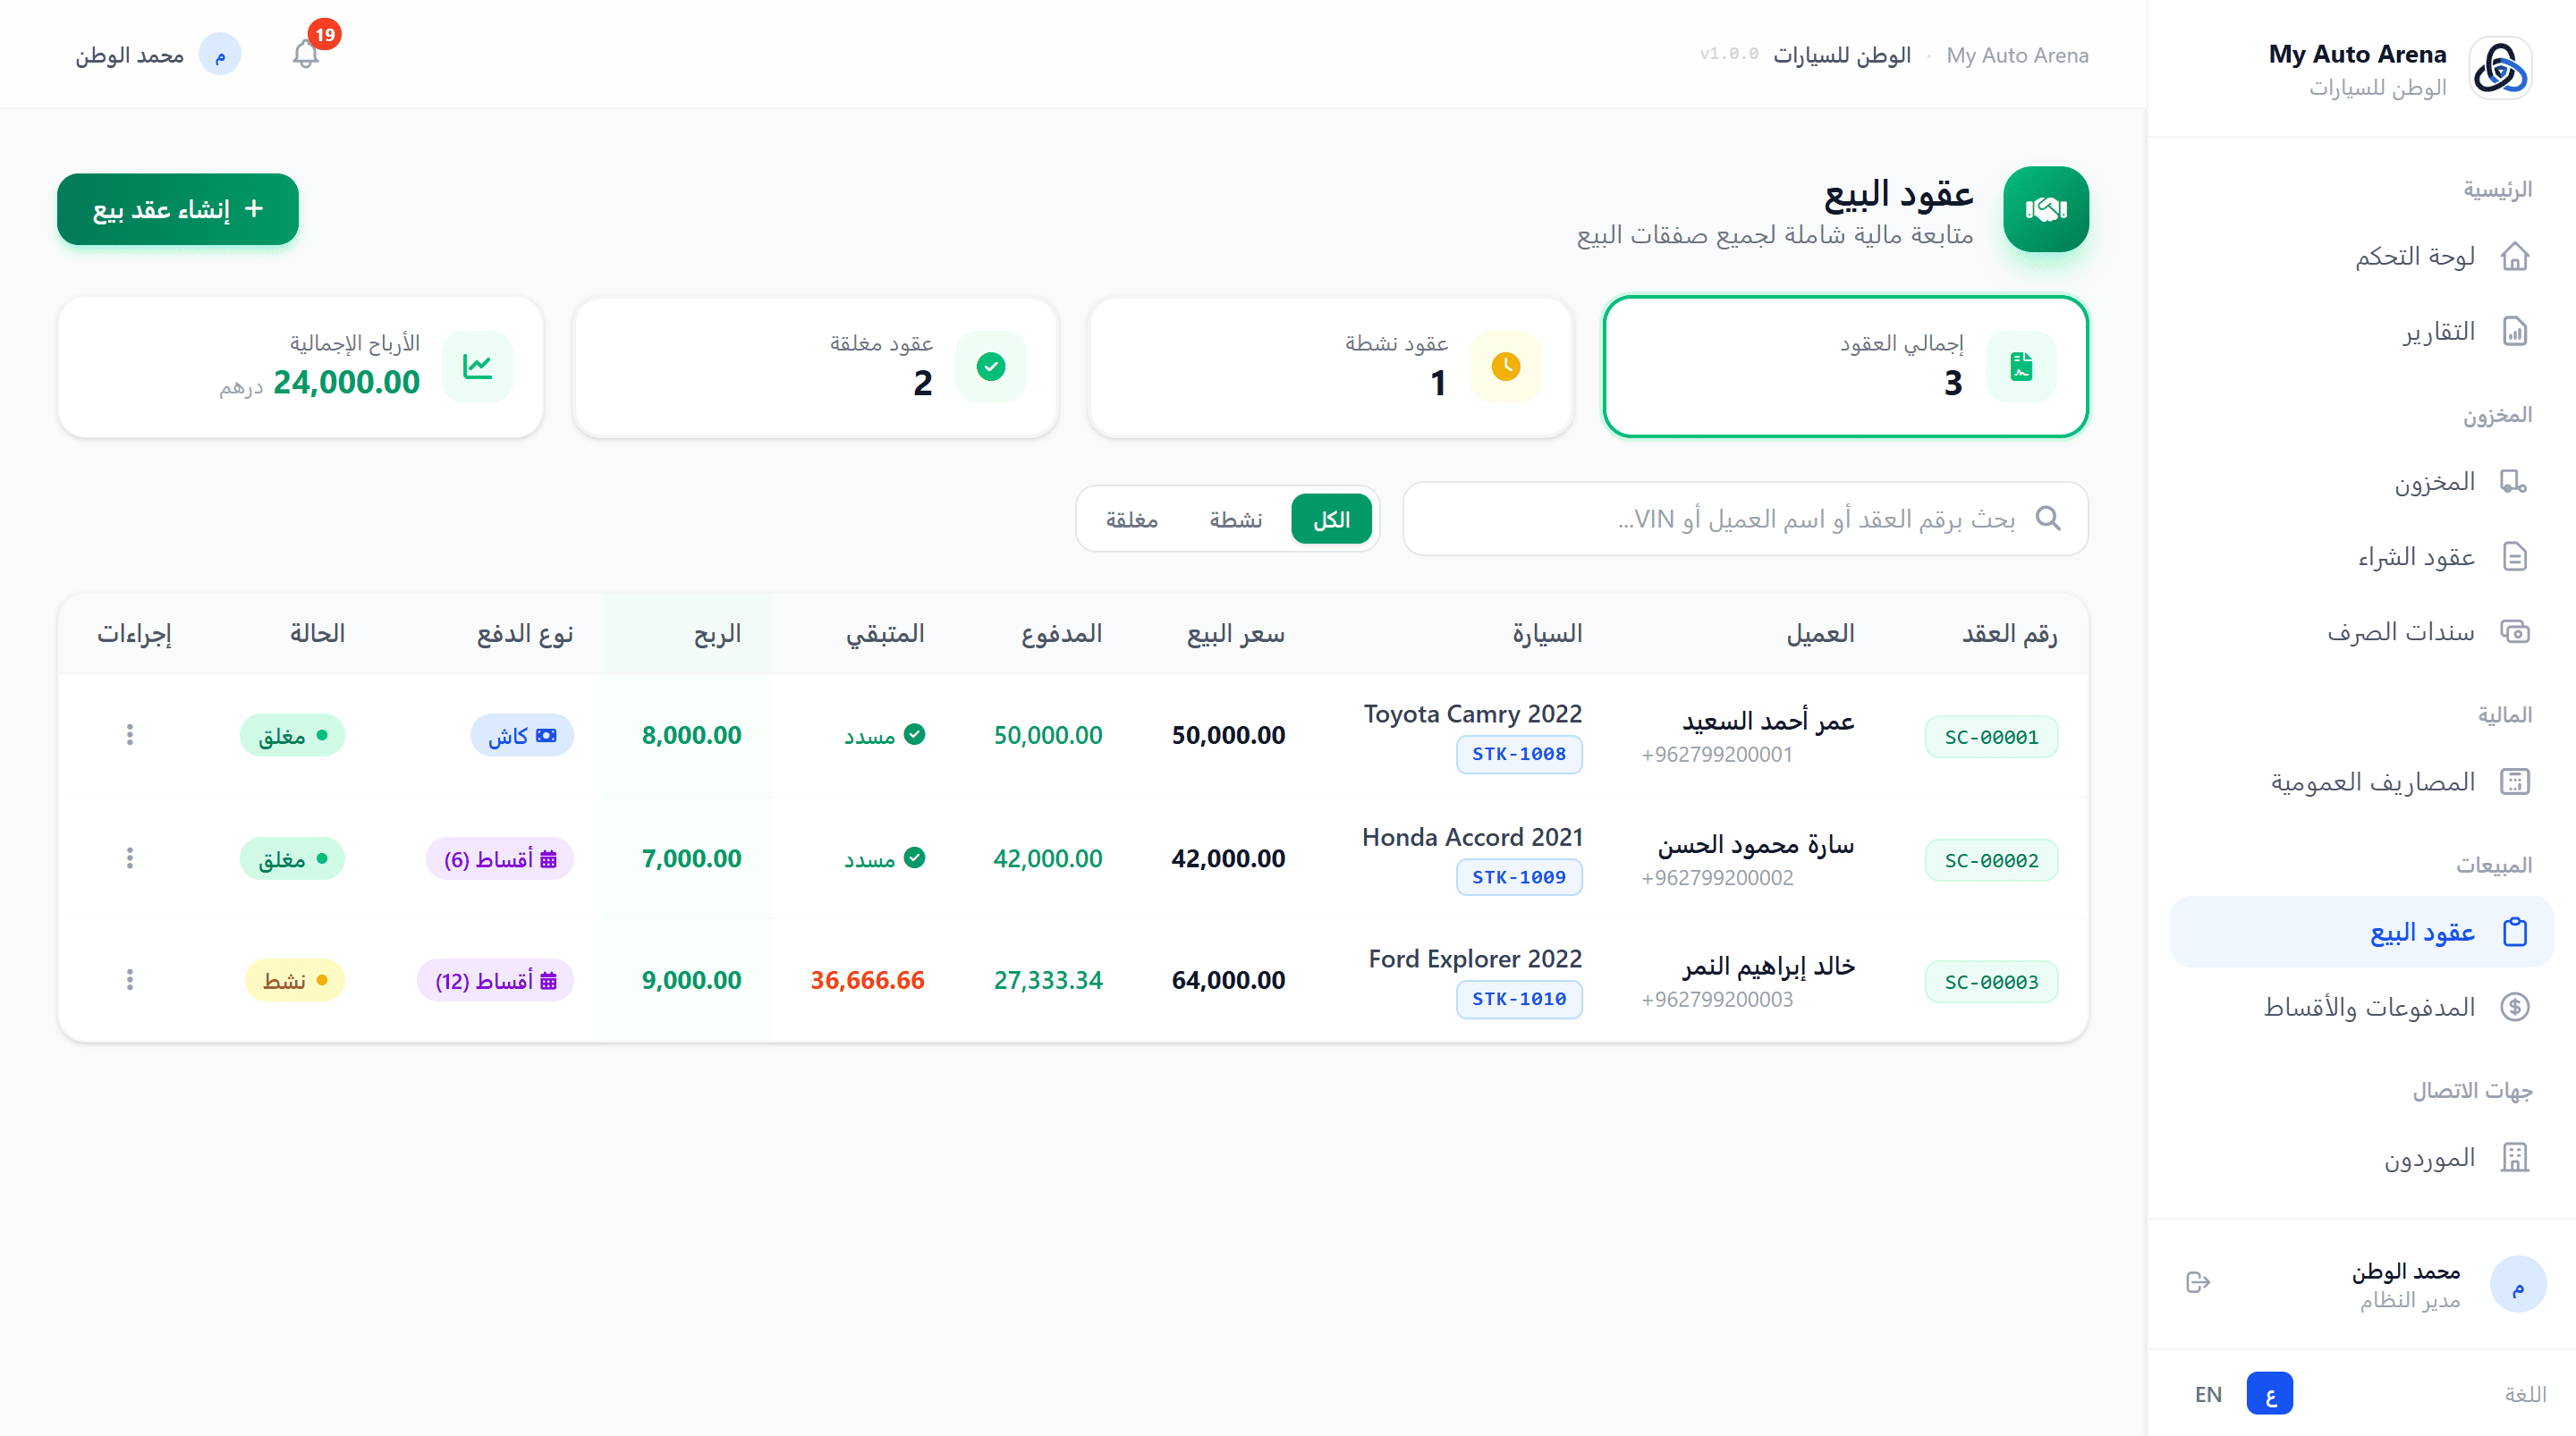
نموذج عقد البيع مع البنود والحسابات التلقائية Sale contract form with line items and live calculations
خطوات العمل Workflow Steps
اختيار العميل والسيارة
Select Customer & Car
ابحث وحدد العميل والسيارة المراد بيعها.
Search and select the customer and the car to be sold.
إضافة البنود
Add Line Items
أضف بند السيارة الرئيسية وأي بنود إضافية. سعر البيع الإجمالي يُحدَّث تلقائياً.
Add the main vehicle item and any additional items. Total sale price updates automatically.
إعداد الدفع
Set Payment Terms
حدد الدفعة المقدمة ونوع الدفع (كامل/أقساط). في حالة الأقساط أدخل عدد الشهور.
Enter the down payment and payment type (full/installments). For installments, enter number of months.
مراجعة وحفظ
Review & Save
راجع جميع الأرقام (سعر البيع، الربح المتوقع، الأقساط الشهرية) ثم احفظ العقد.
Review all numbers (sale price, expected profit, monthly installments) then save the contract.
الطباعة
بعد الحفظ، انقر على زر الطباعة لتوليد PDF احترافي بالعربية أو الإنجليزية.
After saving, click Print to generate a professional PDF in Arabic or English.
المزايا والخصائص Features & Capabilities
اختيار العميل والسيارة
Select Customer & Car
ابحث عن العميل والسيارة بالاسم أو الـ VIN. لا تظهر إلا السيارات المتاحة للبيع.
Search for customers and cars by name or VIN. Only available cars are shown for selection.
بنود متعددة
Multiple Line Items
أضف بنوداً متعددة: السيارة الرئيسية، التعديلات، قطع الغيار، اللوجستيات، الضريبة. كل بند له نوع دفع مستقل.
Add multiple items: main vehicle, modifications, spare parts, logistics, tax. Each item has its own payment type.
خيارات الدفع
Payment Options
حدد الدفعة المقدّمة، اختر الدفع الكامل أو التقسيط. في حالة التقسيط حدد عدد الأشهر (1-120).
Set down payment, choose full payment or installments. For installments, set the number of months (1-120).
حساب تلقائي مباشر
Live Auto Calculation
سعر البيع، الدفعة المقدمة، الأقساط، والربح تُحسب فورياً مع كل تعديل في النموذج.
Sale price, down payment, installments, and profit are calculated instantly with every form change.
طباعة العقد
Print Contract
طباعة العقد بالعربية أو الإنجليزية بتنسيق PDF احترافي مع QR Code للتحقق من الوثيقة.
Print the contract in Arabic or English as a professional PDF with a QR Code for document verification.
المرفقات
Attachments
أرفق وثائق ذات صلة (صور الهوية، عقود موقّعة...) بعقد البيع.
Attach related documents (ID photos, signed contracts, etc.) to the sale contract.
الربح = سعر البيع - التكلفة الإجمالية للسيارة (شراء + مصاريف). يظهر في النموذج بشكل مباشر. Profit = Sale price - Total car cost (purchase + expenses). Displayed live in the form.
لا يمكن تعديل عقد البيع بعد إغلاقه (رصيد صفر). يجب حذف المدفوعات أولاً لإعادة فتحه. A closed sale contract (zero balance) cannot be edited. Delete payments first to reopen it.
الأقساط تُنشأ تلقائياً عند حفظ العقد وتظهر في صفحة المدفوعات والأقساط. Installments are automatically created when the contract is saved and appear in the Payments page.
نظام ضريبة القيمة المضافة (VAT) مدمج بالكامل في عقود البيع ومصمّم للامتثال لأنظمة الدول الخليجية مثل الإمارات (5%). الأسعار المُدخلة في العقد تُعامَل كأسعار شاملة للضريبة، فلا يتغيّر أي رقم مالي قائم — الضريبة تُستخرَج كحصة مضمّنة داخل السعر ويتم عرضها وتقريرها بدقة. A VAT engine is fully integrated into sale contracts, built for GCC tax rules such as the UAE (5%). Prices entered on a contract are treated as VAT-inclusive, so no existing financial figure shifts — VAT is extracted as the tax portion embedded within the price and reported accurately.
صورة توضيحية Screenshot Placeholder
المعالجة الضريبية لكل بند والملخص الضريبي في عقد البيع Per-line VAT treatment and the VAT summary on a sale contract
المعالجة الضريبية لكل بند والملخص الضريبي في عقد البيع Per-line VAT treatment and the VAT summary on a sale contract
خطوات العمل Workflow Steps
ضبط النسبة
Set the Rate
من الإعدادات العامة ← بطاقة ضريبة القيمة المضافة، حدد النسبة أو اتركها فارغة لوراثة نسبة دولتك.
In General Settings → VAT card, set the rate or leave it blank to inherit your country's rate.
تحديد المعالجة لكل بند
Choose Per-Line Treatment
في نموذج عقد البيع، اختر نوع الضريبة لكل بند. السيارة المستعملة افتراضياً على نظام هامش الربح.
In the sale-contract form, pick a VAT type per line. Used vehicles default to the Profit Margin scheme.
إدخال التكلفة
Enter Cost
للبنود الإضافية أدخل سعر التكلفة ليُحتسب صافي الربح والضريبة على الهامش بدقة.
For add-on items, enter the cost price so net profit and margin VAT are computed accurately.
المراجعة والتقرير
Review & Report
راجع الملخص المالي الحي (الضريبة المضمّنة)، ثم استخرج التقرير الضريبي من صفحة التقارير عند الإقرار.
Review the live financial summary (VAT included), then export the VAT Return report from Reports at filing time.
المزايا والخصائص Features & Capabilities
نسبة ضريبة للمعرض
Showroom VAT Rate
من الإعدادات العامة تحدد نسبة الضريبة. اتركها فارغة لاعتماد النسبة الرسمية لدولة معرضك تلقائياً (الإمارات 5%، السعودية 15%...).
Set your VAT rate in General Settings, or leave it blank to inherit your country's statutory rate automatically (UAE 5%, KSA 15%...).
معالجة ضريبية لكل بند
Per-Line VAT Treatment
كل بند في العقد له نوع ضريبة: قياسية (5% على كامل البند للخدمات وقطع الغيار)، هامش الربح (للسيارات المستعملة: الضريبة على الربح فقط)، أو معفاة.
Each contract line has a VAT type: Standard (full 5% for services & parts), Profit Margin (used vehicles: tax on the margin only), or Exempt.
صافي ربح البند
Per-Item Net Profit
أضف حقل التكلفة بجانب سعر البيع لكل بند إضافي (قطع غيار، خدمات). النظام يحتسب صافي الربح (البيع − التكلفة) بدل احتساب كامل قيمة البيع ربحاً.
Add a cost field next to the sale price for each add-on item (parts, services). The system books net profit (sale − cost) instead of counting the whole sale value as profit.
ملخص ضريبي في الـ PDF
VAT Summary on PDF
عقد البيع المطبوع يعرض قسماً ضريبياً: الرقم الضريبي، القيمة الخاضعة للضريبة، وإجمالي ض.ق.م المضمّنة — بالعربية والإنجليزية.
The printed sale contract shows a VAT section: tax number, taxable value, and total VAT included — in both Arabic and English.
تقرير ضريبي مساعد
Assistive VAT Report
تبويب "التقرير الضريبي" في صفحة التقارير هو تقرير مساعد استرشادي يلخّص ضريبة المخرجات والقيمة الخاضعة للضريبة خلال الفترة موزّعة حسب المعالجة، لتسهيل إعداد إقرارك (مع تصدير PDF). لا يُغني عن مراجعة مستشار ضريبي معتمد.
The "VAT Return" tab in Reports is an assistive, indicative report that summarizes output VAT and taxable value for the period, broken down by treatment, to help you prepare your filing (with PDF export). It does not replace review by a certified tax advisor.
الأسعار في العقود شاملة للضريبة؛ المبلغ المعروض هو حصة الضريبة داخل قيمة العقد وليست إضافة فوقه. Contract prices are VAT-inclusive; the figure shown is the tax portion within the contract value, not an addition on top.
نظام هامش الربح للسيارات المستعملة يطبّق الضريبة على الربح فقط (البيع − التكلفة). تأكد من صحة تكلفة السيارة. The Profit Margin scheme for used vehicles taxes only the profit (sale − cost). Make sure the vehicle cost is accurate.
التقرير الضريبي وإعداد تقادم المخزون متاحان في خطتي برو والمؤسسي (ضمن ميزة التقارير). The VAT Return report and inventory-aging setting are available on Pro & Enterprise plans (part of the reports feature).
تتيح وحدة المدفوعات تسجيل دفعات العملاء وتوزيعها تلقائياً على الأقساط المستحقة بالترتيب الزمني (FIFO). تشمل الصفحة لوحة متخصصة للأقساط المتأخرة مع إمكانية الإرسال عبر واتساب. The payments module allows recording customer payments and automatically distributing them to due installments in chronological order (FIFO). The page includes a dedicated panel for overdue installments with WhatsApp reminder functionality.
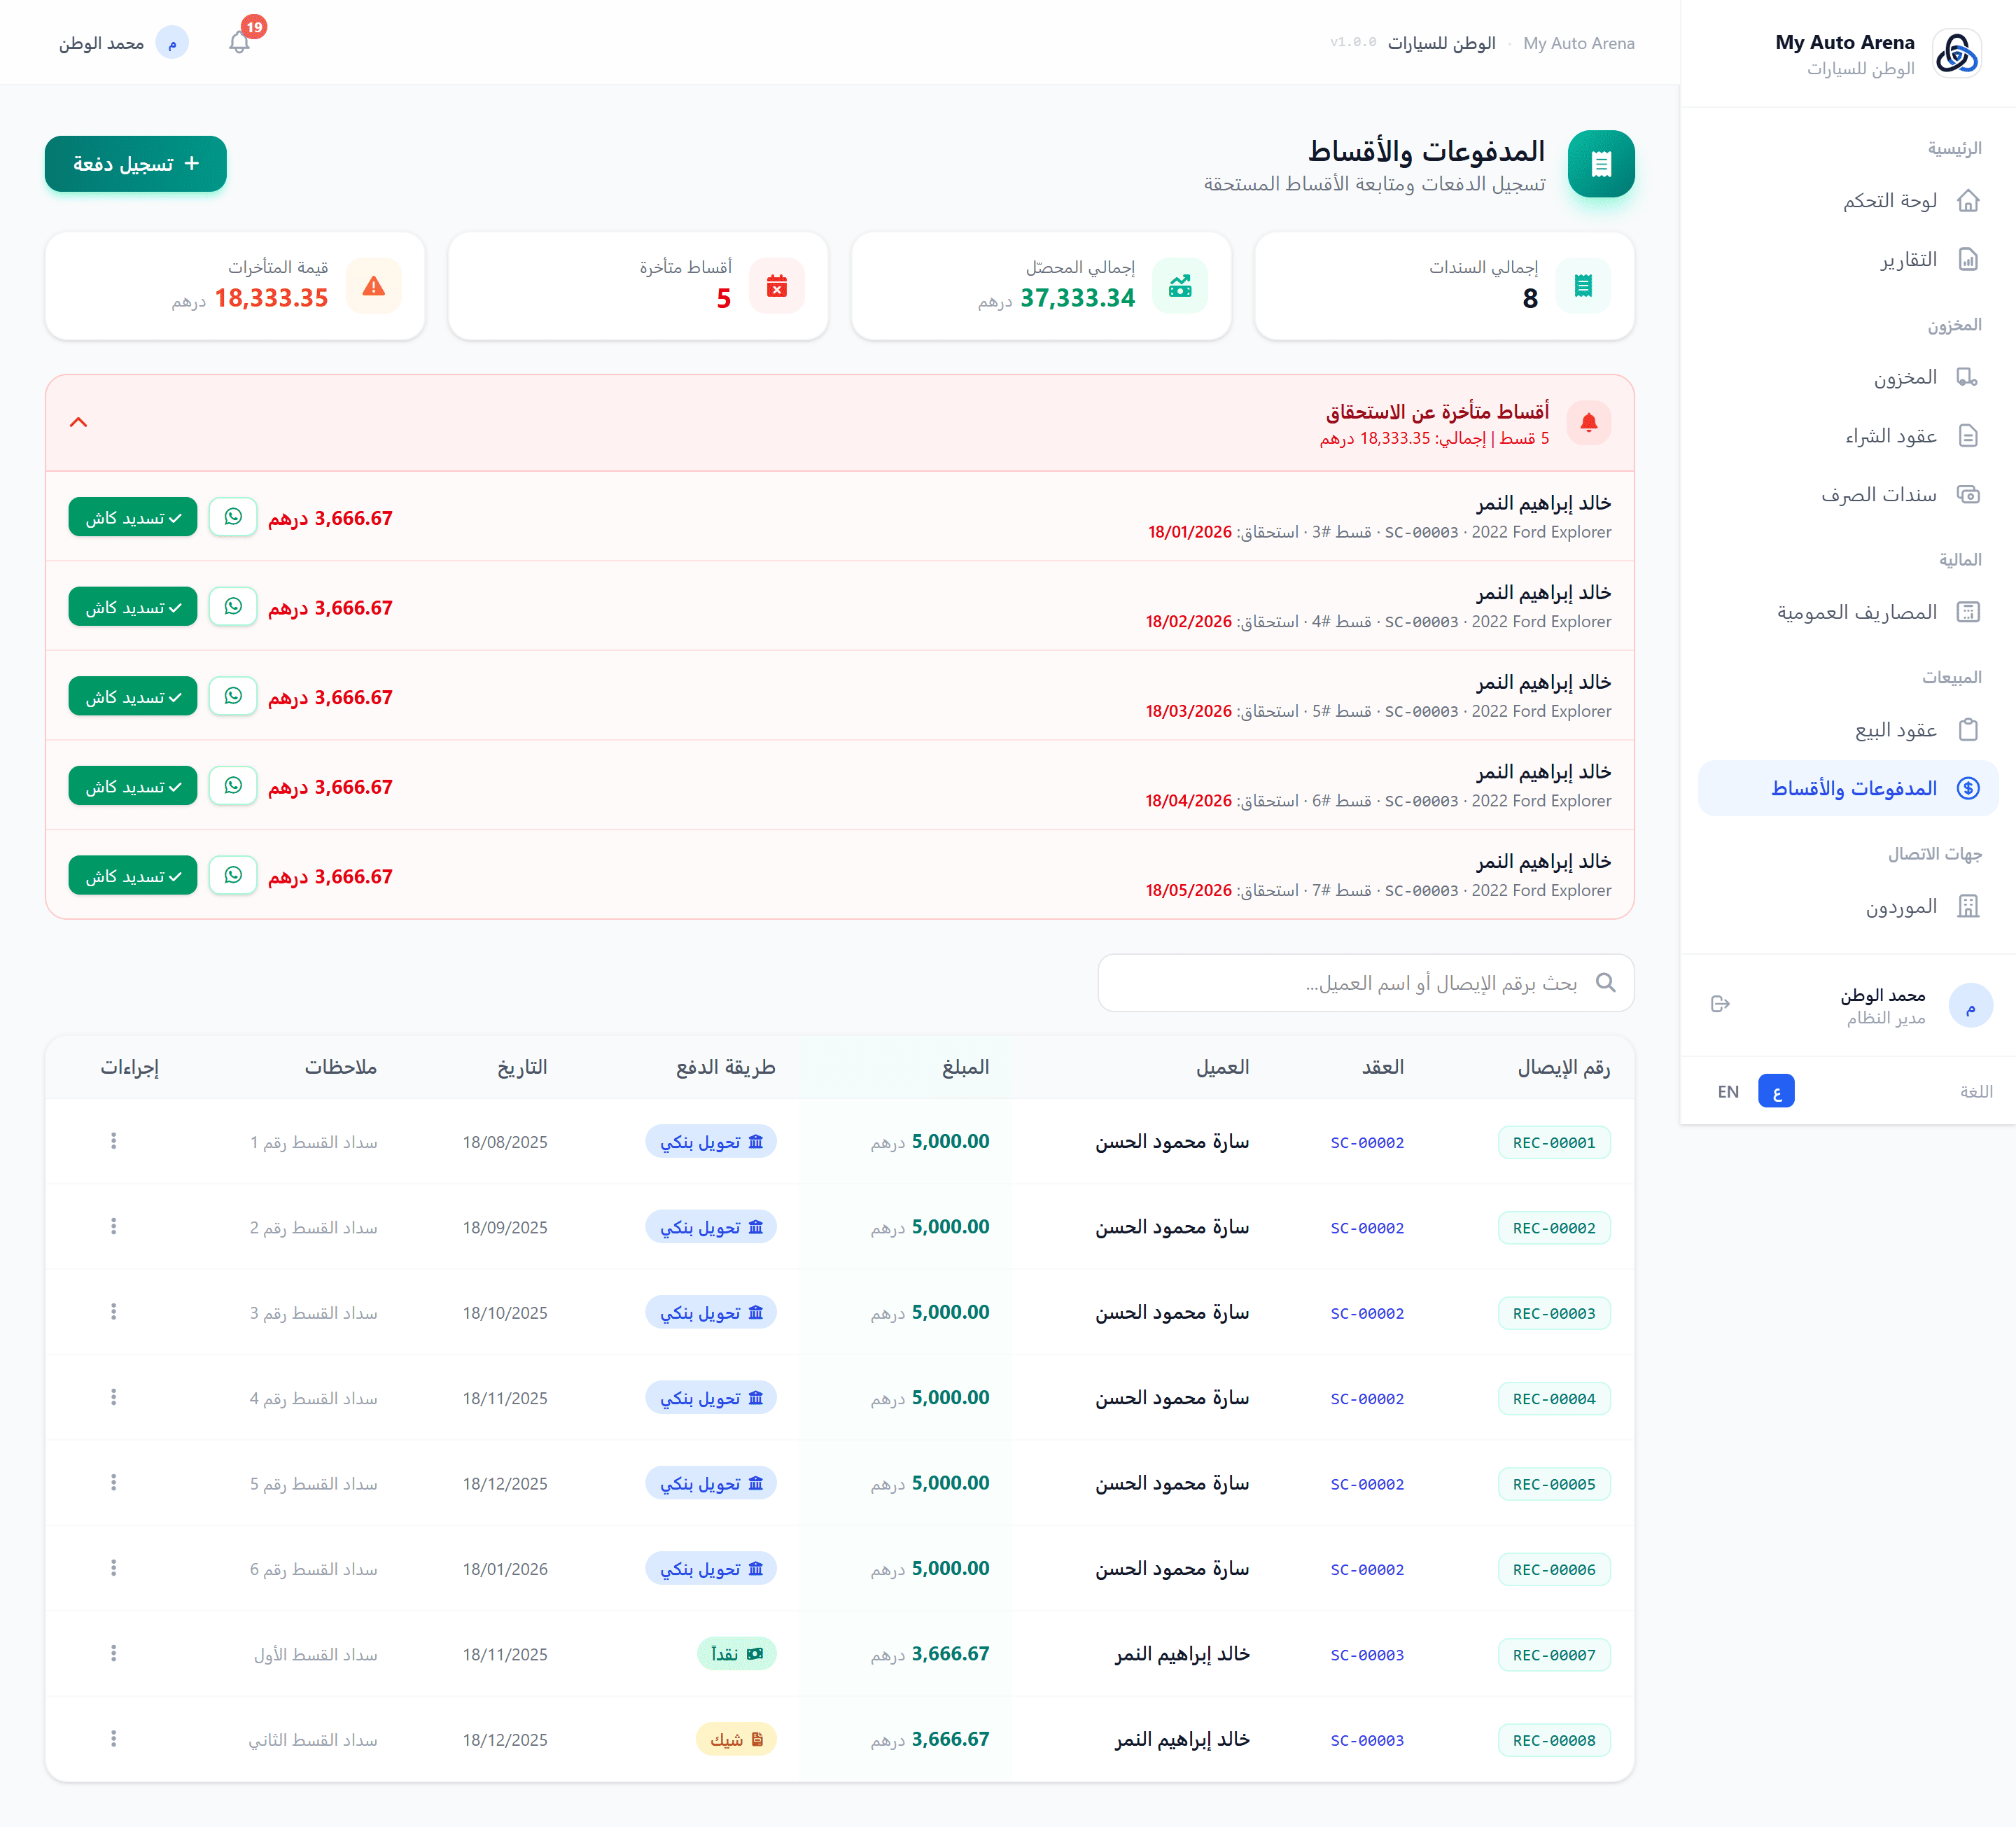
صفحة المدفوعات مع لوحة الأقساط المتأخرة وزر التذكير Payments page with overdue installments panel and reminder button
خطوات العمل Workflow Steps
تسجيل دفعة جديدة
Record New Payment
انقر 'تسجيل دفعة'، اختر عقد البيع من القائمة، أدخل المبلغ وطريقة الدفع والتاريخ.
Click 'Record Payment', choose the sale contract, enter amount, method, and date.
التوزيع على الأقساط
Link to Installments
فعّل خيار 'ربط بالأقساط' ليوزّع النظام الدفعة تلقائياً، أو أوقفه للدفع الحر.
Enable 'Link to Installments' to distribute automatically, or disable it for a free payment.
دفع قسط منفرد
Pay Single Installment
من لوحة الأقساط المتأخرة، انقر 'دفع نقدي' لتسوية قسط محدد مباشرةً.
From the overdue installments panel, click 'Pay Cash' to settle a specific installment directly.
إرسال تذكير
Send Reminder
انقر أيقونة واتساب بجانب القسط المتأخر، خصّص الرسالة، وأرسلها للعميل.
Click the WhatsApp icon next to an overdue installment, customize the message, and send it.
المزايا والخصائص Features & Capabilities
تسجيل دفعة
Record Payment
حدد عقد البيع، أدخل المبلغ، طريقة الدفع (نقد/تحويل/شيك/بطاقة)، وتاريخ الدفع.
Select the sale contract, enter amount, payment method (cash/transfer/cheque/card), and date.
توزيع تلقائي FIFO
Automatic FIFO Distribution
يوزّع النظام الدفعة تلقائياً على أقدم الأقساط المستحقة أولاً. يمكن تعطيل هذا الخيار.
The system automatically distributes the payment to the oldest due installments first. This option can be disabled.
لوحة الأقساط المتأخرة
Overdue Installments Panel
تعرض جميع الأقساط التي تجاوز موعد استحقاقها مع اسم العميل والمبلغ وزر دفع سريع.
Displays all past-due installments with customer name, amount, and a quick pay button.
تذكير واتساب
WhatsApp Reminder
أرسل رسالة تذكير مخصصة للعميل عبر واتساب من لوحة الأقساط المتأخرة.
Send a customized reminder message to the customer via WhatsApp from the overdue panel.
طباعة الإيصال
Print Receipt
اطبع إيصال الدفع بالعربية أو الإنجليزية بتنسيق PDF.
Print the payment receipt in Arabic or English as a PDF.
حذف الدفعة
Delete Payment
عند حذف دفعة، يُعيد النظام تلقائياً فتح الأقساط المرتبطة بها ويُعيد حساب الرصيد.
Deleting a payment automatically reopens the linked installments and recalculates the balance.
لا يمكن تسجيل دفعة تتجاوز الرصيد المتبقي في عقد البيع. A payment amount cannot exceed the remaining balance of the sale contract.
عند تسوية آخر قسط (وصول الرصيد لصفر)، يُغلق عقد البيع تلقائياً. When the last installment is settled (balance reaches zero), the sale contract closes automatically.
طرق الدفع المتاحة: نقدي، تحويل بنكي، شيك بنكي، بطاقة ائتمانية. Available payment methods: Cash, Bank Transfer, Bank Cheque, Credit Card.
تتيح وحدة الموردين إدارة قائمة الشركات والأفراد الذين يُزوّدون المعرض بالسيارات. يرتبط كل مورد بعقود الشراء الخاصة به. The suppliers module allows managing the companies and individuals who supply vehicles to your dealership. Each supplier is linked to their purchase contracts.
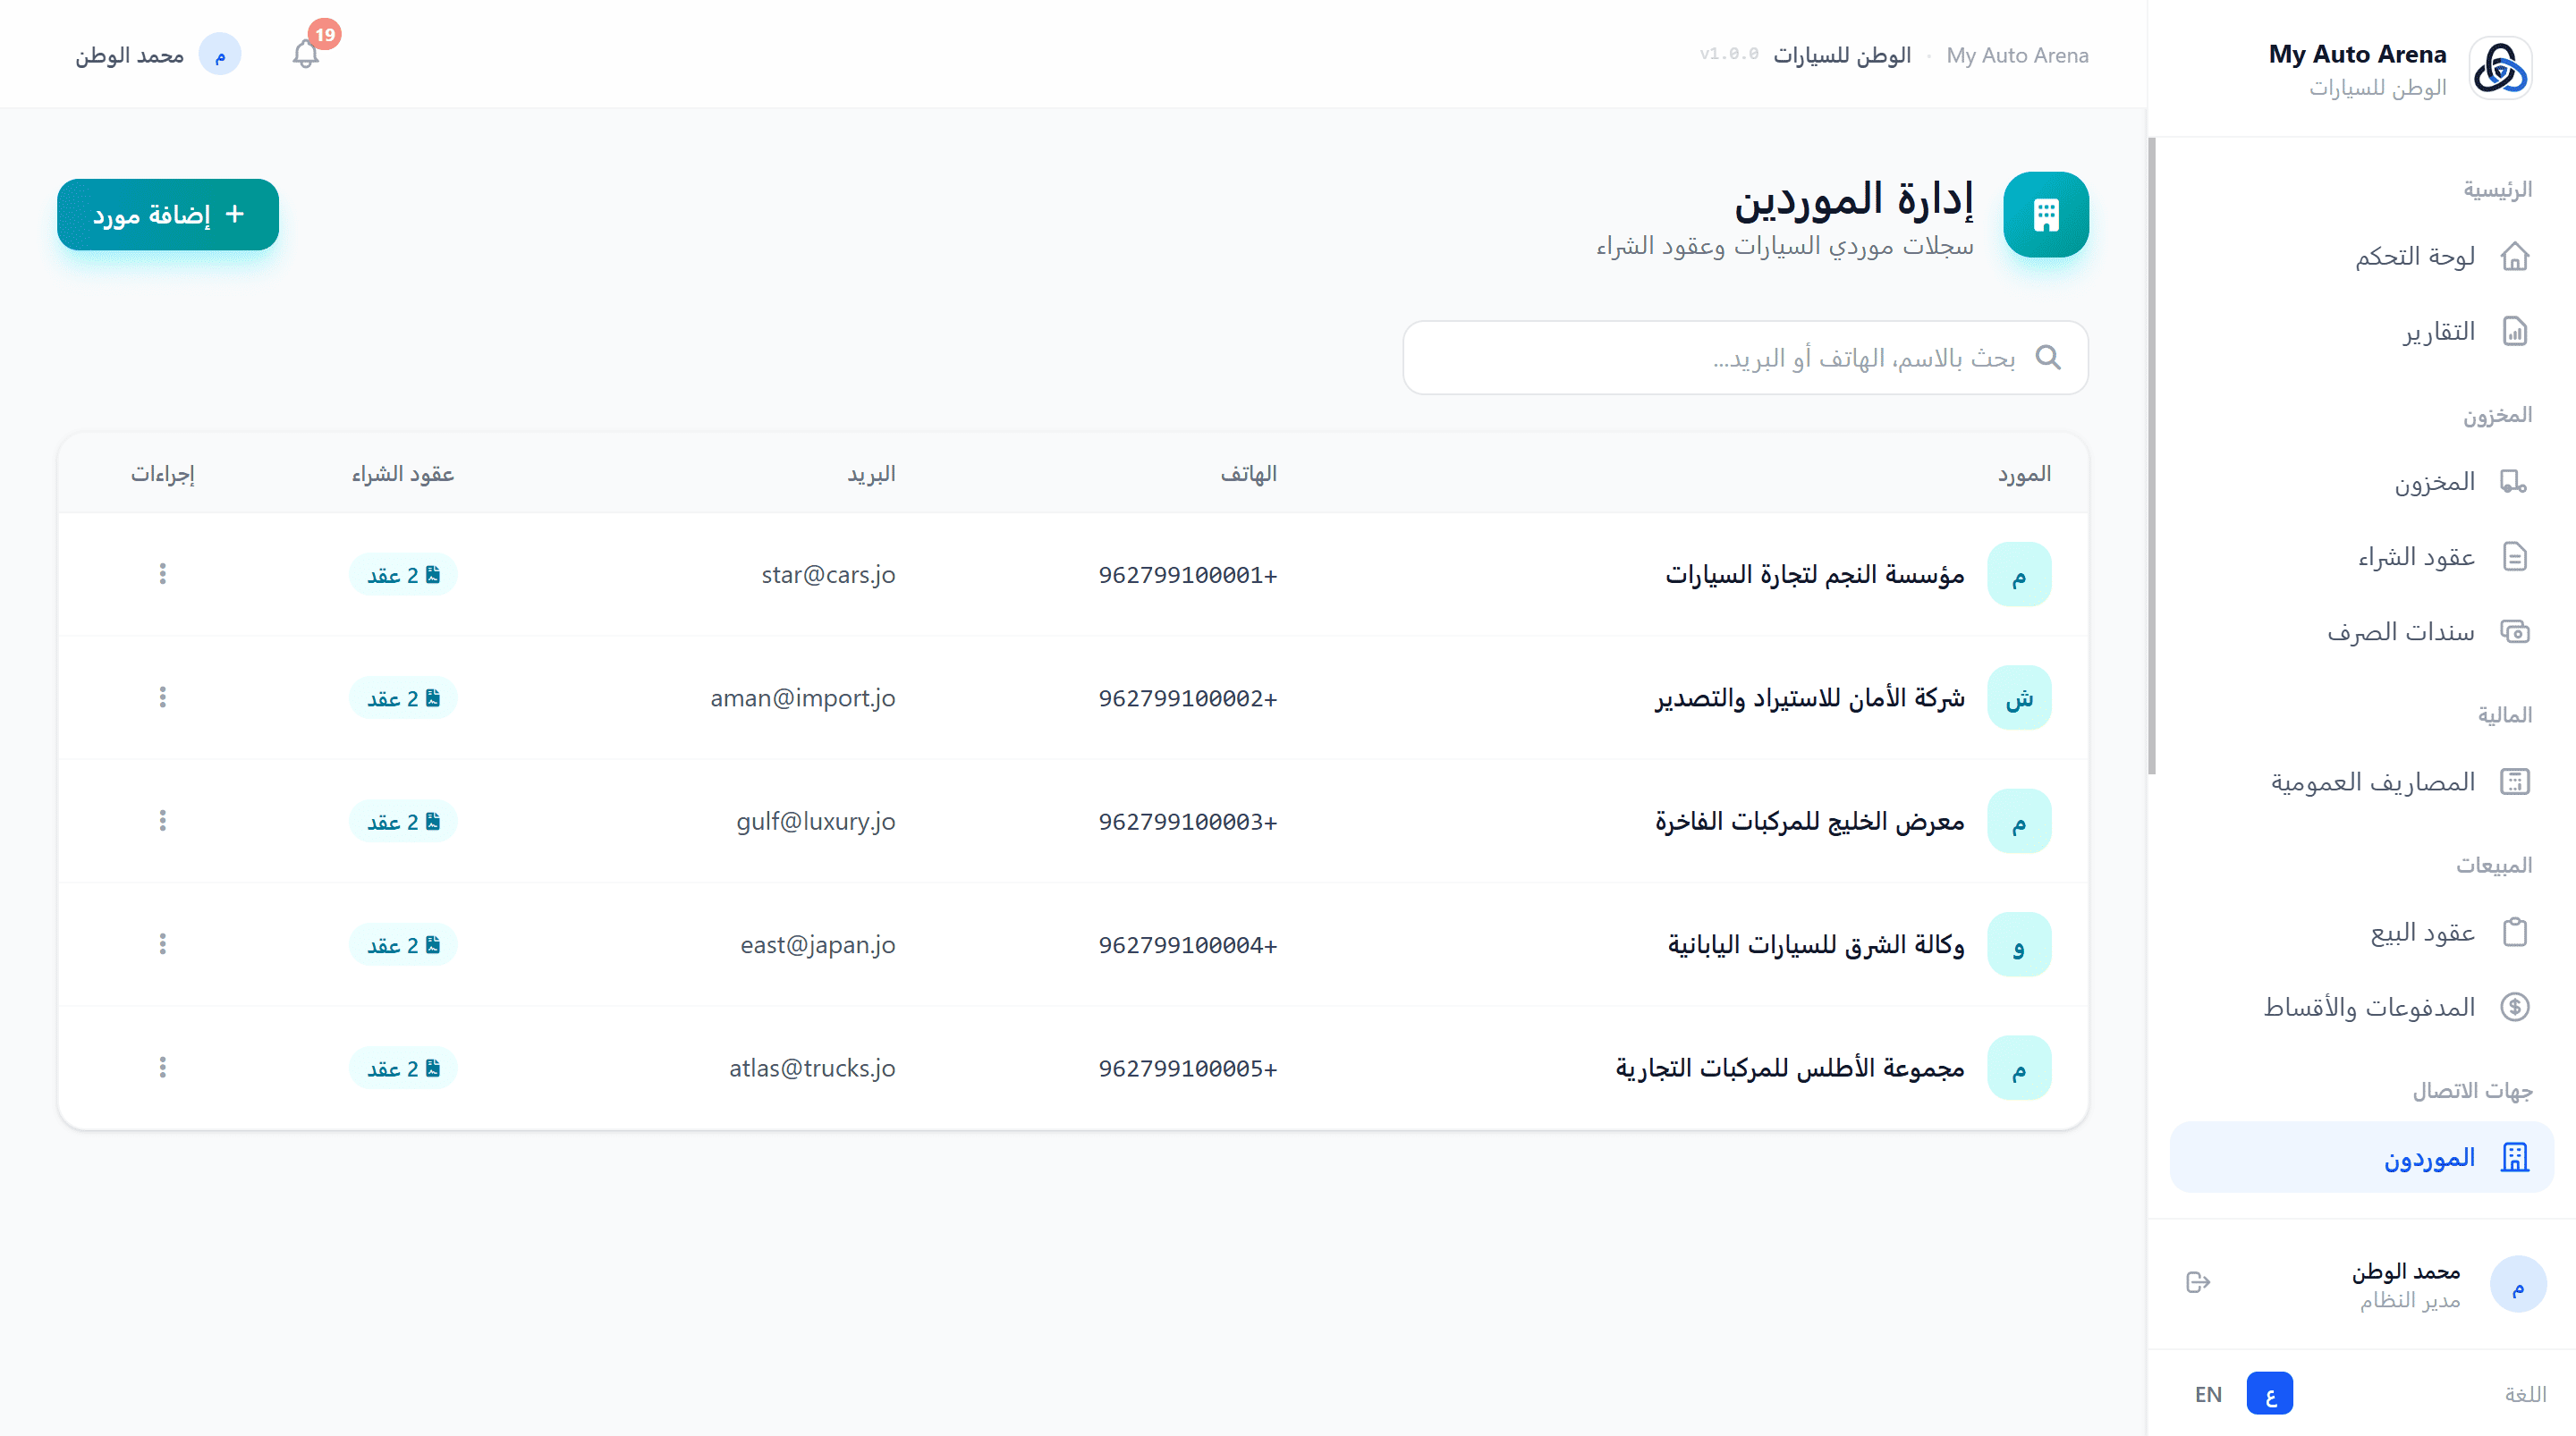
صفحة الموردين مع قائمة الموردين وبيانات التواصل Suppliers page with list and contact details
خطوات العمل Workflow Steps
إضافة مورد جديد
Add New Supplier
انقر 'إضافة مورد'، أدخل الاسم والبيانات الاتصالية، ثم احفظ.
Click 'Add Supplier', enter the name and contact details, then save.
ربط بعقد شراء
Link to Purchase Contract
عند إنشاء عقد شراء، اختر المورد من القائمة. يظهر عدد عقوده مباشرةً في قائمة الموردين.
When creating a purchase contract, select the supplier from the list. Their contract count appears in the suppliers list.
المزايا والخصائص Features & Capabilities
إضافة مورد
Add Supplier
أدخل اسم المورد (إلزامي)، رقم الهاتف، البريد الإلكتروني، رقم الهوية، والعنوان.
Enter supplier name (required), phone, email, national ID, and address.
البحث
Search
ابحث بالاسم، رقم الهاتف، البريد الإلكتروني، أو رقم الهوية.
Search by name, phone, email, or national ID.
عقود الشراء
Purchase Contracts
يُعرض عدد عقود الشراء لكل مورد. لا يمكن حذف مورد له عقود شراء.
The number of purchase contracts per supplier is shown. Suppliers with contracts cannot be deleted.
رقم الهاتف والبريد الإلكتروني ورقم الهوية فريدة لكل معرض ولا يمكن تكرارها لمورديين مختلفين. Phone, email, and national ID must be unique per dealership - they cannot be duplicated across suppliers.
لا يمكن حذف مورد إذا كان لديه عقود شراء مرتبطة به في النظام. A supplier cannot be deleted if they have purchase contracts linked to them.
تتيح وحدة العملاء إدارة قاعدة بيانات عملاء المعرض مع تتبع عقود البيع والأرصدة المستحقة لكل عميل. The customers module enables managing your dealership's customer database while tracking sale contracts and outstanding balances per customer.
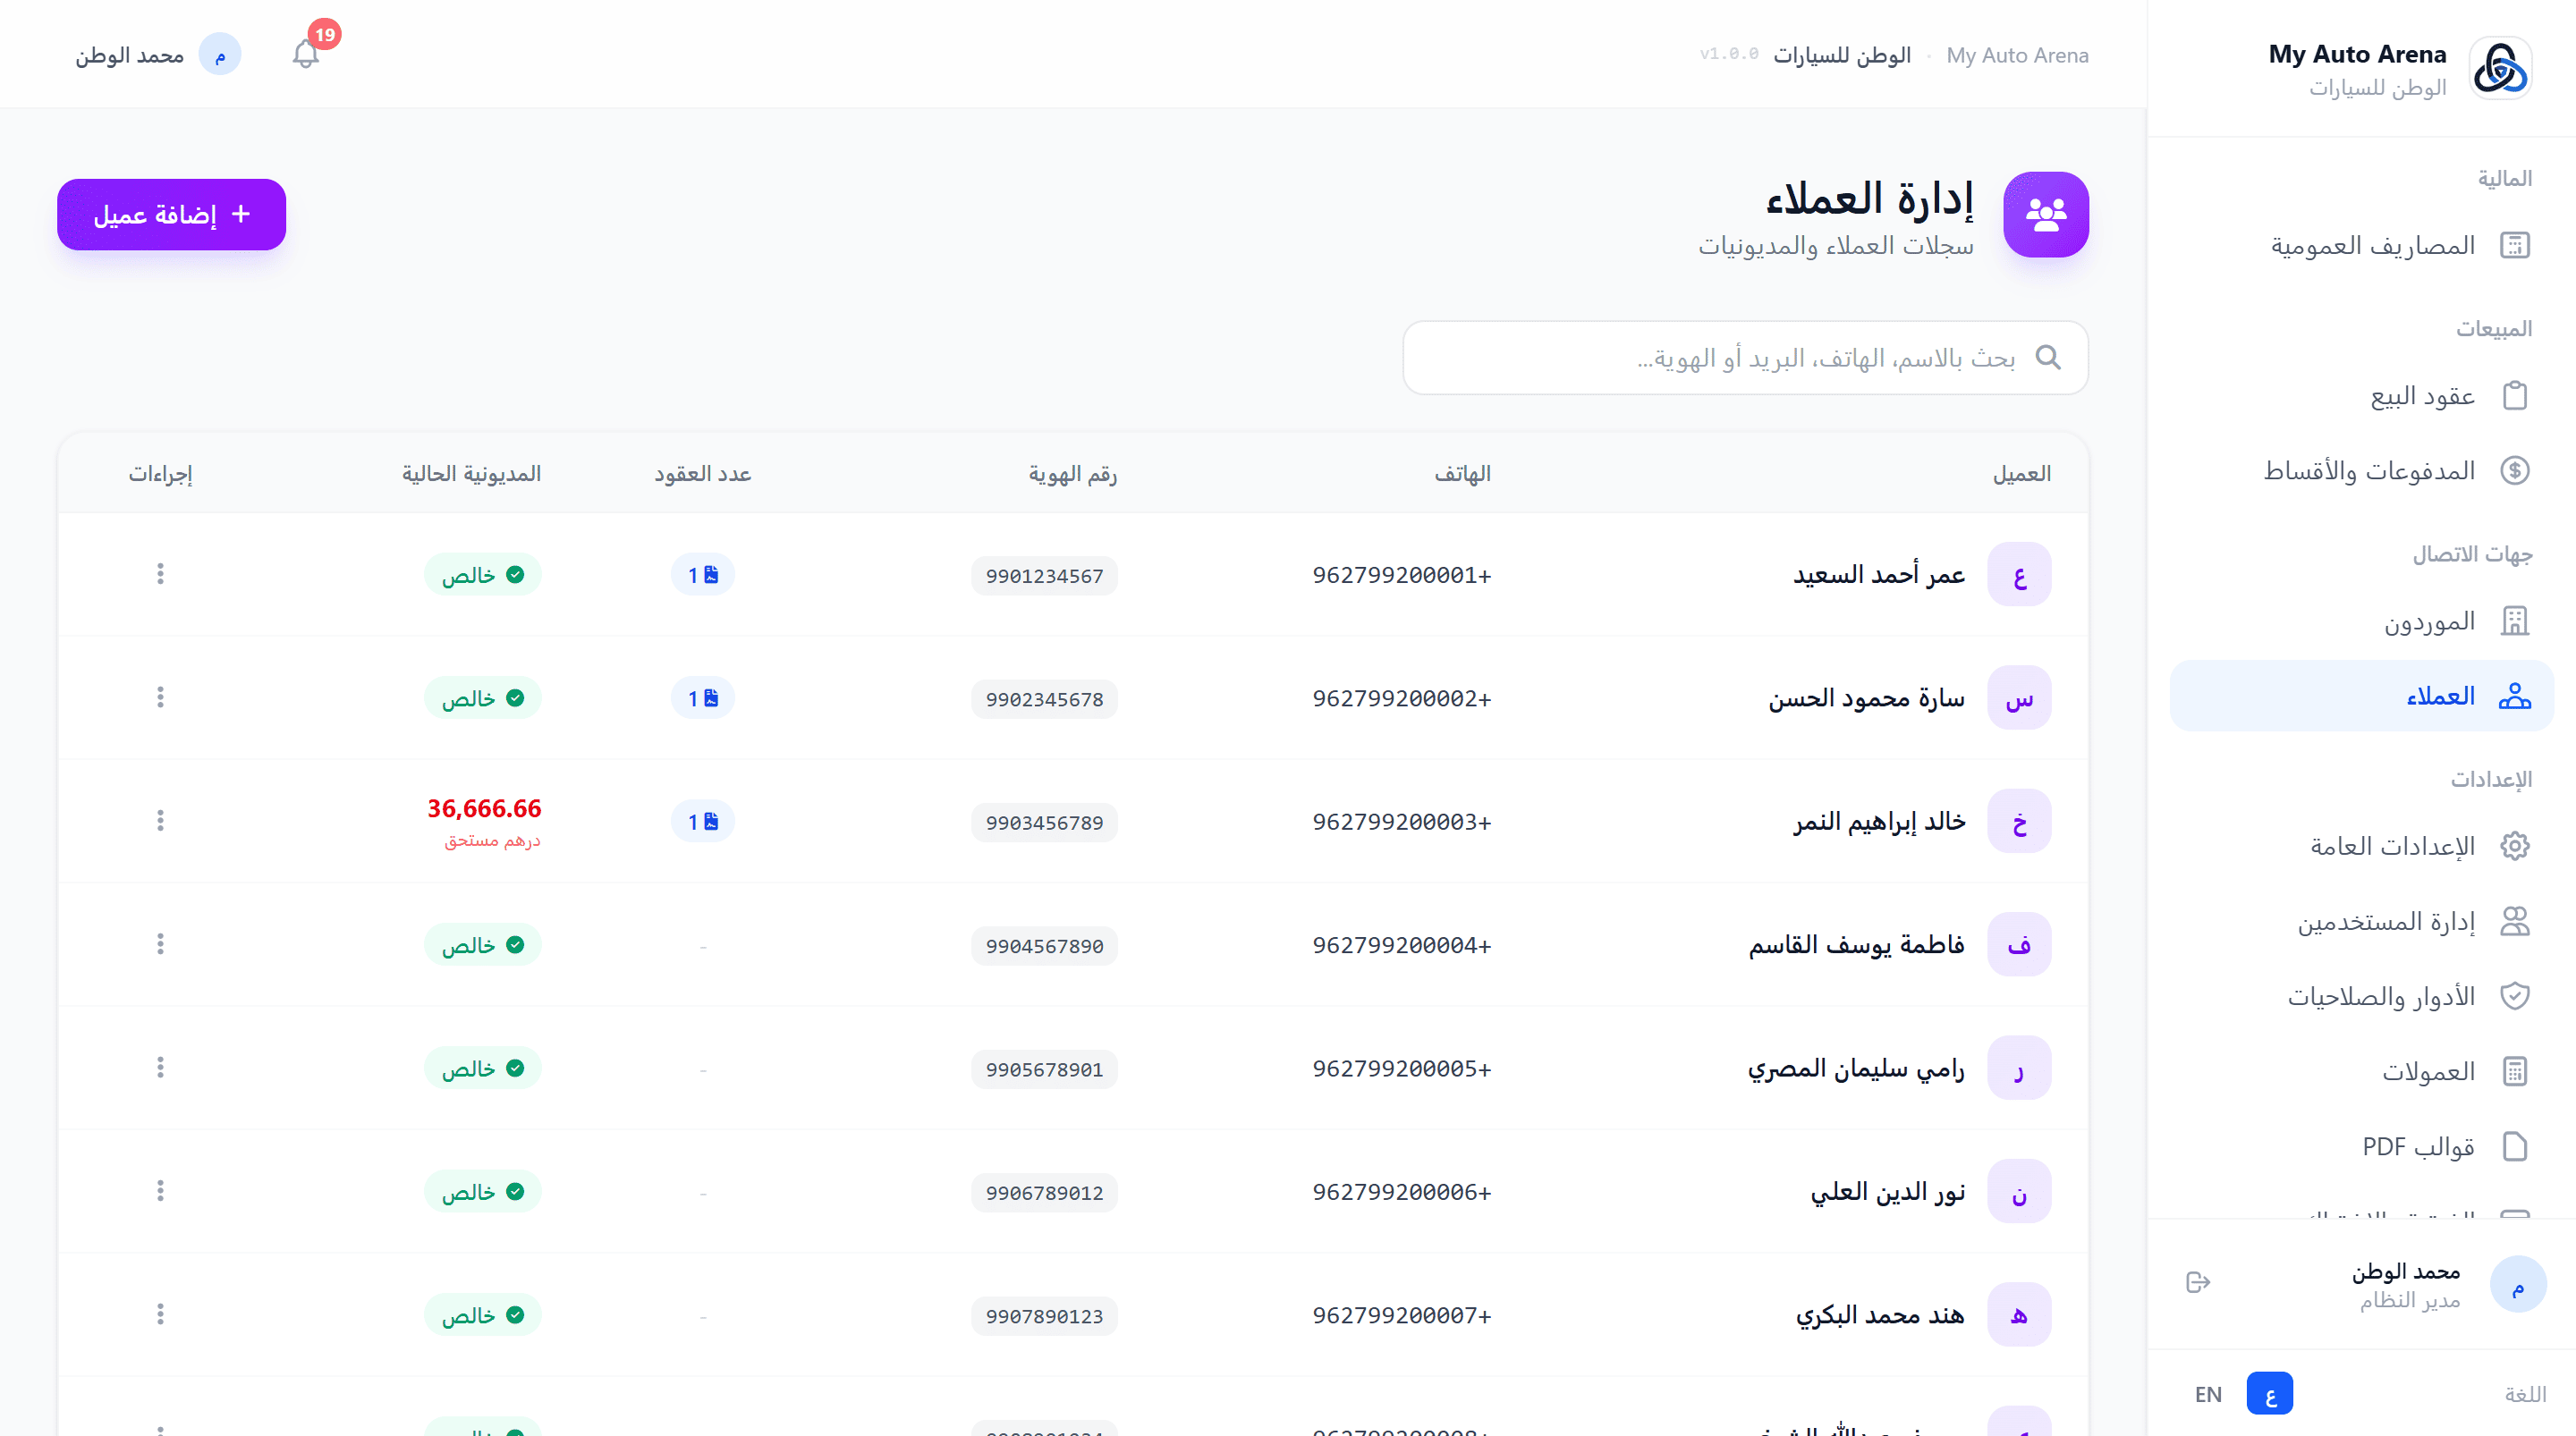
صفحة العملاء مع بيانات الاتصال والأرصدة المستحقة Customers page with contact details and outstanding balances
خطوات العمل Workflow Steps
إضافة عميل جديد
Add New Customer
انقر 'إضافة عميل'، أدخل البيانات المطلوبة، ثم احفظ.
Click 'Add Customer', enter the required details, then save.
ربط بعقد بيع
Link to Sale Contract
عند إنشاء عقد بيع، ابحث عن العميل بالاسم واختره. سيظهر تاريخه الكامل في العقود.
When creating a sale contract, search for the customer by name and select them.
عرض الملف الشامل
View Full Profile
من قائمة العملاء، انقر على اسم العميل لفتح ملفه الشامل الذي يتضمن جميع عقوده وأقساطه ومدفوعاته.
From the customer list, click on a customer's name to open their 360° profile showing all contracts, installments, and payments.
المزايا والخصائص Features & Capabilities
إضافة عميل
Add Customer
أدخل الاسم (إلزامي)، رقم الهاتف، البريد الإلكتروني، رقم الهوية، العنوان، والملاحظات.
Enter name (required), phone, email, national ID, address, and notes.
عقود البيع
Sale Contracts
يُعرض عدد عقود البيع لكل عميل ومجموع الأرصدة المستحقة.
The number of sale contracts and total outstanding balance are shown per customer.
البحث
Search
ابحث بالاسم، رقم الهاتف، البريد الإلكتروني، أو رقم الهوية.
Search by name, phone, email, or national ID.
الملف الشامل للعميل
360° Customer Profile
بطاقة هوية كاملة مع دفتر حسابات مفصّل: جميع عقود البيع، الأقساط، والمدفوعات مرتبة زمنياً على صفحة واحدة.
A full identity card with a detailed ledger: all sale contracts, installments, and payments listed chronologically on one page.
لا يمكن حذف عميل إذا كان لديه رصيد مستحق (عقود بيع نشطة بها رصيد غير مدفوع). A customer cannot be deleted if they have outstanding balances (active sale contracts with unpaid amounts).
يمكن إضافة عملاء مباشرةً أثناء إنشاء عقد البيع دون الحاجة للذهاب لصفحة العملاء أولاً. Customers can be added directly while creating a sale contract without navigating to the customers page first.
الملف الشامل للعميل يعرض إجمالي مشترياته وصافي رصيده المستحق في رأس الصفحة للرجوع السريع. The 360° profile shows the customer's total purchase value and net outstanding balance at the top for quick reference.
تشمل الإعدادات العامة ضبط العملة، تحديد حد تقادم المخزون، توثيق المعرض الرسمي، إدارة الملف العام للمعرض (الشعار، خرائط جوجل، أرقام الهاتف)، وتخصيص قوالب PDF للمستندات. General settings include currency configuration, stagnant inventory threshold, official showroom verification, public profile management (logo, Google Maps, phone numbers), and custom PDF template design.
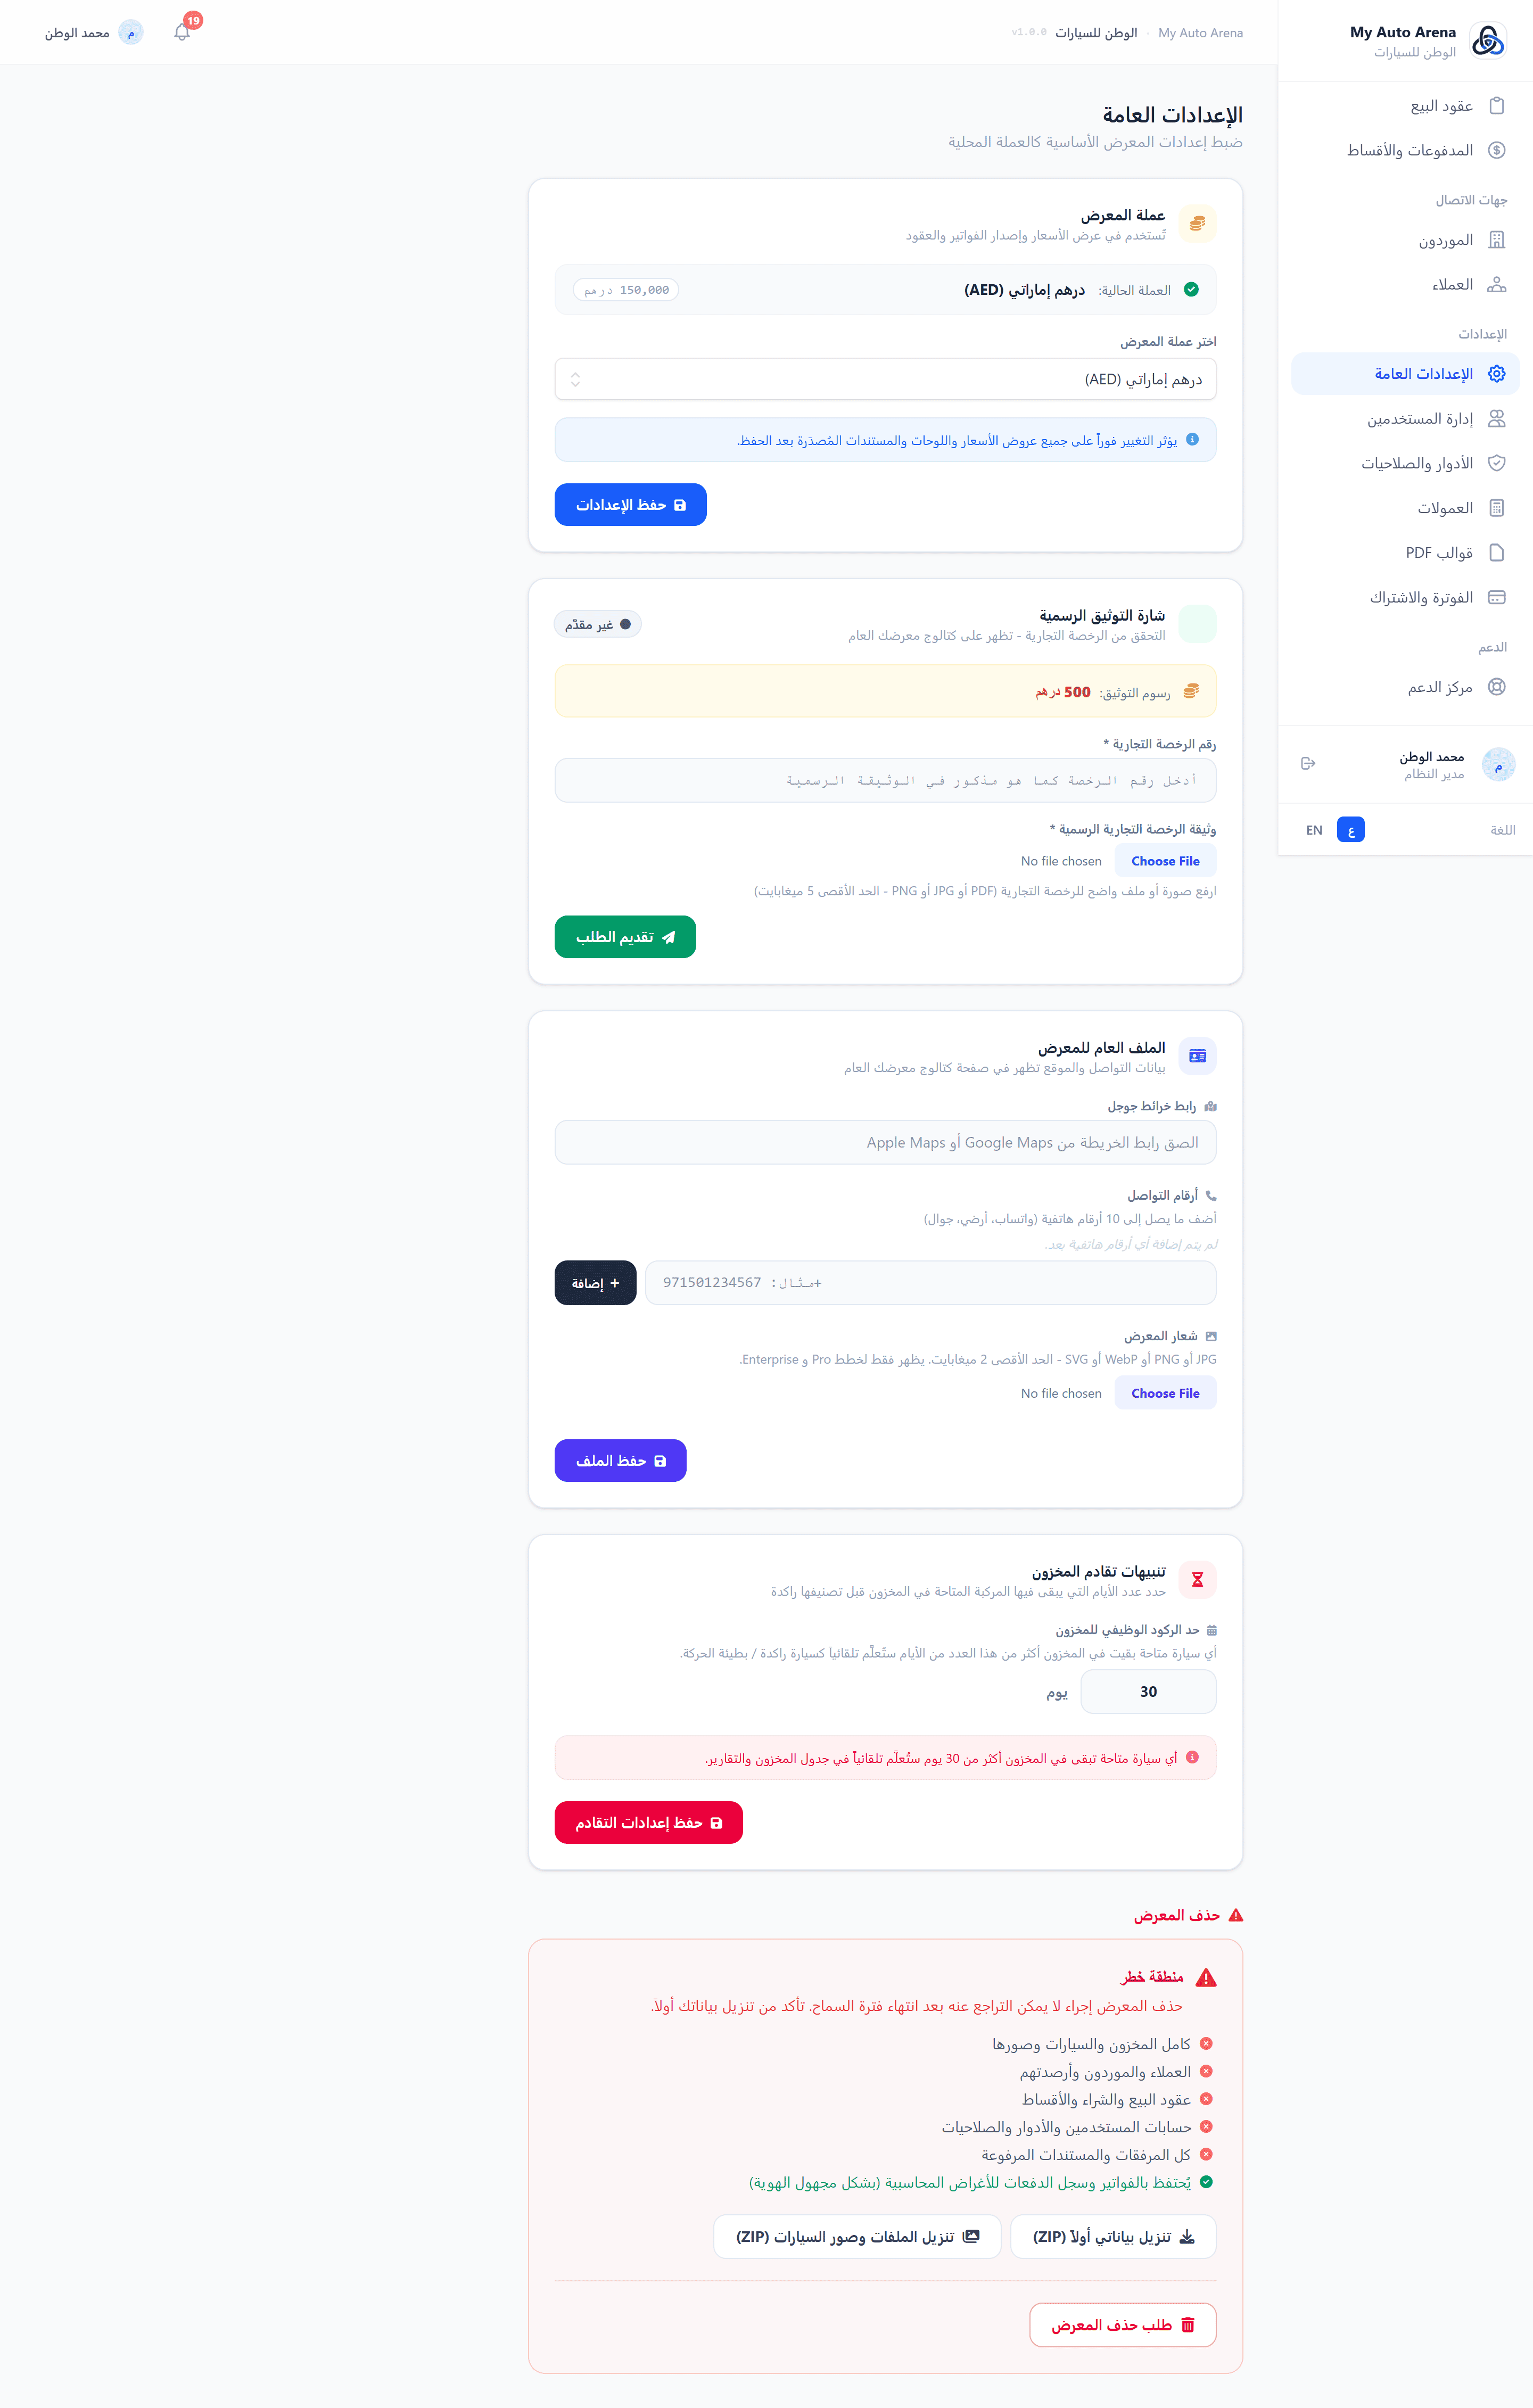
صفحة الإعدادات العامة - قسم التوثيق وإعدادات الملف العام General settings page - Verification section and public profile settings
خطوات العمل Workflow Steps
ضبط العملة
Set Currency
من تبويب 'الإعدادات العامة'، اختر عملتك واحفظ. يتطلب تحديث الصفحة لرؤية التغييرات.
From the 'General Settings' tab, choose your currency and save. Refresh the page to see the changes.
توثيق المعرض
Verify Showroom
انقر 'ابدأ التوثيق'، ارفع رخصة المعرض ثم إيصال رسوم التوثيق، وانتظر مراجعة فريق الدعم.
Click 'Start Verification', upload your trade license then a payment receipt, and wait for the support team's review.
تحديث الملف العام
Update Public Profile
ارفع الشعار وأضف رابط الخرائط وأرقام الهاتف لتظهر في الكتالوج العام.
Upload your logo, add Maps link and phone numbers to appear in the public catalog.
إنشاء فرع
Create a Branch
من تبويب 'الفروع'، انقر 'فرع جديد'، أدخل اسمه، ارفع شعاره، وأضف بريده الإلكتروني. يمكنك بعدها تعيين موظفين للفرع من إدارة المستخدمين.
From the 'Branches' tab, click 'New Branch', enter its name, upload a logo, and add an email. You can then assign staff to the branch from User Management.
المزايا والخصائص Features & Capabilities
العملة الافتراضية
Default Currency
اختر عملة المعرض من قائمة العملات المدعومة. تؤثر على عرض جميع المبالغ في النظام.
Choose your showroom currency from the supported list. Affects all amount displays across the system.
توثيق المعرض
Showroom Verification
رفع رخصة المعرض والإيصال المالي للحصول على شارة 'موثّق'. يمر بمراحل: لا شيء → وثائق معلقة → دفع معلق → قيد المراجعة → موثّق.
Upload your trade license and payment receipt to get a 'Verified' badge. Process: none → pending docs → pending payment → under review → verified.
شعار المعرض
Showroom Logo
ارفع شعاراً احترافياً (JPG, PNG, WebP, SVG) بحد أقصى 2MB. يظهر في الكتالوج العام وصفحات المعرض.
Upload a professional logo (JPG, PNG, WebP, SVG) max 2MB. Appears in the public catalog and showroom pages.
رابط خرائط جوجل
Google Maps Link
أضف رابط موقع معرضك على خرائط جوجل ليظهر للعملاء في الكتالوج العام.
Add your showroom's Google Maps location link to display to customers in the public catalog.
أرقام الهاتف
Phone Numbers
أضف حتى 10 أرقام هاتف للمعرض تظهر للعملاء في الصفحات العامة.
Add up to 10 phone numbers for your showroom displayed to customers on public pages.
إدارة الفروع
Branch Management
أنشئ فروعاً متعددة لمعرضك من تبويب 'الفروع'. لكل فرع اسمه، شعاره، بريده الإلكتروني، وكتالوجه العام المستقل.
Create multiple branches from the 'Branches' tab. Each branch has its own name, logo, email, and independent public catalog.
حد تقادم المخزون
Stagnant Inventory Threshold
حدد عدد الأيام الذي يُعتبر بعده المركبة راكدة (مثال: 90 يوماً). بعد تجاوز هذا الحد تظهر شارة تحذيرية على السيارة في قائمة المخزون وتُدرج في تقرير تقادم المخزون.
Set the number of days after which a vehicle is considered stagnant (e.g. 90 days). Once exceeded, a warning badge appears on the vehicle in the inventory list and it is included in the Inventory Aging Report.
قوالب PDF المخصصة
Custom PDF Templates
أنشئ قوالب PDF بشعارك وألوانك وخط تذييل مخصص. تعيّن لكل نوع مستند قالباً مستقلاً (Pro فأعلى). راجع قسم 'قوالب PDF' للتفاصيل.
Design branded PDF templates with your logo, colors, and custom footer. Assign different templates per document type on Pro and above. See the 'PDF Templates' section for full details.
التوثيق الرسمي يمنح معرضك شارة 'موثّق' في الكتالوج العام ويزيد من ثقة العملاء. Official verification gives your showroom a 'Verified' badge in the public catalog and increases customer trust.
رسوم التوثيق تُحدَّد من قِبَل إدارة المنصة وتظهر في صفحة التوثيق. Verification fees are set by platform management and shown on the verification page.
الاشتراك والفوترة يبقيان على مستوى المعرض الرئيسي - إنشاء الفروع لا يُنشئ اشتراكات منفصلة. Subscription and billing remain at the main showroom level - creating branches does not create separate subscriptions.
يتيح المسؤول إضافة أعضاء فريق المعرض وتعيين أدوار مختلفة لكل منهم، مع التحكم الكامل في تفعيل وتعطيل الحسابات. Administrators can add showroom team members and assign different roles to each, with full control over enabling and disabling accounts.
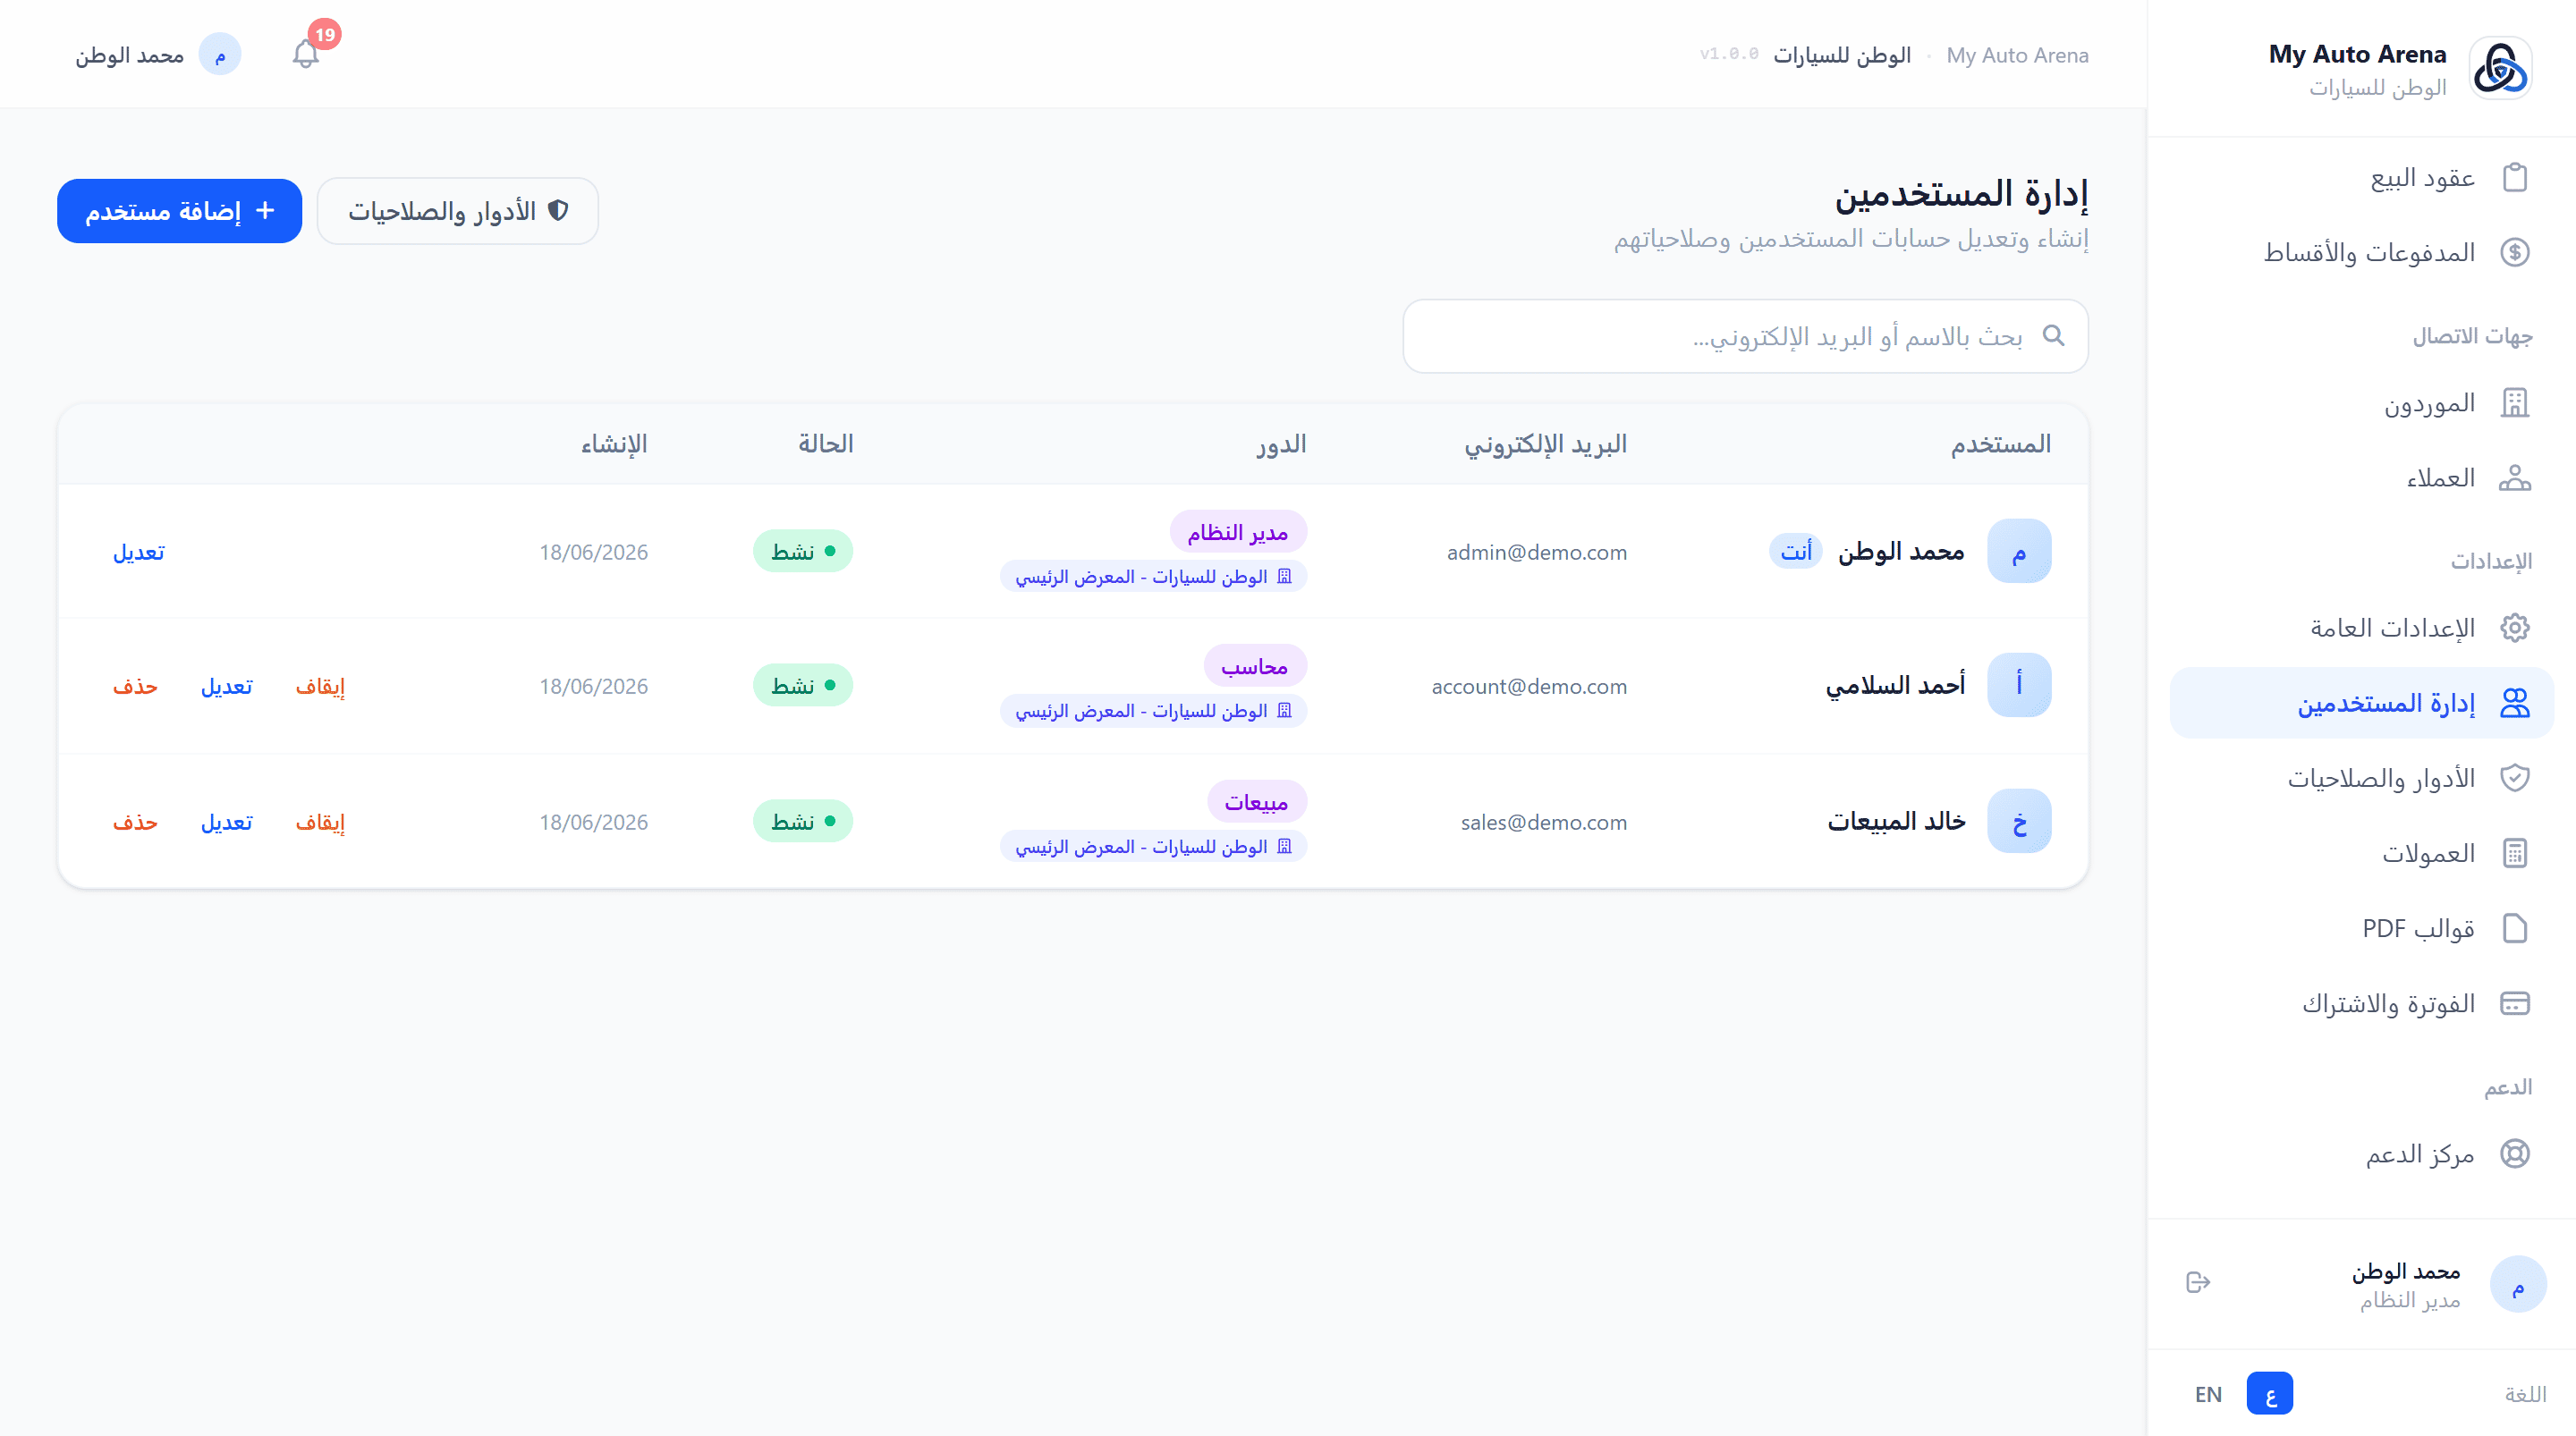
صفحة إدارة المستخدمين مع قائمة الفريق والأدوار User management page with team list and roles
خطوات العمل Workflow Steps
إضافة مستخدم جديد
Add New User
انقر 'إضافة مستخدم'، أدخل بياناته وعيّن دوره، ثم احفظ.
Click 'Add User', enter their details and assign a role, then save.
تعيين دور
Assign Role
اختر الدور المناسب (مثال: موظف مبيعات، محاسب) من قائمة الأدوار المتاحة.
Choose the appropriate role (e.g. Sales Staff, Accountant) from the available roles list.
إدارة الوصول
Manage Access
فعّل أو عطّل الحساب حسب الحاجة. المستخدم المعطّل لا يستطيع تسجيل الدخول.
Enable or disable accounts as needed. A disabled user cannot log in.
المزايا والخصائص Features & Capabilities
إضافة مستخدم
Add User
أدخل الاسم، البريد الإلكتروني، وكلمة مرور. عيّن دوراً من الأدوار المتاحة.
Enter name, email, and password. Assign a role from available roles.
تفعيل/تعطيل
Enable/Disable
يمكن تعطيل حساب مستخدم مؤقتاً دون حذفه. لا يمكن تعطيل حسابك الخاص.
A user account can be temporarily disabled without deletion. You cannot disable your own account.
البريد الإلكتروني ثابت
Immutable Email
لا يمكن تغيير البريد الإلكتروني للمستخدمين من داخل النظام. يمكن فقط لـ SuperAdmin تعديله.
User emails cannot be changed from within the system. Only SuperAdmin can modify them.
البحث
Search
ابحث في قائمة المستخدمين بالاسم أو البريد الإلكتروني.
Search the user list by name or email.
لا يمكن حذف حسابك الشخصي أو تعطيله. هذا الإجراء محمي لمنع قفل النظام. You cannot delete or disable your own account. This is protected to prevent system lockout.
يجب أن يكون البريد الإلكتروني لكل مستخدم فريداً داخل المعرض. لا يمكن تكراره. Each user's email must be unique within the dealership - it cannot be duplicated.
تتيح وحدة الأدوار والصلاحيات تخصيص صلاحيات وصول دقيقة لكل دور في المعرض. يشمل النظام أدواراً افتراضية وأدواراً مخصصة قابلة للإنشاء. The roles and permissions module allows customizing precise access rights for each role in the dealership. The system includes default roles and custom creatable roles.
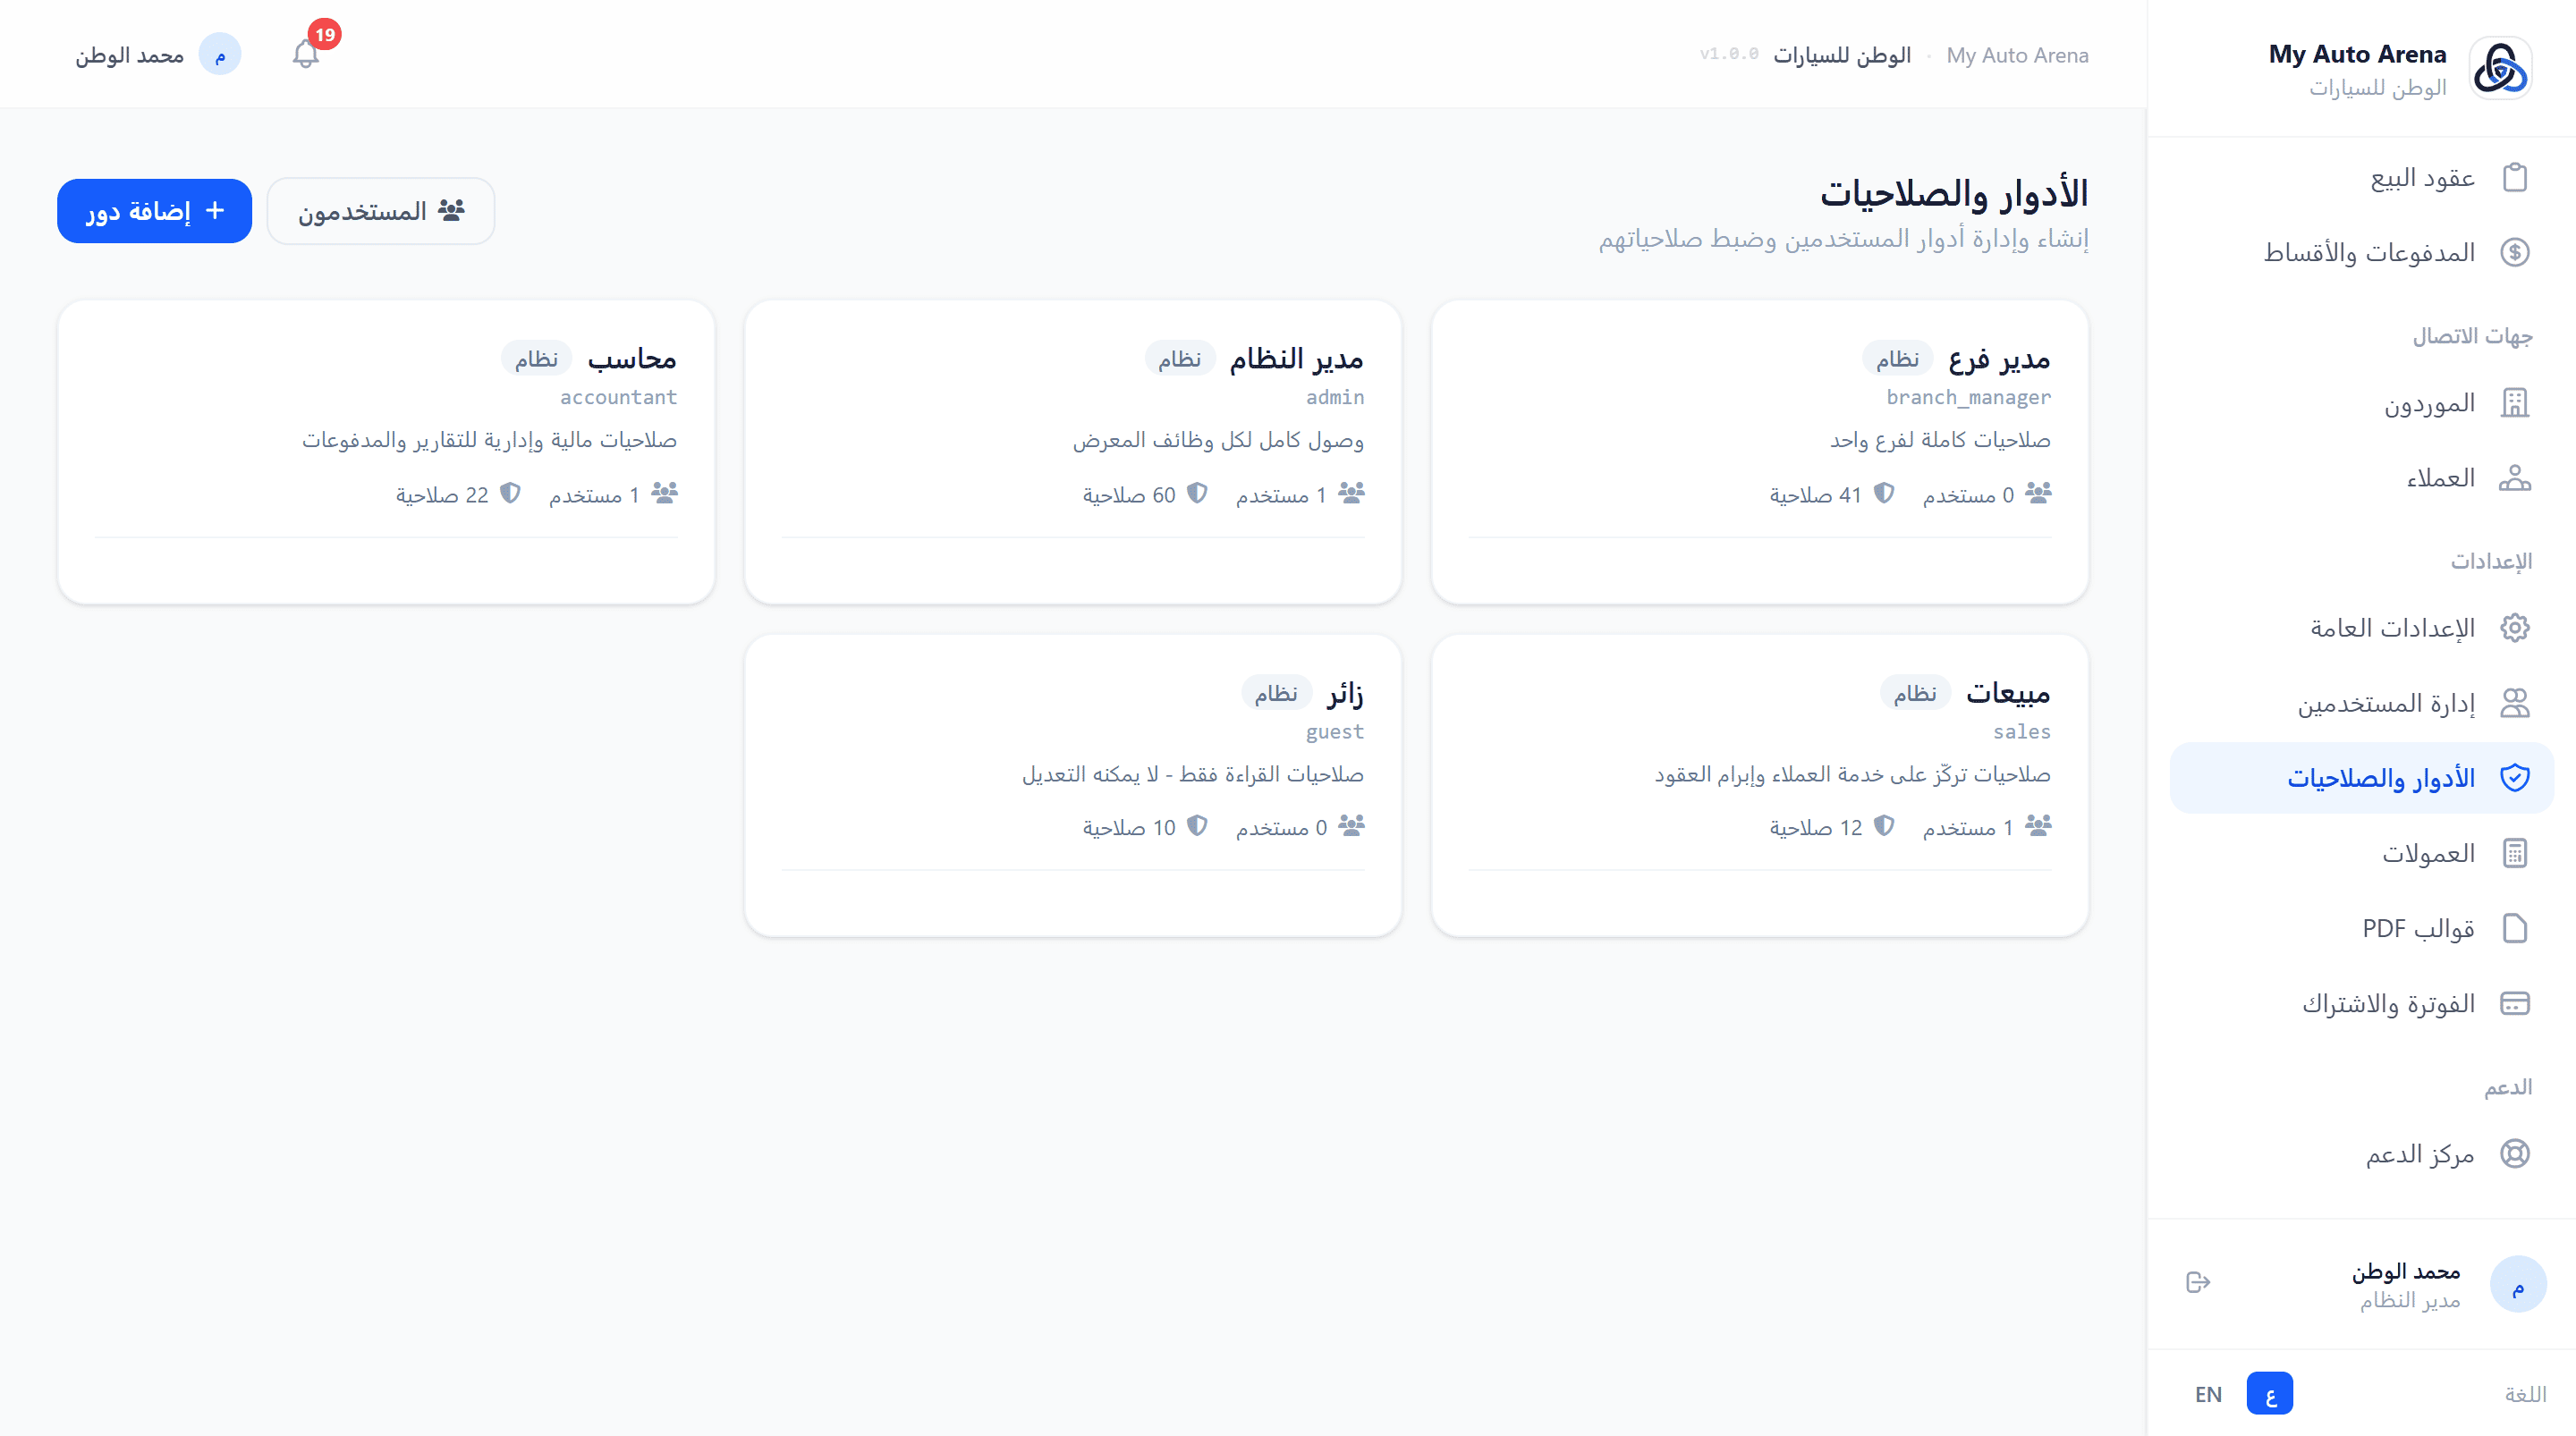
صفحة الأدوار والصلاحيات - مصفوفة الصلاحيات التفاعلية Roles & permissions page - interactive permissions matrix
خطوات العمل Workflow Steps
إنشاء دور
Create Role
انقر 'إنشاء دور'، أدخل اسم الدور، وفعّل الصلاحيات المطلوبة من المصفوفة.
Click 'Create Role', enter the role name, and enable required permissions from the matrix.
تعيين للمستخدمين
Assign to Users
من صفحة إدارة المستخدمين، عيّن الدور الجديد للمستخدمين المناسبين.
From the User Management page, assign the new role to appropriate users.
المزايا والخصائص Features & Capabilities
إنشاء دور مخصص
Create Custom Role
أنشئ أدواراً بأسماء مخصصة (مثال: موظف مبيعات، محاسب، مدير فرع) وحدد صلاحياتها.
Create roles with custom names (e.g. Sales Staff, Accountant, Branch Manager) and define their permissions.
مصفوفة الصلاحيات
Permissions Matrix
صفوف: الوحدات (لوحة التحكم، المخزون، العملاء...). أعمدة: الإجراءات (عرض، إضافة، تعديل، حذف).
Rows: modules (dashboard, inventory, customers...). Columns: actions (view, create, update, delete).
تحديد الكل
Select All
اختر أو ألغِ اختيار جميع صلاحيات وحدة بضغطة واحدة.
Select or deselect all permissions for a module with a single click.
الأدوار الافتراضية للنظام (مسؤول، موظف) محمية ولا يمكن حذفها. يمكن فقط تعديل الأدوار المخصصة. Default system roles (Admin, Employee) are protected and cannot be deleted. Only custom roles can be deleted.
لا يمكن حذف دور مُعيَّن لمستخدمين نشطين. أعد تعيين المستخدمين أولاً. A role assigned to active users cannot be deleted. Reassign those users first.
تتيح وحدة الفوترة إدارة اشتراكك في المنصة، مراجعة الفواتير، طلب التجديد، وتقديم طلبات ميزات مخصصة لفريق الدعم. The billing module allows you to manage your platform subscription, review invoices, request renewal, and submit custom feature requests to the support team.
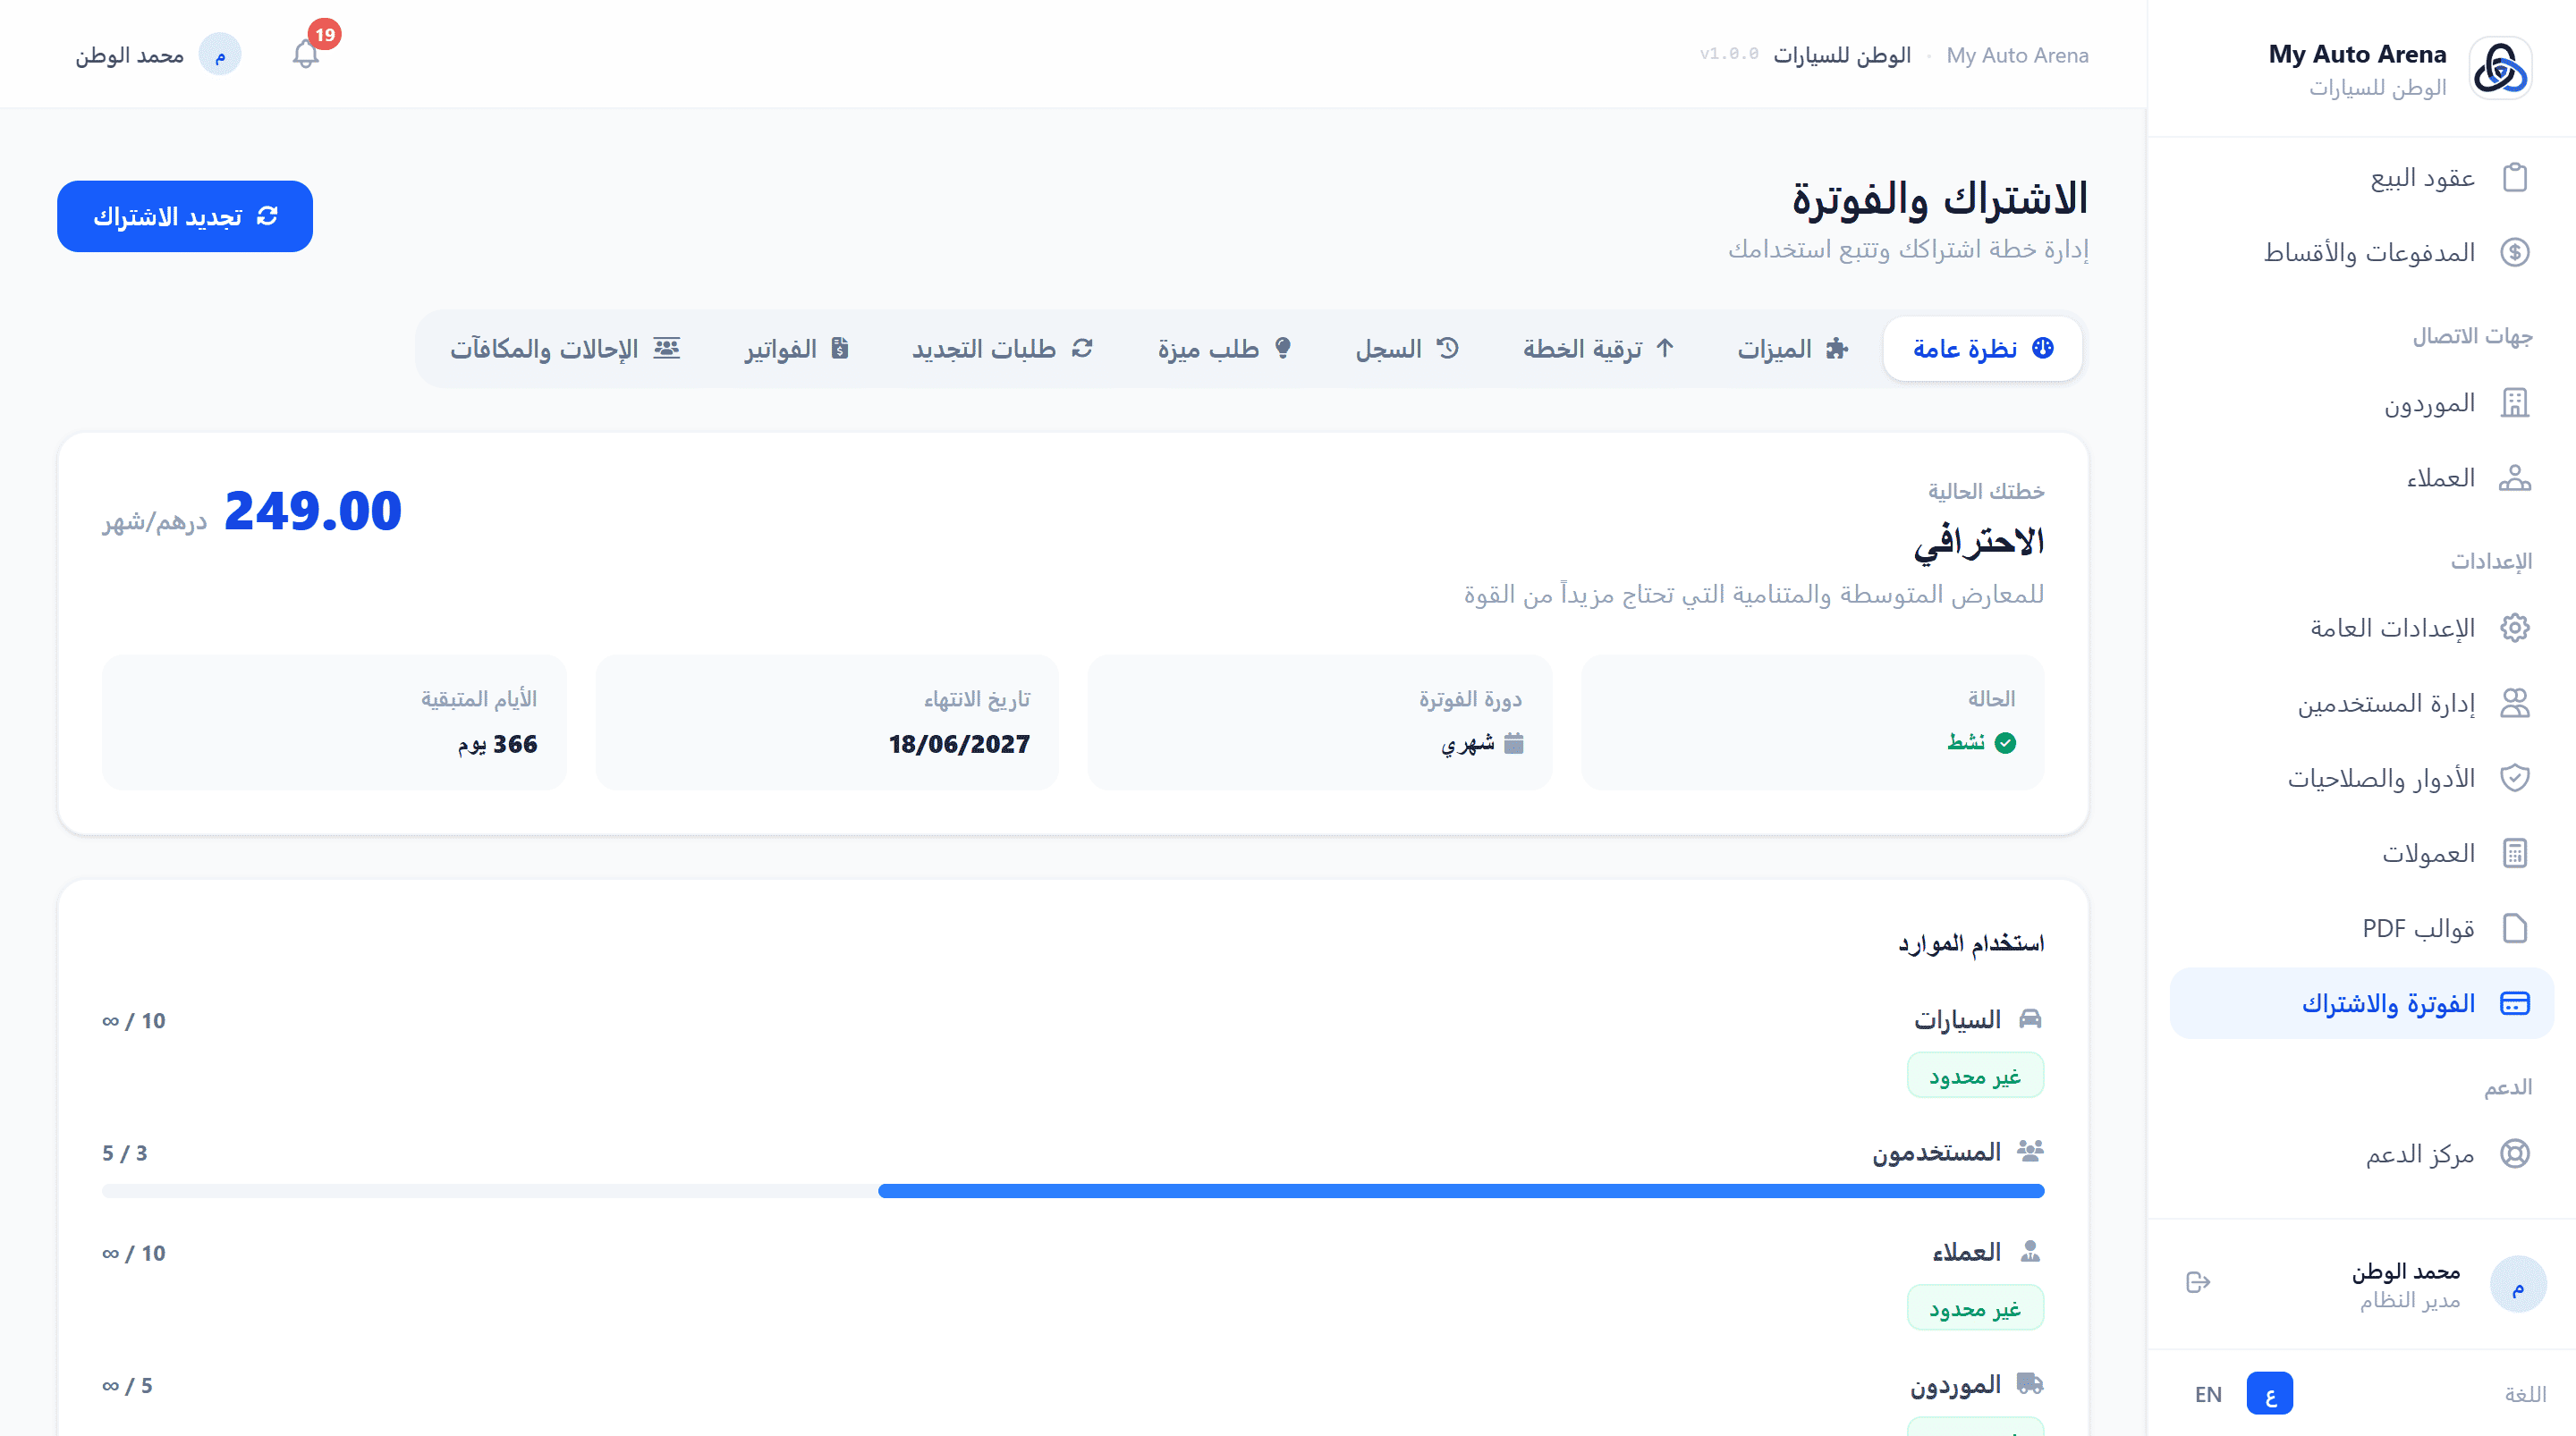
صفحة الفوترة - نظرة عامة على الاشتراك مع نسب الاستخدام Billing page - subscription overview with usage ratios
خطوات العمل Workflow Steps
مراجعة حالة الاشتراك
Review Subscription Status
من 'الفوترة → نظرة عامة'، تحقق من تاريخ انتهاء اشتراكك وحالته.
From 'Billing → Overview', check your subscription expiry date and status.
تجديد الاشتراك
Renew Subscription
انقر 'طلب التجديد'، اختر مدة التجديد، وارفع إيصال الدفع. يحصل حسابك على فترة سماح 3 أيام.
Click 'Request Renewal', choose a duration, and upload a payment receipt. Your account gets a 3-day grace period.
الدفع عبر زينة
Pay via Ziina
من إيميل التذكير، انقر 'ادفع الآن عبر زينة'. أكمل الدفع على صفحة زينة الآمنة - سيُجدَّد اشتراكك تلقائياً فور التأكيد.
From the reminder email, click 'Pay Now via Ziina'. Complete payment on Ziina's secure page - your subscription renews automatically upon confirmation.
طلب ميزة مخصصة
Request Custom Feature
من تبويب 'طلب'، اكتب عنوان ووصف الميزة المطلوبة وأرسلها لفريق التطوير.
From the 'Request' tab, write a title and description for the desired feature and send it to the development team.
المزايا والخصائص Features & Capabilities
نظرة عامة
Overview
اعرض خطتك الحالية، حالة الاشتراك، تاريخ الانتهاء، ونسب الاستخدام (سيارات، مستخدمون...).
View your current plan, subscription status, expiry date, and usage ratios (cars, users, etc.).
الميزات
Features
قائمة كاملة بالميزات المدرجة في خطتك الحالية مع حالة كل ميزة.
Complete list of features included in your current plan with each feature's status.
سجل الاشتراكات
Subscription History
سجل كامل بتغييرات خطتك والفترات السابقة.
Full log of your plan changes and previous subscription periods.
الترقية
Upgrade
اعرض الخطط المتاحة وقارن الميزات. تواصل مع الدعم لترقية خطتك.
Browse available plans and compare features. Contact support to upgrade your plan.
طلب التجديد
Renewal Request
ارفع إيصال الدفع لتجديد اشتراكك (1-12 شهراً مع خصومات للدفع المسبق).
Upload a payment receipt to renew your subscription (1-12 months with early payment discounts).
الفواتير
Invoices
اعرض آخر 10 فواتير لاشتراكاتك السابقة.
View your last 10 subscription invoices.
الإحالات والمكافآت
Referrals & Rewards
شارك رابط الإحالة الخاص بمعرضك - عند أول دفعة يسددها المعرض المُحال، يحصل كلاكما على شهر مجاني إضافي مضاف للاشتراك تلقائياً.
Share your showroom's referral link - when the referred showroom makes their first payment, both of you automatically earn a free extra month added to your subscriptions.
الدفع الفوري عبر زينة
Instant Payment via Ziina
عند اقتراب موعد انتهاء الاشتراك أو انتهائه، يصلك إيميل تذكير يتضمن رابط دفع فوري عبر بوابة زينة. انقر الرابط وأكمل الدفع مباشرةً - يُفعَّل اشتراكك تلقائياً فور استلام التأكيد دون أي تدخل يدوي.
When your subscription is nearing expiry or has expired, you receive a reminder email with an instant Ziina payment link. Click the link, complete payment on Ziina's secure page - your subscription renews automatically upon confirmation with no manual intervention needed.
عند انتهاء الاشتراك تدخل في فترة سماح قصيرة ثم يُعلَّق الحساب. جدّد قبل انتهاء صلاحيته. When the subscription expires, you enter a short grace period then the account is suspended. Renew before expiry.
الدفع لـ 6 أشهر يمنحك خصم 10%، والدفع لـ 12 شهراً يمنحك خصم 20%. Paying for 6 months gives 10% discount; paying for 12 months gives 20% discount.
رابط الدفع عبر زينة مخصص لمعرضك فقط وصالح لفترة محدودة. لا تشاركه مع أي شخص. The Ziina payment link is exclusive to your showroom and valid for a limited time. Do not share it with anyone.
يتيح الملف الشخصي تعديل بياناتك الأساسية كالاسم، وتغيير كلمة المرور، وإدارة التحقق الثنائي لتعزيز أمان حسابك. The profile page allows editing basic information such as your name, changing your password, and managing Two-Factor Authentication to enhance account security.
صورة توضيحية Screenshot Placeholder
صفحة الملف الشخصي مع إعدادات الأمان والتحقق الثنائي Profile page with security settings and Two-Factor Authentication
صفحة الملف الشخصي مع إعدادات الأمان والتحقق الثنائي Profile page with security settings and Two-Factor Authentication
خطوات العمل Workflow Steps
تعديل الاسم
Edit Name
من الملف الشخصي، عدّل اسمك الكامل وانقر 'حفظ'.
From Profile, edit your full name and click Save.
تغيير كلمة المرور
Change Password
من تبويب 'كلمة المرور'، أدخل كلمتك الحالية والجديدة وأكّدها، ثم احفظ.
From the Password tab, enter your current and new password, confirm, and save.
تفعيل 2FA
Enable 2FA
من تبويب 'التحقق الثنائي'، امسح رمز QR بتطبيق المصادقة، أدخل الرمز لتأكيد التفعيل.
From the Two-Factor tab, scan the QR code with an authenticator app, enter the code to confirm activation.
المزايا والخصائص Features & Capabilities
تعديل الاسم
Edit Name
يمكن لجميع المستخدمين تعديل أسمائهم الكاملة في أي وقت.
All users can edit their full name at any time.
البريد الإلكتروني
Email Address
البريد الإلكتروني للمستخدمين في المعرض محمي ولا يمكن تغييره من الملف الشخصي. تواصل مع الدعم لتغييره.
Email addresses for showroom users are protected and cannot be changed from the profile. Contact support to change it.
تغيير كلمة المرور
Change Password
أدخل كلمة المرور الحالية ثم كلمة المرور الجديدة (8 أحرف على الأقل).
Enter your current password then your new password (minimum 8 characters).
التحقق الثنائي (2FA)
Two-Factor Auth (2FA)
فعّل التحقق الثنائي باستخدام تطبيق المصادقة (مثل Google Authenticator) لحماية إضافية.
Enable 2FA using an authenticator app (like Google Authenticator) for extra protection.
ننصح بشدة بتفعيل التحقق الثنائي لحماية حسابك من الاختراق غير المصرح به. We strongly recommend enabling 2FA to protect your account from unauthorized access.
احتفظ بأكواد الاسترداد التي تظهر عند تفعيل 2FA في مكان آمن لاستخدامها في حالة فقدان هاتفك. Save the recovery codes shown when enabling 2FA in a safe place to use them if you lose your phone.
يوفر النظام نظام تذاكر دعم فني متكامل لتقديم طلبات المساعدة، الإبلاغ عن الأخطاء، وتقديم المقترحات. يعمل الفريق على الرد خلال وقت قصير. The system provides a comprehensive support ticket system for submitting help requests, reporting bugs, and making suggestions. Our team aims to respond quickly.
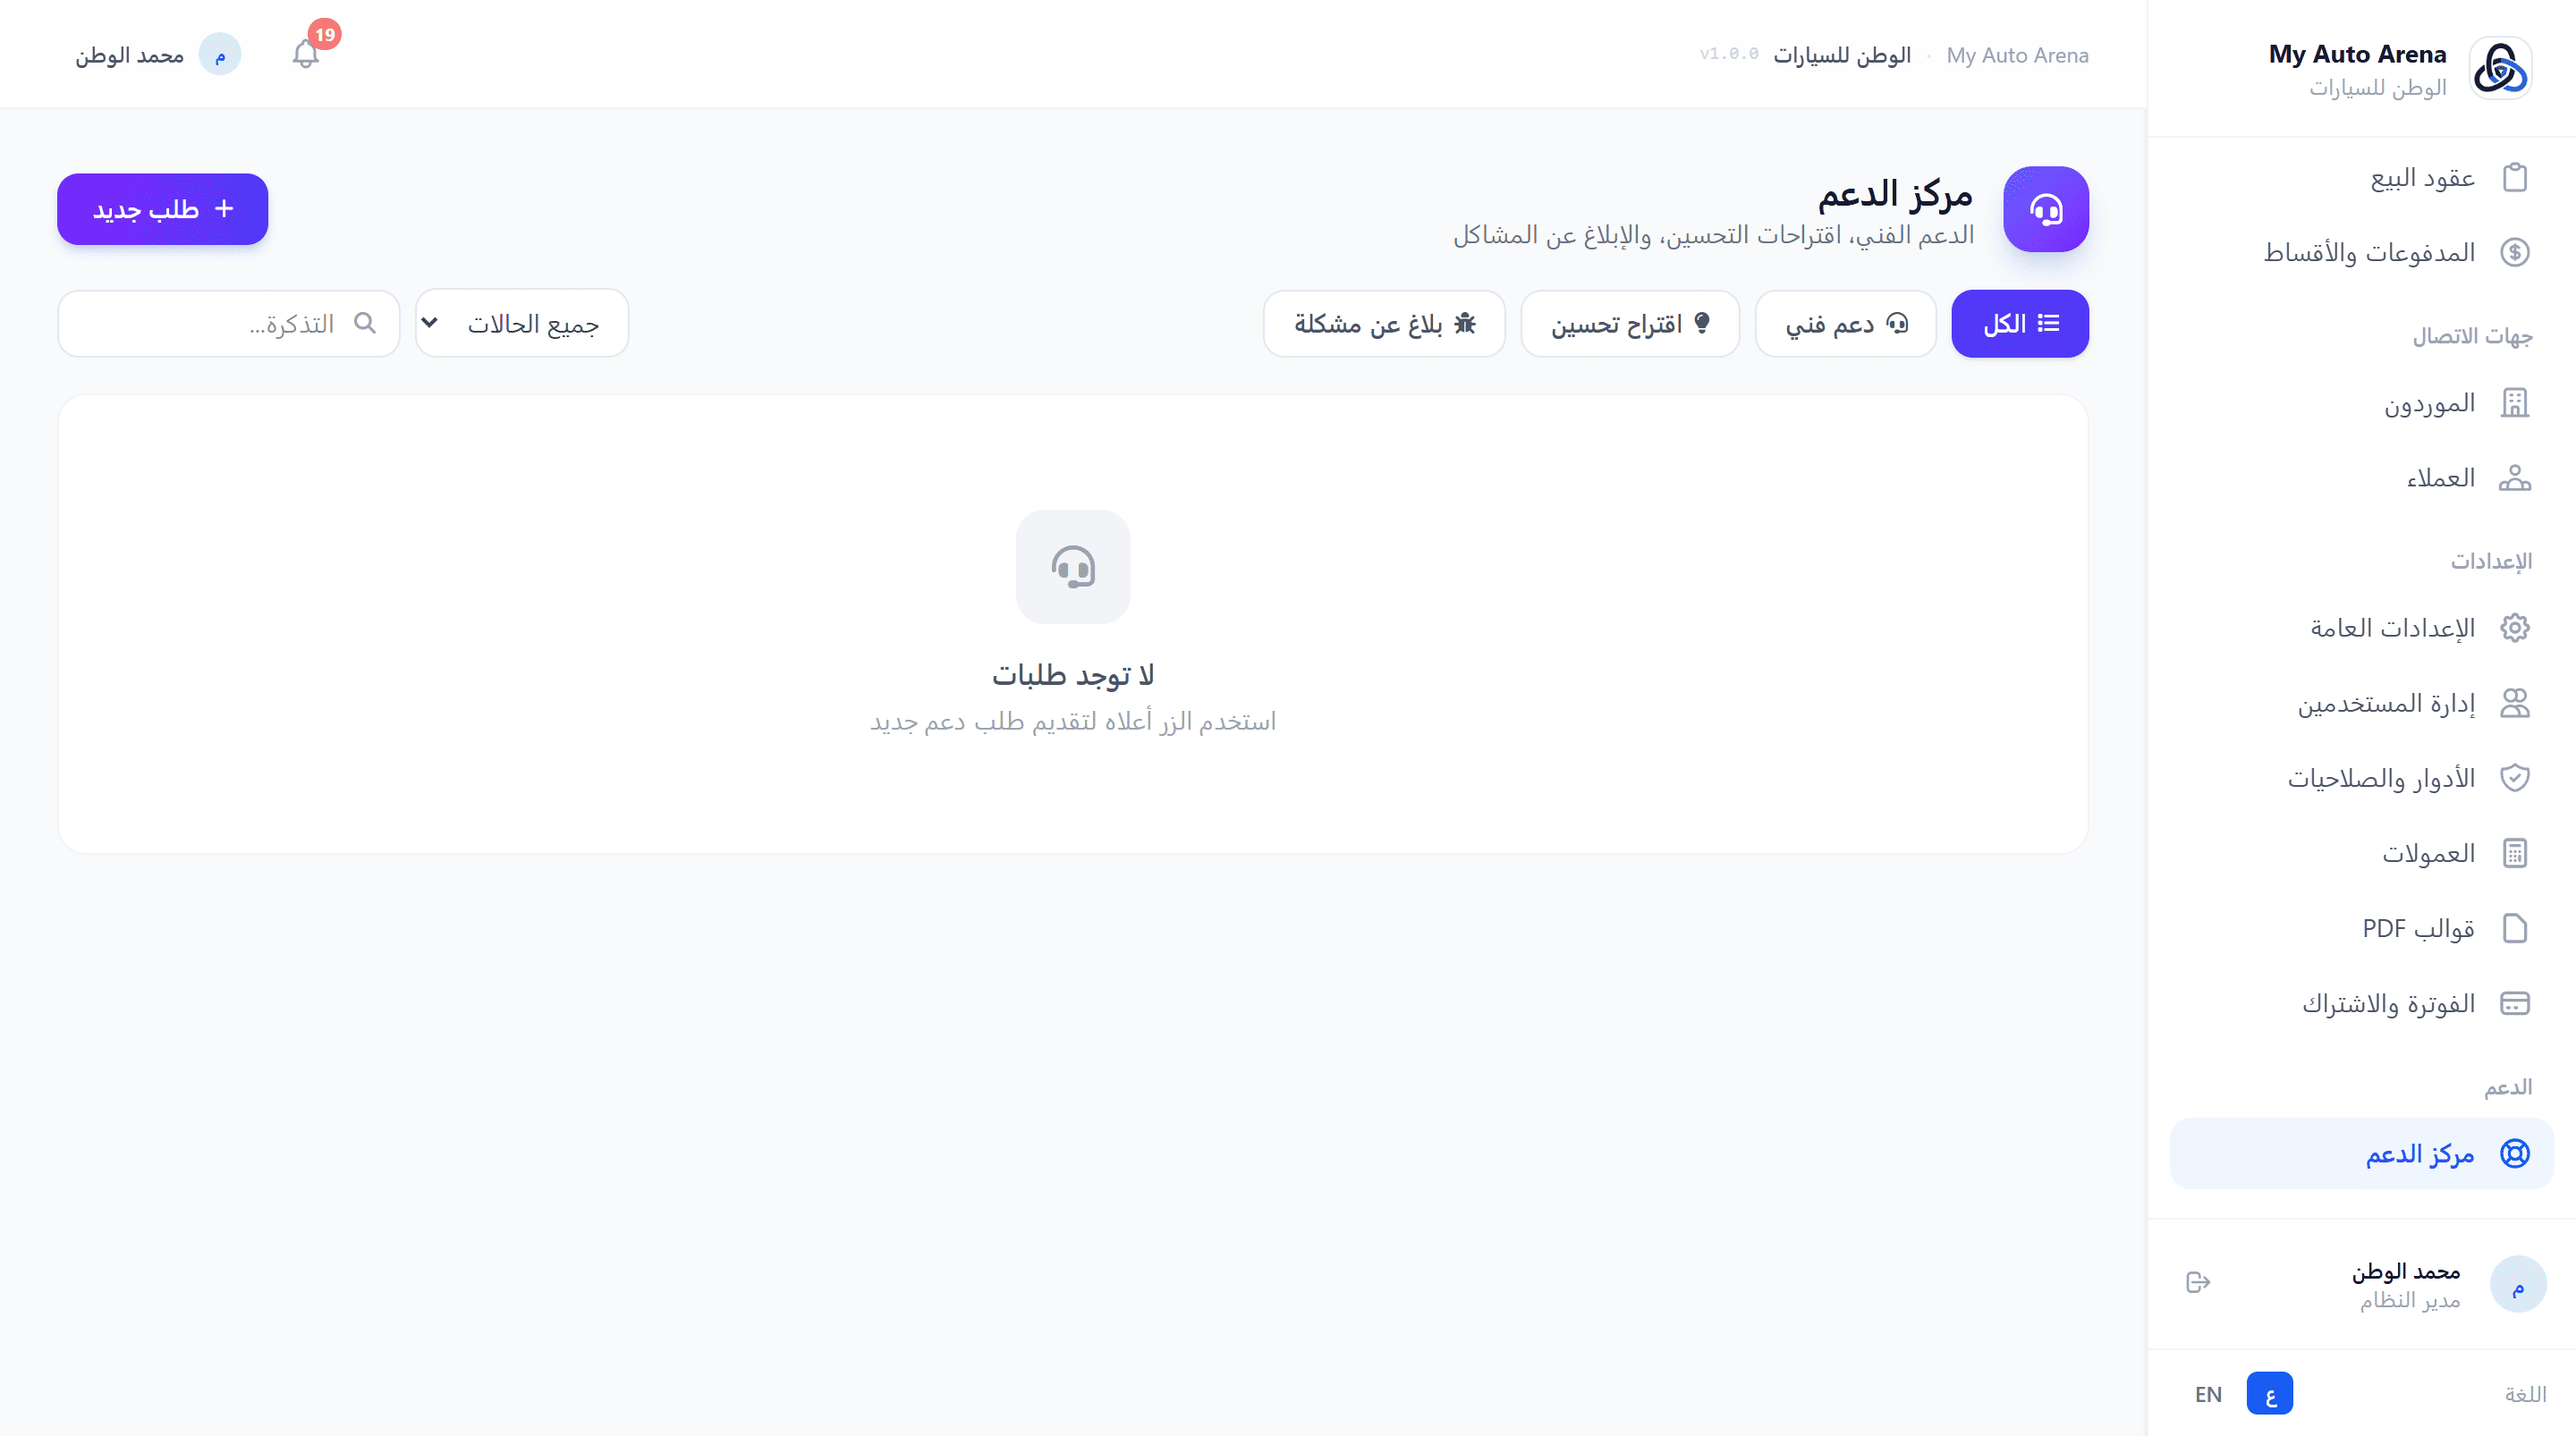
صفحة الدعم الفني مع نموذج إنشاء تذكرة جديدة Support page with new ticket creation form
خطوات العمل Workflow Steps
إنشاء تذكرة جديدة
Create New Ticket
من 'الدعم الفني'، انقر 'تذكرة جديدة'، أدخل الموضوع ونوع الطلب والأولوية والرسالة.
From 'Support', click 'New Ticket', enter the subject, request type, priority, and message.
إرفاق ملفات
Attach Files
اسحب وأفلت الملفات أو انقر للتحميل. يمكن أيضاً لصق صور من الحافظة.
Drag and drop files or click to upload. You can also paste images from clipboard.
متابعة الحالة
Track Status
من قائمة التذاكر، اطّلع على حالة كل تذكرة (جديدة/مفتوحة/مغلقة) وردود الفريق.
From the tickets list, check each ticket's status (new/open/closed) and team replies.
المزايا والخصائص Features & Capabilities
إنشاء تذكرة
Create Ticket
أرسل طلب دعم بعنوان، نوع (دعم/مقترح/بلاغ خطأ)، أولوية (منخفضة/متوسطة/عالية/عاجلة)، ورسالة تفصيلية.
Submit a support request with a title, type (support/suggestion/bug report), priority (low/medium/high/urgent), and detailed message.
مرفقات
Attachments
أرفق حتى 5 ملفات (صور، PDF) بحد أقصى 5MB لكل ملف لإيضاح المشكلة.
Attach up to 5 files (images, PDFs) max 5MB each to illustrate the issue.
تصفية التذاكر
Filter Tickets
صفّح تذاكرك حسب النوع أو الحالة. ابحث برقم التذكرة أو الموضوع.
Browse your tickets by type or status. Search by ticket number or subject.
متابعة الردود
Follow Replies
استعرض ردود فريق الدعم على تذاكرك من داخل النظام.
View support team replies to your tickets from within the system.
بلاغات الأخطاء تُعيَّن لها أولوية عالية تلقائياً لضمان الاستجابة السريعة. Bug reports are automatically assigned high priority to ensure fast response.
كلما كانت رسالتك أكثر تفصيلاً وتضمنت صوراً توضيحية، كلما تمكّن الفريق من حل مشكلتك بشكل أسرع. The more detailed your message and the more screenshots you include, the faster the team can resolve your issue.
تتضمن المنصة صفحات عامة لا تحتاج تسجيل دخول، مصممة للعملاء المحتملين. تشمل كتالوج سيارات المعرض، صفحة تفاصيل كل سيارة، ودليل المعارض العام للمنصة بالكامل. The platform includes public pages that don't require login, designed for potential customers. These include the dealership car catalog, individual car detail pages, and the platform-wide public showrooms directory.
صورة توضيحية Screenshot Placeholder
الكتالوج العام للمعرض مع صور السيارات وفلتر الماركات Showroom public catalog with car photos and brand filter
الكتالوج العام للمعرض مع صور السيارات وفلتر الماركات Showroom public catalog with car photos and brand filter
خطوات العمل Workflow Steps
مشاركة الكتالوج
Share Catalog
من لوحة التحكم، انقر على أيقونة 'الكتالوج العام' للحصول على رابطه. شاركه مع عملائك.
From the dashboard, click the 'Public Catalog' icon to get its link. Share it with your customers.
مشاركة سيارة محددة
Share a Specific Car
من المخزون، انقر 'رابط السيارة' لنسخ رابطها المباشر ومشاركته.
From inventory, click 'Car Link' to copy its direct URL and share it.
التحقق من وثيقة
Verify a Document
امسح QR Code الموجود في العقد المطبوع أو أدخل الرابط يدوياً للوصول لصفحة التحقق.
Scan the QR Code on the printed contract or enter the link manually to access the verification page.
المزايا والخصائص Features & Capabilities
كتالوج المعرض
Showroom Catalog
الرابط: /معرفك/catalog - يعرض جميع السيارات المتاحة مع صور، أسعار، وفلتر الماركات. قابل للمشاركة مع العملاء.
URL: /your-slug/catalog - Displays all available cars with photos, prices, and brand filter. Shareable with customers.
صفحة تفاصيل السيارة
Car Detail Page
الرابط: /معرفك/car/ID - صفحة مفصّلة لكل سيارة مع معرض صور كامل، المواصفات، السعر، وزر التواصل.
URL: /your-slug/car/ID - Detailed page for each car with full photo gallery, specs, price, and contact button.
دليل المعارض العام
Public Showrooms Directory
الرابط: /showrooms - يعرض جميع المعارض الموثّقة في المنصة مع أعداد السيارات وروابط الكتالوجات.
URL: /showrooms - Lists all verified showrooms on the platform with car counts and catalog links.
التحقق من الوثائق
Document Verification
الرابط: /معرفك/verify-document/TOKEN - صفحة عامة للتحقق من أصالة عقود البيع عبر رمز QR ورمز دخول سري.
URL: /your-slug/verify-document/TOKEN - Public page to verify the authenticity of sale contracts via QR Code and secret passcode.
الكتالوج العام يعرض فقط السيارات بالحالة 'متاحة'. السيارات المباعة أو المحجوزة لا تظهر للعملاء. The public catalog only shows 'available' cars. Sold or reserved cars are not visible to customers.
كلما كانت بيانات المعرض مكتملة (شعار، صور، أوصاف)، كلما بدا الكتالوج أكثر احترافية وجذباً للعملاء. The more complete your showroom profile (logo, photos, descriptions), the more professional and appealing the catalog looks to customers.
شارة 'موثّق' تظهر في دليل المعارض وعلى صفحة الكتالوج لمعارض استكملت عملية التوثيق الرسمي. The 'Verified' badge appears in the showrooms directory and on catalog pages for showrooms that completed official verification.
يدعم النظام إنشاء فروع متعددة لنفس المعرض، حيث يُعامَل كل فرع كوحدة مستقلة بالكامل: موظفوه، سياراته، عقوده، مدفوعاته، شعاره، وكتالوجه العام. الاشتراك والفوترة يبقيان على مستوى المعرض الرئيسي فقط. The system supports multiple branches per showroom, where each branch operates as a fully independent unit: its own staff, cars, contracts, payments, logo, and public catalog. Subscription and billing remain at the main showroom level only.
صورة توضيحية Screenshot Placeholder
صفحة إدارة الفروع - إعدادات الشعار والموظفين والكتالوج المستقل Branch management page - logo settings, staff assignment, and independent catalog
صفحة إدارة الفروع - إعدادات الشعار والموظفين والكتالوج المستقل Branch management page - logo settings, staff assignment, and independent catalog
خطوات العمل Workflow Steps
إنشاء الفرع
Create a Branch
من الإعدادات ← الفروع، انقر 'فرع جديد' وأدخل اسم الفرع، ارفع شعاره وأضف بريده الإلكتروني.
Go to Settings → Branches, click 'New Branch', enter the branch name, upload its logo, and add an email.
تعيين موظفين للفرع
Assign Staff to Branch
من إدارة المستخدمين، افتح بيانات الموظف واختر الفرع المرتبط به من القائمة المنسدلة (يتطلب خطة Enterprise).
From User Management, open a staff member's profile and select their branch from the dropdown (requires Enterprise plan).
مشاركة كتالوج الفرع
Share Branch Catalog
انسخ رابط الكتالوج العام الخاص بالفرع من صفحة الفروع وشاركه مع عملاء الفرع.
Copy the branch's public catalog link from the Branches page and share it with that branch's customers.
التنقل بين الفروع
Switch Between Branches
مديرو المعرض يستطيعون التنقل بين سياقات الفروع من خلال بوابة الفروع لرؤية بيانات كل فرع بشكل منفصل.
Showroom admins can switch between branch contexts from the branch portal to view each branch's data separately.
المزايا والخصائص Features & Capabilities
كتالوج عام مستقل لكل فرع
Independent Public Catalog per Branch
الرابط: /معرفك/catalog/اسم-الفرع - صفحة عامة مستقلة تعرض سيارات الفرع فقط مع شعاره وبيانات التواصل.
URL: /your-slug/catalog/branch-name - A standalone public page showing only that branch's cars with its logo and contact details.
موظفون مرتبطون بالفرع
Branch-Assigned Staff
يُعيَّن كل موظف لفرع محدد (خطة Enterprise). الموظف يرى ويتعامل فقط مع بيانات فرعه، بينما يرى مديرو المعرض كل الفروع.
Each staff member is assigned to a specific branch (Enterprise plan). Staff only see and work with their branch's data, while showroom admins see all branches.
شعار وبريد الفرع
Branch Logo & Email
لكل فرع شعار مستقل وبريد إلكتروني خاص. يظهران في الكتالوج العام للفرع وعلى مستندات PDF الصادرة منه.
Each branch has its own logo and email address, appearing on the branch's public catalog and all PDF documents issued from it.
مستندات PDF مُبوَّبة بالفرع
Branch-Branded PDF Documents
جميع عقود البيع والشراء والمستندات المطبوعة تُظهر اسم الفرع وشعاره بشكل بارز، مع اسم المعرض الرئيسي كمرجع.
All printed sale/purchase contracts and documents prominently display the branch name and logo, with the main showroom name as a reference.
شريط انتماء الفرع
Branch Affiliation Banner
يظهر شريط في أعلى كل صفحة داخلية عند العمل في سياق فرع معين يُشير إلى اسم الفرع وارتباطه بالمعرض الرئيسي.
A banner appears at the top of every internal page when working within a branch context, showing the branch name and its link to the main showroom.
لوحة تحكم معزولة
Isolated Dashboard
الإحصائيات ولوحة التحكم تعرض فقط بيانات الفرع الحالي للموظف المرتبط به.
Stats and the dashboard show only the current branch's data for staff assigned to that branch.
الفرع الرئيسي (بلا فرع محدد) يشمل المدير العام وجميع البيانات غير المرتبطة بفرع معين. The main branch (no specific branch) covers the general manager and all data not linked to a specific branch.
تعيين موظف لفرع محدد يعني أنه لن يرى بيانات الفروع الأخرى. تأكد من التعيين الصحيح قبل الحفظ. Assigning a staff member to a specific branch means they won't see other branches' data. Verify the assignment before saving.
كل عملية بيع وشراء ومدفوعات تُسجَّل تلقائياً تحت الفرع الخاص بالموظف المُنجِز للعملية. Every sale, purchase, and payment is automatically recorded under the branch of the staff member who completed the transaction.
يتيح نظام قوالب PDF تخصيص مظهر جميع المستندات المولَّدة في النظام (العقود، الإيصالات، الفواتير) بشعار معرضك وألوانه وخط التذييل المخصص. الخطة تحدد عدد القوالب وصلاحية التعيين لكل نوع مستند. The PDF template engine lets you brand all generated documents (contracts, receipts, invoices) with your logo, colors, and custom footer text. Your plan tier controls how many templates you can create and whether per-type assignment is available.
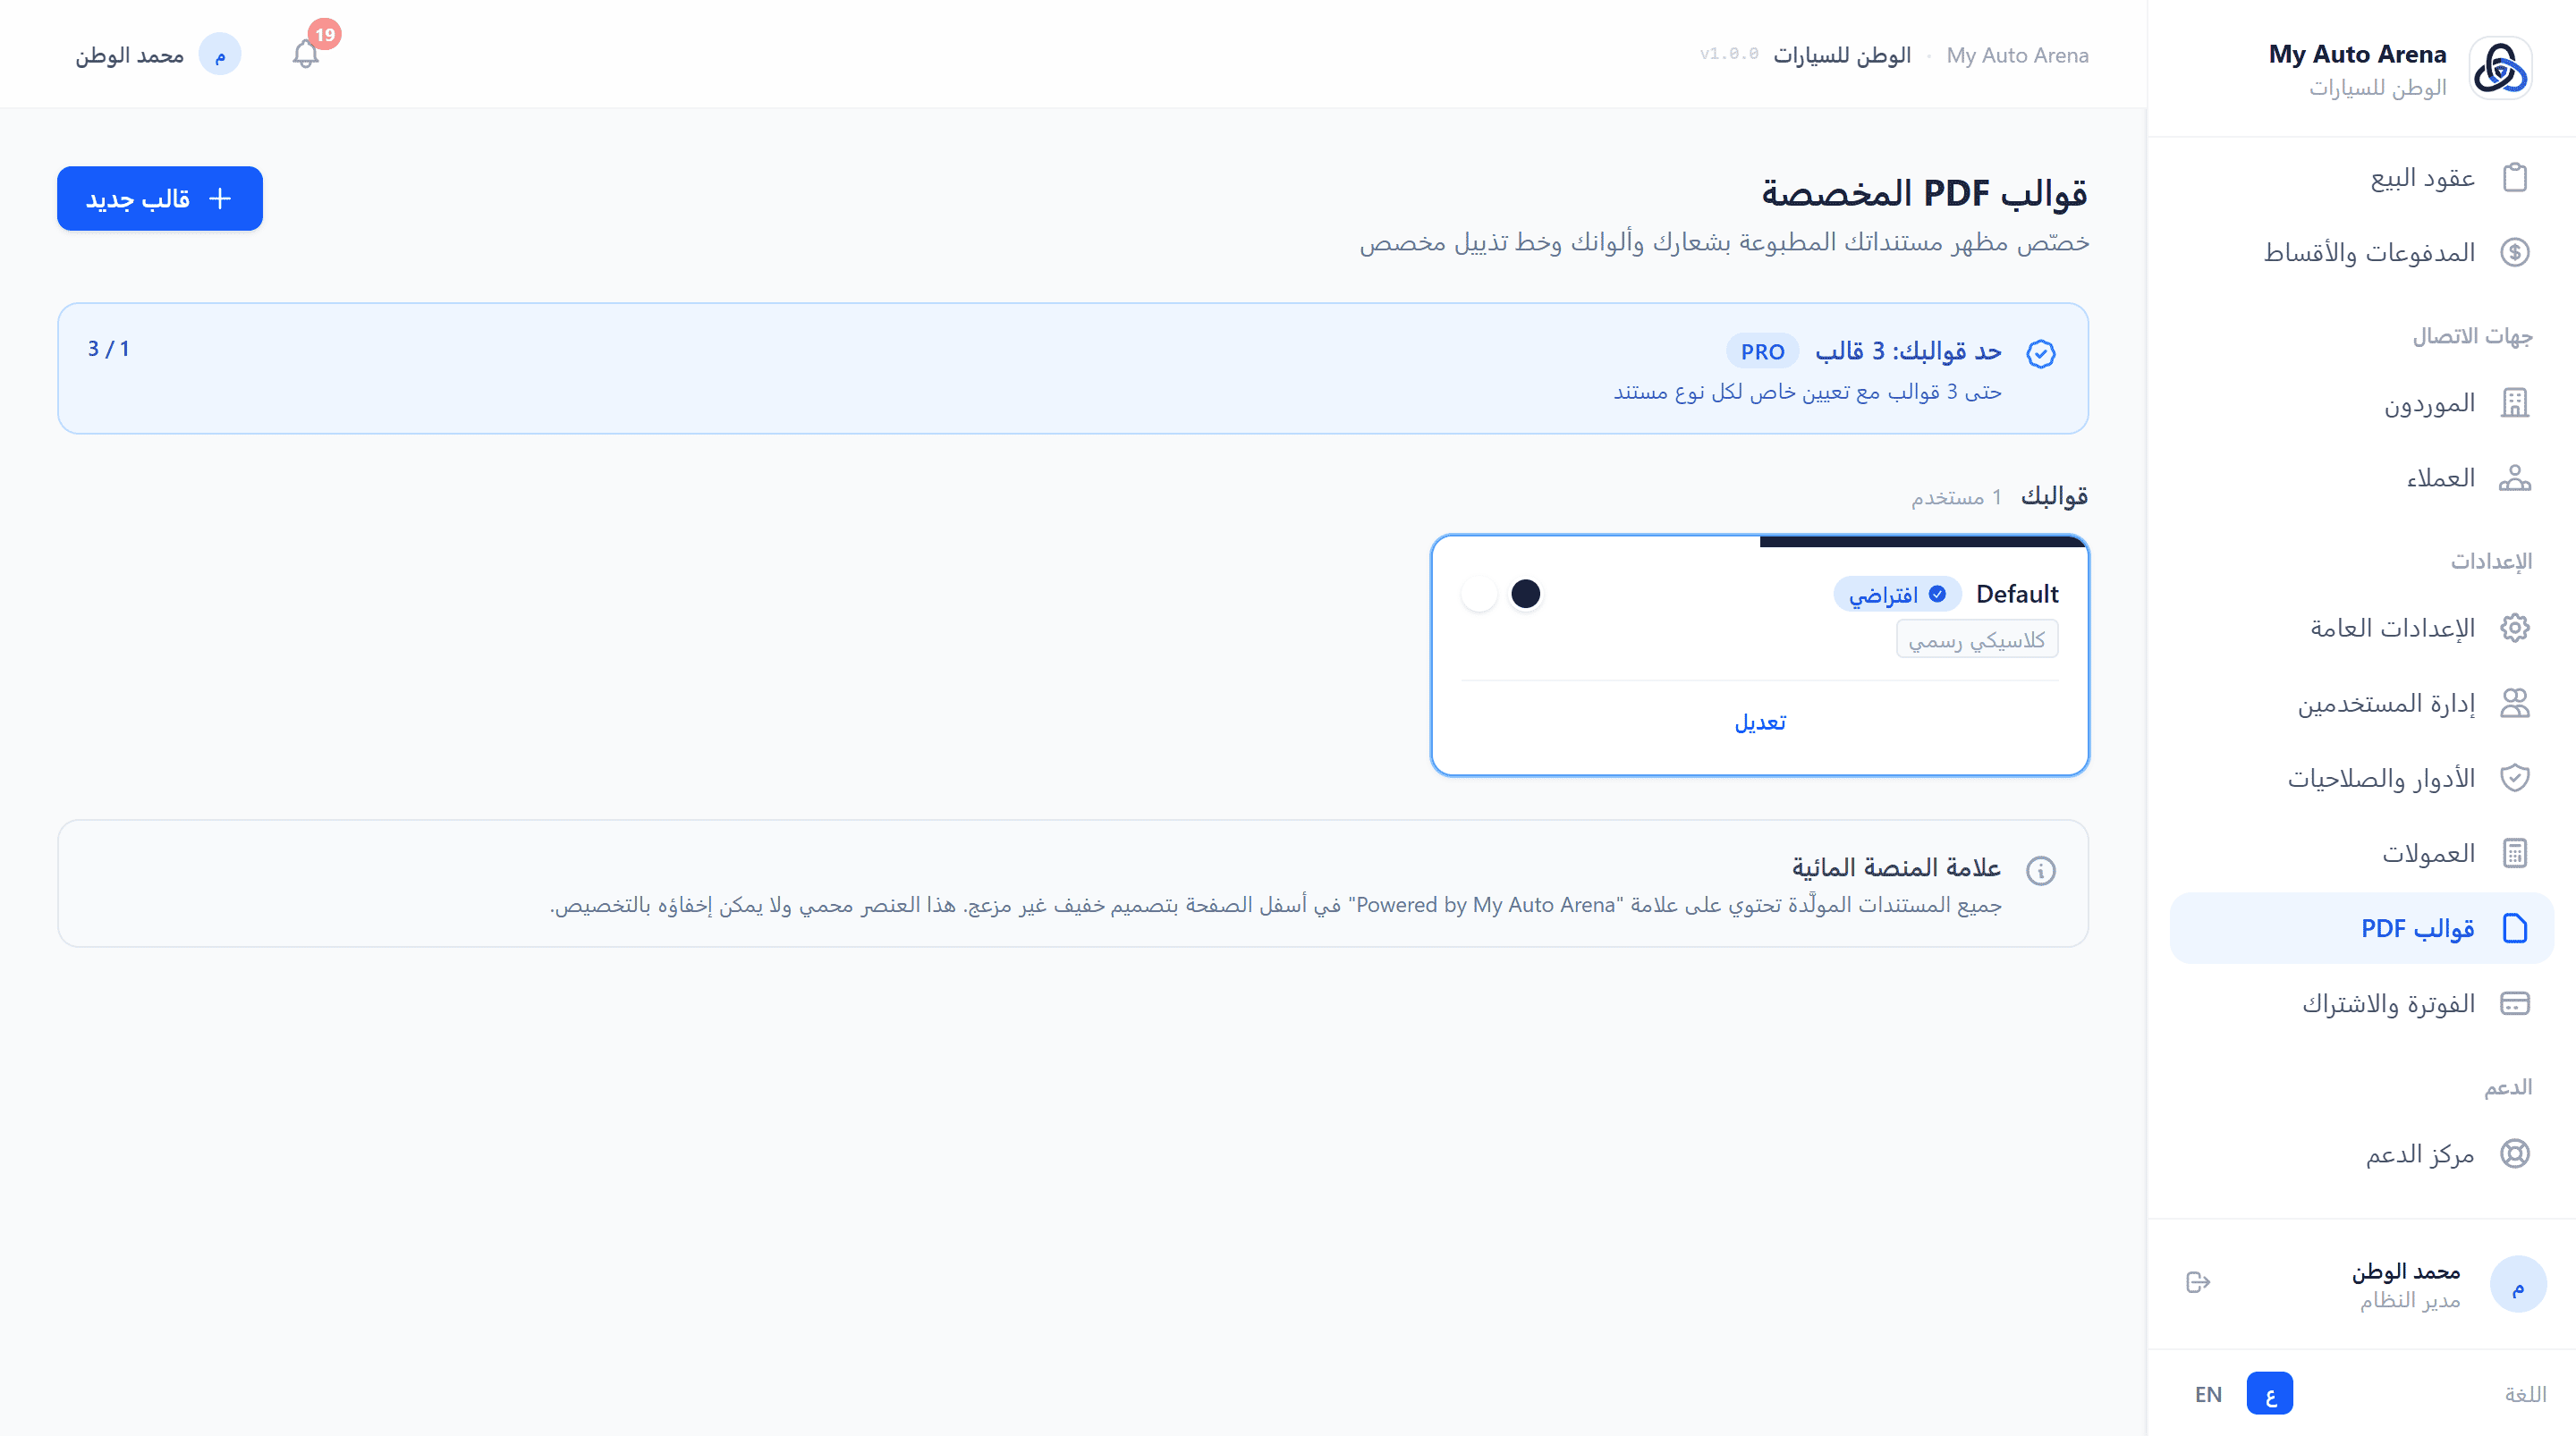
صفحة قوالب PDF - بطاقات القوالب ومنتقي الألوان ولوحة التعيين PDF Templates page - template cards, color picker, and assignment panel
خطوات العمل Workflow Steps
افتح صفحة قوالب PDF
Open PDF Templates
من القائمة الجانبية: الإعدادات ← قوالب PDF.
From the sidebar: Settings → PDF Templates.
أنشئ قالباً جديداً
Create a New Template
انقر 'قالب جديد'، ادخل الاسم، اختر الألوان باستخدام منتقي الألوان، ارفع الشعار (اختياري)، وأضف نص التذييل.
Click 'New Template', enter a name, pick colors with the color picker, optionally upload a logo, and add footer text.
معاينة مباشرة
Live Color Preview
يظهر شريط معاينة الألوان أسفل منتقيات الألوان مباشرةً ليُظهر كيف سيبدو الهيدر.
A preview bar below the color pickers shows the header layout in real time so you can verify the look before saving.
تعيين القالب الافتراضي
Set as Default
انقر 'تعيين افتراضياً' على أي قالب ليصبح القالب المُطبَّق على جميع المستندات ما لم يكن هناك تعيين خاص.
Click 'Set as Default' on any template to apply it across all documents unless a specific type assignment overrides it.
تعيين لكل نوع مستند (Pro+)
Assign Per Document Type (Pro+)
افتح لوحة 'تعيين القوالب لأنواع المستندات' واختر قالباً مختلفاً لكل نوع. التغيير فوري على المستندات اللاحقة.
Expand the 'Assign Templates to Document Types' panel and choose a different template per type. Changes take effect immediately on new documents.
المزايا والخصائص Features & Capabilities
قوالب متعددة (Pro / Enterprise)
Multiple Templates (Pro / Enterprise)
يمكن لمستخدمي Pro إنشاء حتى 3 قوالب، وEnterprise حتى 10 قوالب. كل قالب له اسم واستقلالية كاملة.
Pro users can create up to 3 templates; Enterprise up to 10. Each template is fully independent with its own name and styling.
تعيين لكل نوع مستند (Pro+)
Per-Document-Type Assignment (Pro+)
عيِّن قالباً مختلفاً لكل نوع: عقد الشراء، عقد البيع، سند الصرف، إيصال الدفعة، كشف الحساب، المصروف التشغيلي، الفاتورة.
Assign a different template to each type: Purchase Contract, Sale Contract, Expense Voucher, Payment Receipt, Account Statement, General Expense, Invoice.
اللون الأساسي والثانوي
Primary & Secondary Colors
اللون الأساسي يُستخدم في هيدر المستند اليميني، عناوين الأقسام، والحدود البارزة. اللون الثانوي لخلفية هيدر اليسار.
Primary color drives the right-side header, section titles, and accent borders. Secondary color styles the left header background.
شعار في الهيدر
Logo in Header
ارفع شعار المعرض ليظهر داخل هيدر كل مستند. يمكن تفعيله أو إلغاؤه لكل قالب.
Upload your showroom logo to embed it inside every document header. Toggleable per template.
خيار الخط (Enterprise)
Font Selection (Enterprise)
اختر عائلة الخط للأرقام والنصوص اللاتينية من بين خطوط DejaVu المتوافقة مع النص العربي.
Choose a font family for numbers and Latin text from DejaVu variants that are compatible with Arabic rendering.
نص تذييل مخصص
Custom Footer Text
أضف سطراً مخصصاً يظهر في أسفل كل صفحة مثل: الرقم الضريبي، العبارة القانونية، معلومات الاتصال.
Add a custom line at the bottom of every page - e.g. tax number, legal disclaimer, or contact info.
معلومات البنك في التذييل
Bank Info in Footer
أضف بيانات الحساب البنكي التي تظهر في تذييل كل مستند: اسم البنك، اسم صاحب الحساب، رقم الحساب، رقم IBAN، رمز SWIFT. تُعرض بالترتيب تلقائياً وبثنائية لغوية (عربي/إنجليزي).
Add your bank account details to appear in the footer of every document: Bank Name, Account Holder Name, Account Number, IBAN, and SWIFT code. Displayed in the correct order automatically, with bilingual labels (Arabic / English).
علامة المنصة المائية
Platform Watermark
جميع المستندات تحتوي تلقائياً على علامة 'Powered by My Auto Arena' في أسفل الصفحة بشكل خفيف غير مزعج. هذا العنصر محمي ومحجوز هيكلياً ولا يتأثر بأي تخصيص.
All documents automatically carry a subtle 'Powered by My Auto Arena' signature in the footer. This element is structurally reserved and cannot be overridden by any template customization.
حماية QR Code
QR Code Protection
رمز QR للتحقق من المستند محجوز في مكان ثابت في أسفل الصفحة ولا يمكن لأي قالب إخفاؤه أو تغيير موقعه.
The document verification QR code block is structurally fixed in the footer - no template can hide it or reposition it.
خطة Starter: قالب واحد فقط مع خيارات أساسية (شعار + ألوان + تذييل). لمزيد من القوالب والتعيين المتقدم، قم بالترقية. Starter plan: one template with basic options (logo, colors, footer). Upgrade to Pro or Enterprise for multiple templates and per-type assignment.
تغيير قالب لا يؤثر على المستندات المطبوعة مسبقاً - فقط المستندات المولَّدة بعد الحفظ ستستخدم القالب الجديد. Changing a template does not affect previously printed documents - only documents generated after saving will use the new template.
لا يمكن حذف القالب الافتراضي مباشرةً. عيِّن قالباً آخر افتراضياً أولاً ثم احذف القديم. You cannot delete the default template directly. Set another template as default first, then delete the old one.
نظام الإشعارات الداخلي يُنبّهك في الوقت الفعلي بكل حدث مهم في معرضك - من إغلاق صفقة إلى أقساط متأخرة - دون الحاجة لتحديث الصفحة. يُصدر صوت تنبيه عند وصول أي إشعار جديد. The internal notification system alerts you in real time to every important event in your showroom - from closing a deal to overdue installments - without refreshing the page. A sound chime plays whenever a new notification arrives.
صورة توضيحية Screenshot Placeholder
لوحة الإشعارات - قائمة التنبيهات مع أيقونات الأنواع المختلفة وعداد الجرس Notification panel - alert list with type icons and bell counter badge
لوحة الإشعارات - قائمة التنبيهات مع أيقونات الأنواع المختلفة وعداد الجرس Notification panel - alert list with type icons and bell counter badge
خطوات العمل Workflow Steps
فتح لوحة الإشعارات
Open Notification Panel
انقر على أيقونة الجرس 🔔 في الشريط العلوي لفتح قائمة الإشعارات. الرقم الأحمر يعرض عدد الإشعارات غير المقروءة.
Click the 🔔 bell icon in the top bar to open the notification list. The red badge shows the unread count.
تحديد الإشعار كمقروء
Mark as Read
مرّر مؤشر الفأرة على إشعار غير مقروء (خلفية زرقاء) وانقر ✓ لتحديده كمقروء. ينتقل إلى حالة 'مقروء'.
Hover over an unread notification (blue background) and click ✓ to mark it as read.
حذف الإشعار
Delete Notification
انقر 🗑 على إشعار مقروء لحذفه نهائياً من القائمة.
Click 🗑 on a read notification to permanently remove it from the list.
تحديد الكل كمقروء
Mark All as Read
انقر 'تحديد الكل كمقروء' في رأس القائمة لتصفير عداد الإشعارات دفعةً واحدة.
Click 'Mark all as read' in the panel header to clear the unread counter at once.
المزايا والخصائص Features & Capabilities
إغلاق عقد بيع
Sale Contract Closed
تنبيه فوري عند تسوية عقد بيع بالكامل - مع تمييز الصفقات الكبيرة (50,000+) بتنبيه 🏆 منفصل.
Instant alert when a sale contract is fully settled - with a separate 🏆 alert for large deals (50,000+).
استلام دفعة
Payment Received
إشعار عند تسجيل أي دفعة جديدة من عميل مع تفاصيل العقد والمبلغ.
Notification when a new customer payment is recorded, with contract and amount details.
سيارة جديدة في المخزون
New Vehicle in Inventory
تنبيه عند إضافة مركبة جديدة إلى المخزون مع تفاصيل الماركة والموديل والسنة.
Alert when a new vehicle is added to inventory, with make, model, and year details.
مصروف كبير
Large Expense
تنبيه عند تسجيل سند صرف بمبلغ يتجاوز الحد المحدد (2,000 بالعملة الافتراضية).
Alert when an expense voucher exceeds the defined threshold (2,000 in the default currency).
عقد بخسارة
Loss Contract
تحذير فوري عند إغلاق عقد بيع تبيّن أن سعر البيع أقل من التكلفة الإجمالية للمركبة.
Immediate warning when a sale contract closes at a loss (sale price below total vehicle cost).
أقساط متأخرة
Overdue Installments
تنبيه يومي (الساعة 9 صباحاً) يُلخّص جميع الأقساط التي تجاوزت تاريخ استحقاقها.
Daily alert (9 AM) summarizing all installments that have passed their due date.
أحداث الاشتراك
Subscription Events
تنبيهات بتغيير الخطة، تفعيل الاشتراك، تعليق الحساب، انتهاء الفترة التجريبية، واقتراب الحصة القصوى.
Alerts for plan changes, subscription activation, account suspension, trial expiry, and approaching quota limits.
رسائل من الإدارة
Admin Messages
تنبيهات مباشرة تصلك من فريق إدارة المنصة مع إشعار صوتي فوري عند وصولها.
Direct notifications from the platform management team, with an instant sound alert upon arrival.
يُصدر النظام صوت تنبيه (تنغيمة قصيرة) عند وصول إشعار جديد أثناء تصفّحك للنظام - دون الحاجة لمراقبة الجرس باستمرار. The system plays a short two-tone chime when a new notification arrives while you're browsing - no need to constantly watch the bell.
تتجدد الإشعارات تلقائياً كل 30 ثانية في الخلفية - أي حدث جديد يظهر دون تحديث يدوي للصفحة. Notifications auto-refresh every 30 seconds in the background - any new event appears without manually reloading the page.
النقرة الأولى على ✓ تحوّل الإشعار إلى 'مقروء'، والنقرة الثانية على 🗑 تحذفه نهائياً - نظام ثنائي الخطوة لمنع الحذف العرضي. First click on ✓ marks the notification as read; second click on 🗑 deletes it permanently - a two-step system to prevent accidental deletion.